Tag Archives: oxygen

Apr 202114Wed

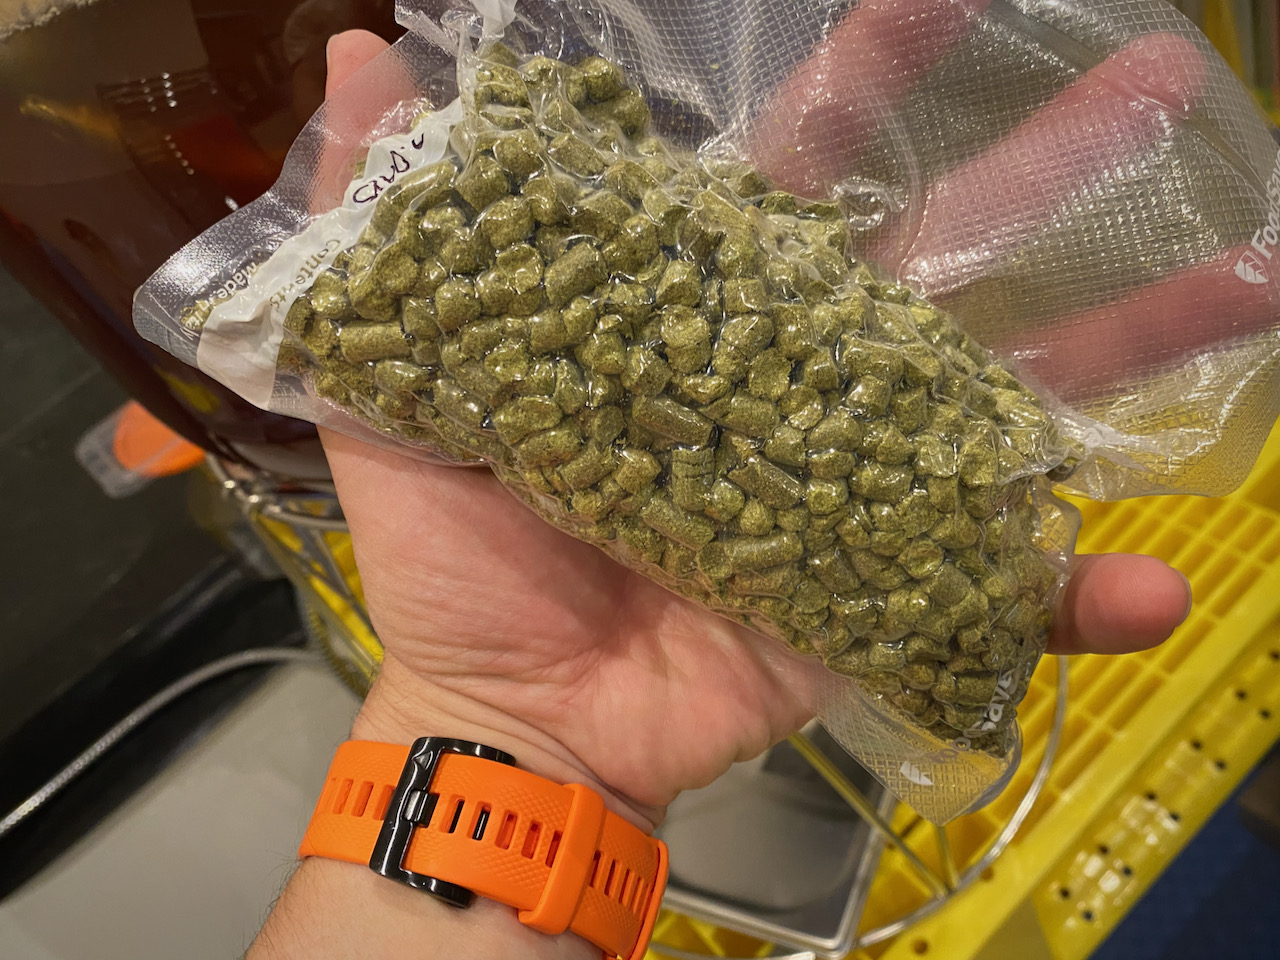
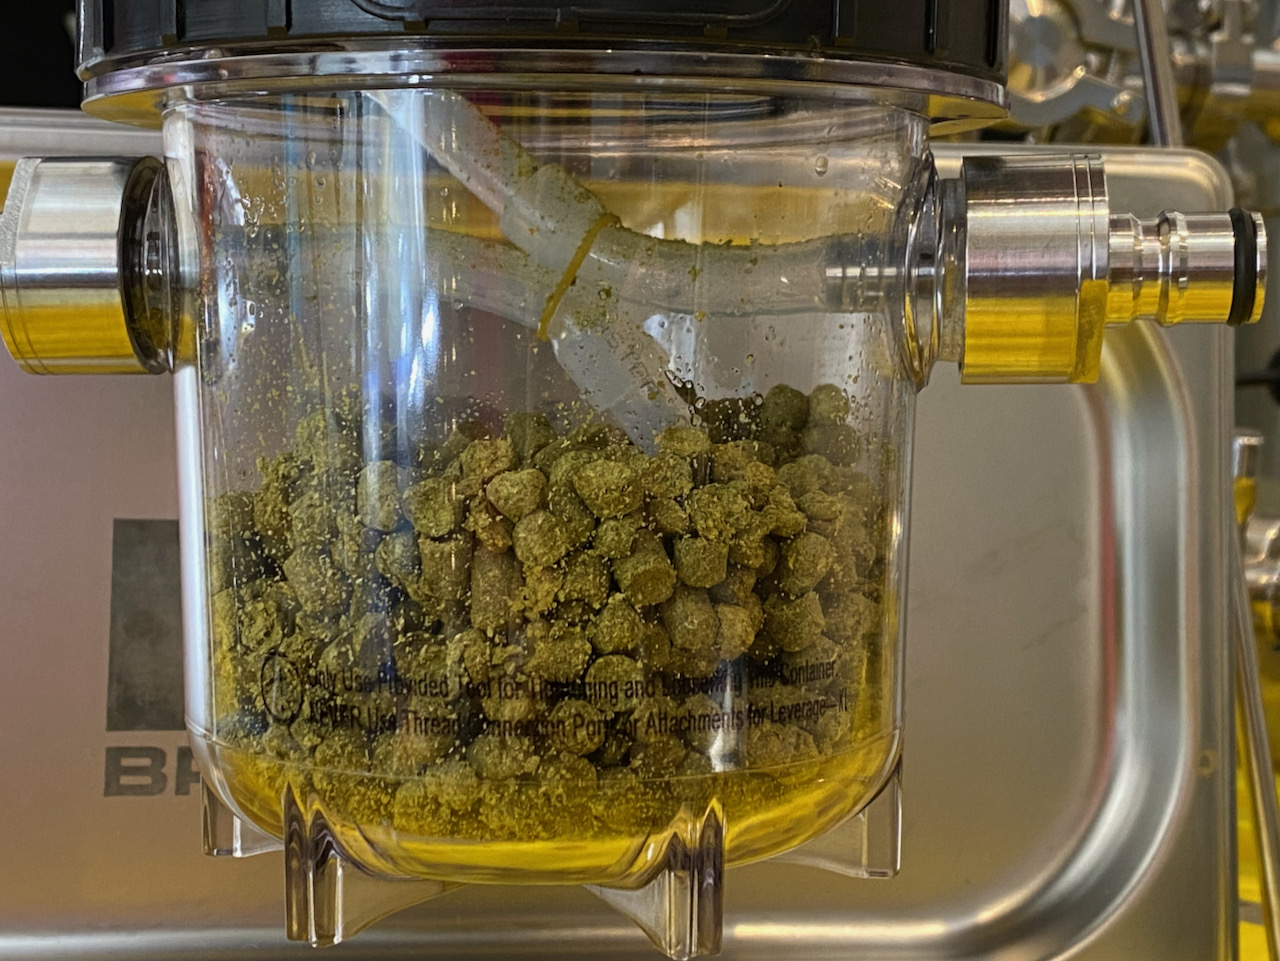
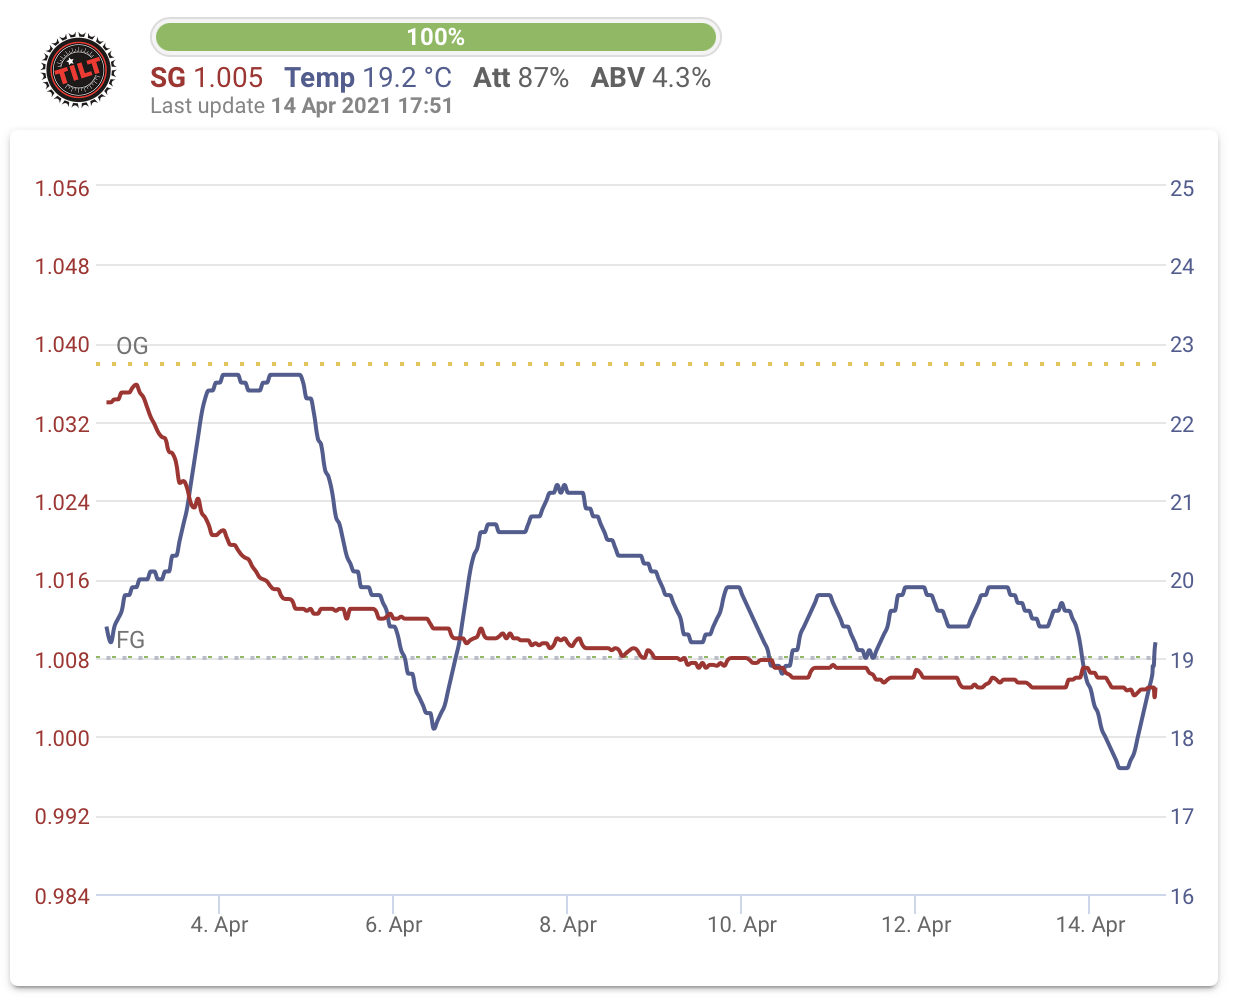
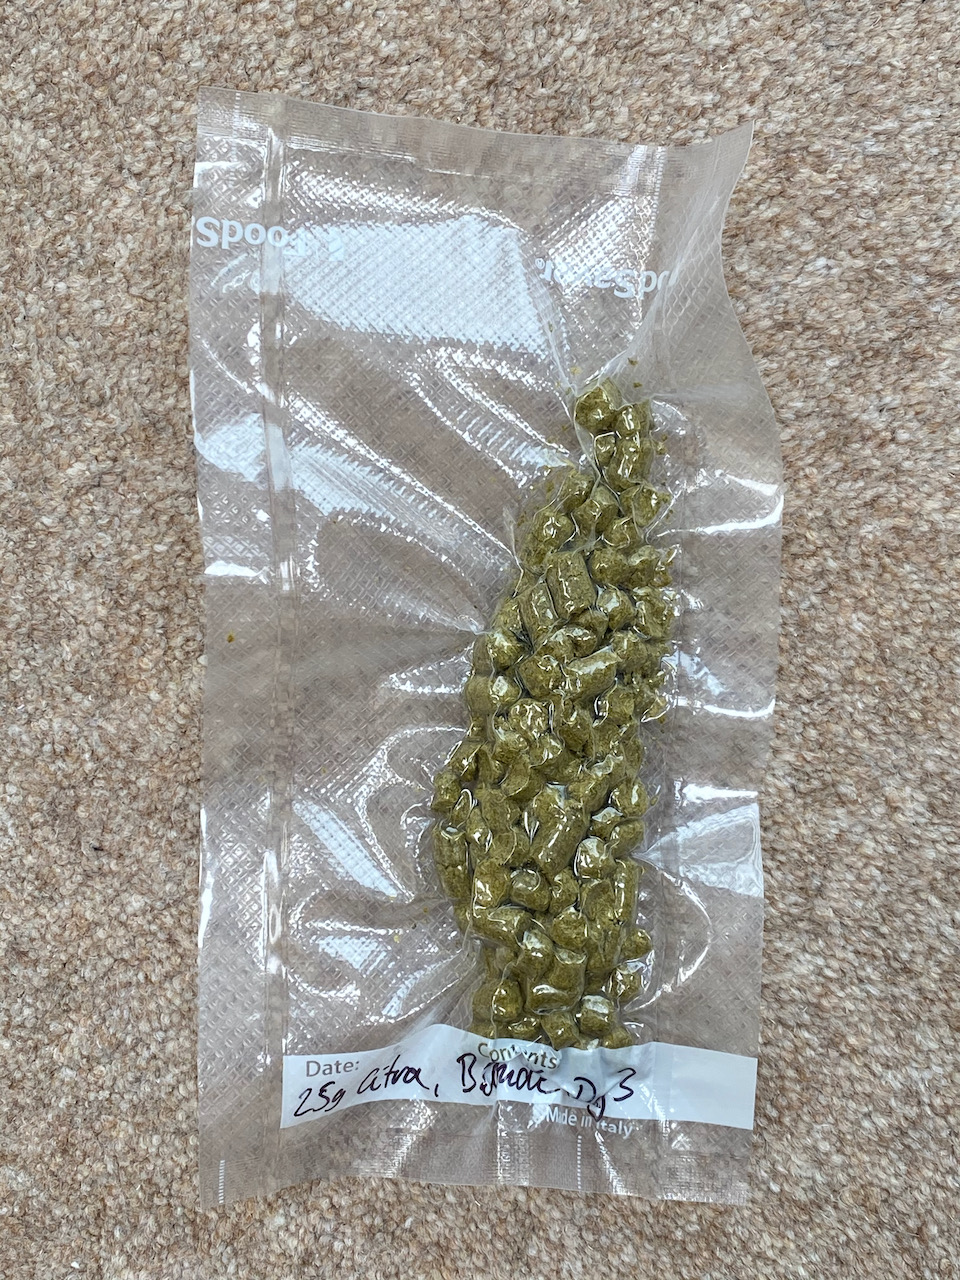
There’s some very slight signs of fermentation going on and still a bit of Krausen remaining, but I’m going to stick to schedule and remove the trub, then chuck in some hops. Added today were:

  • 93g Falconer’s Flight 11%
  • 55g Amarillo 9.2%
  • 55g Mosaic 12.25%

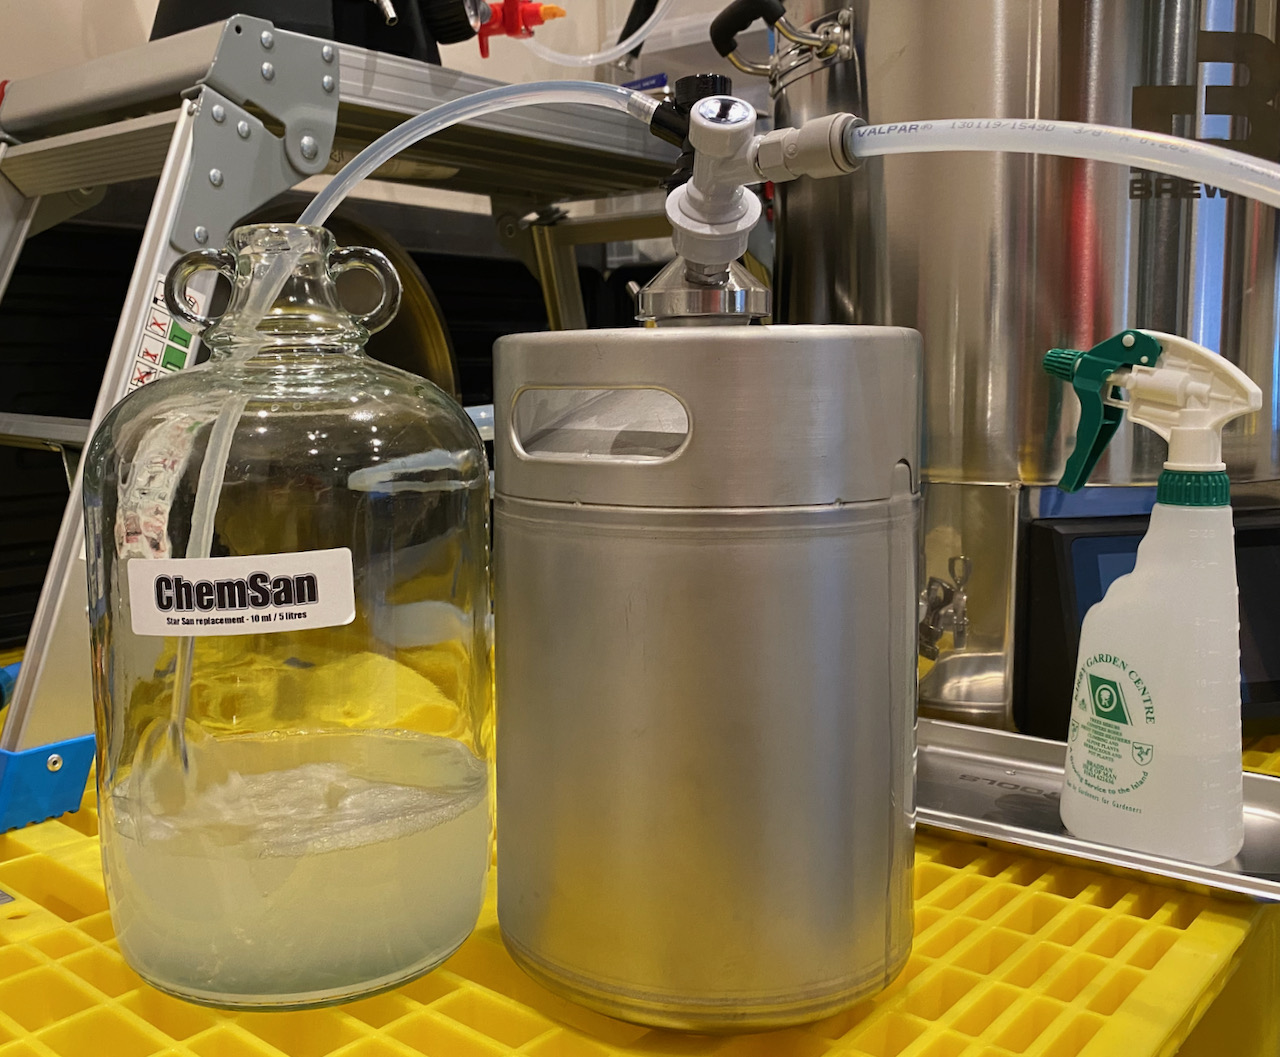
The procedure was broadly the same as when I dry-hopped Golden Wave just over two weeks ago; reduce FV pressure to 5 PSI, shut butterfly valve, de-pressurise collection jar completely via the fitted carbonation cap and drain as much liquid as possible before unscrewing.

I did a couple of things differently this time around, starting with the gradual reduction of FV pressure from 10 to 5 PSI over the space of 24 hours. I wanted to see if this would help to clear up some of the remaining Krausen (it did, but that may have just as likely been the additional 24 hours too) and because it felt like a respectful thing to do to my expensive WLP001 yeast. Speaking of which, another thing I did differently this time was to save some of that yeast in a sanitised plastic beaker for a reuse experiment over the coming days.

Introducing … [thing]

I’ll name you once you do your job, Fermzilla-collection-jar-thing!

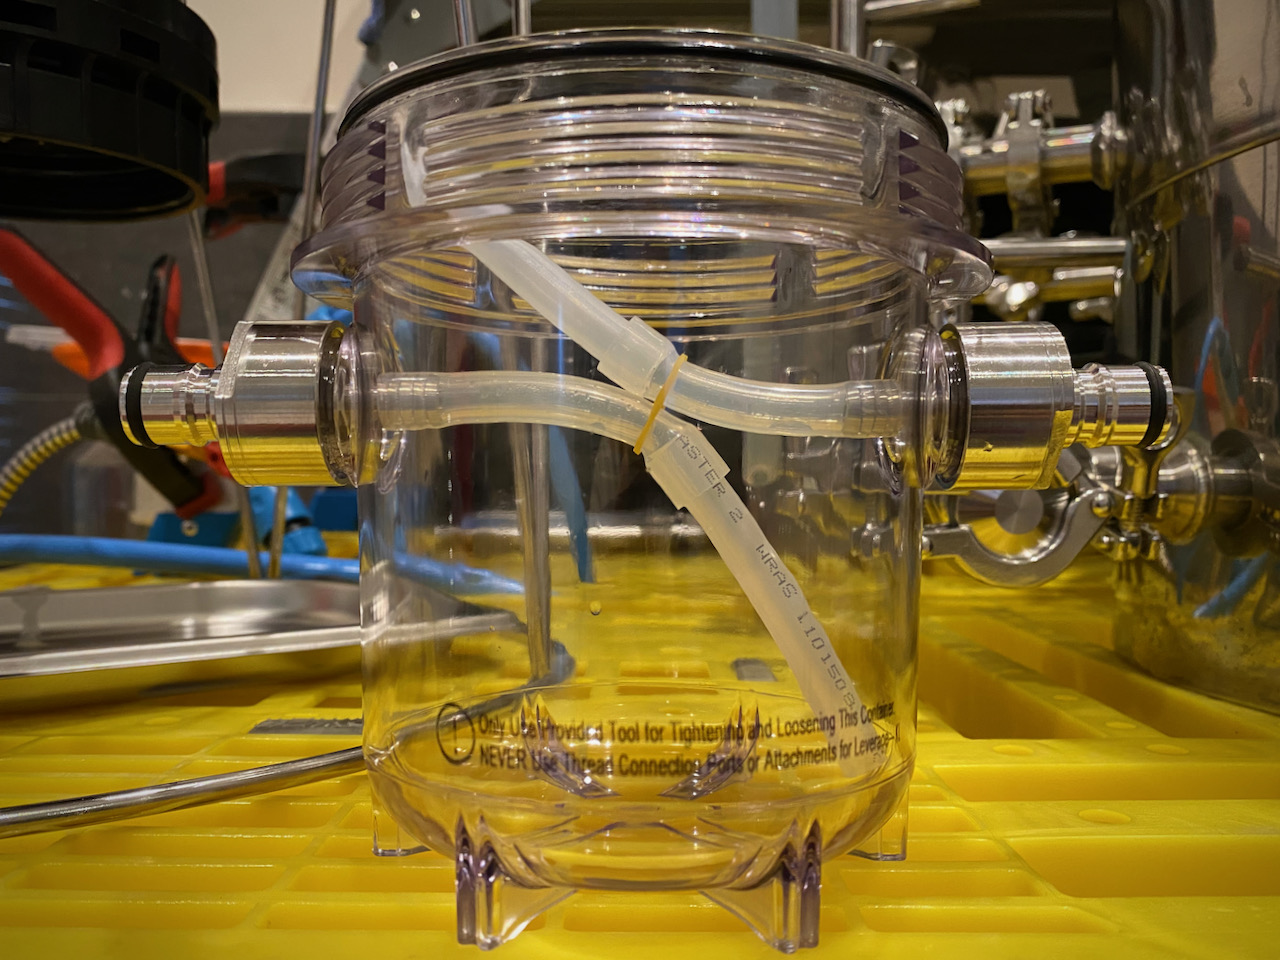
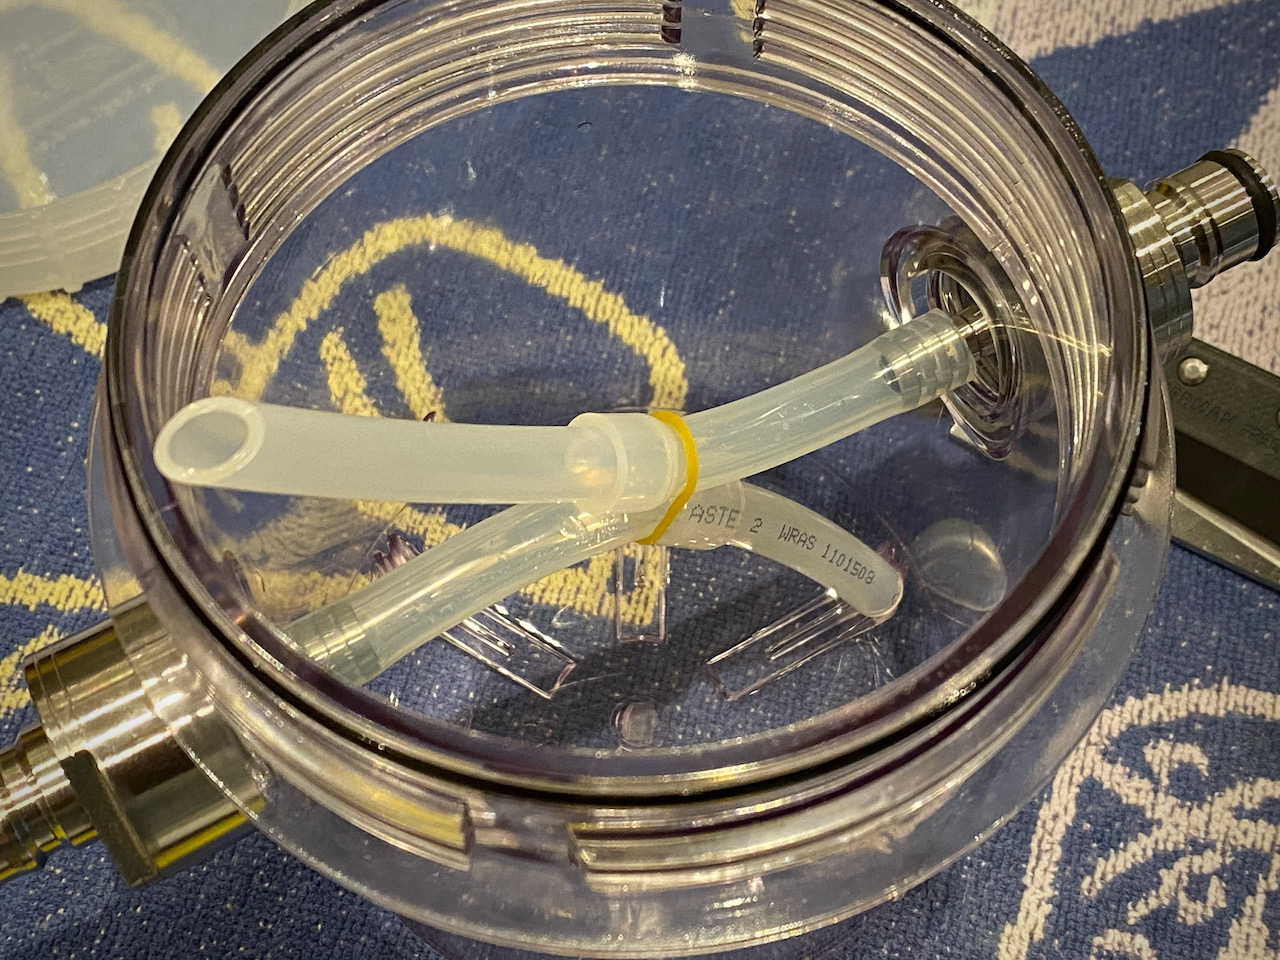
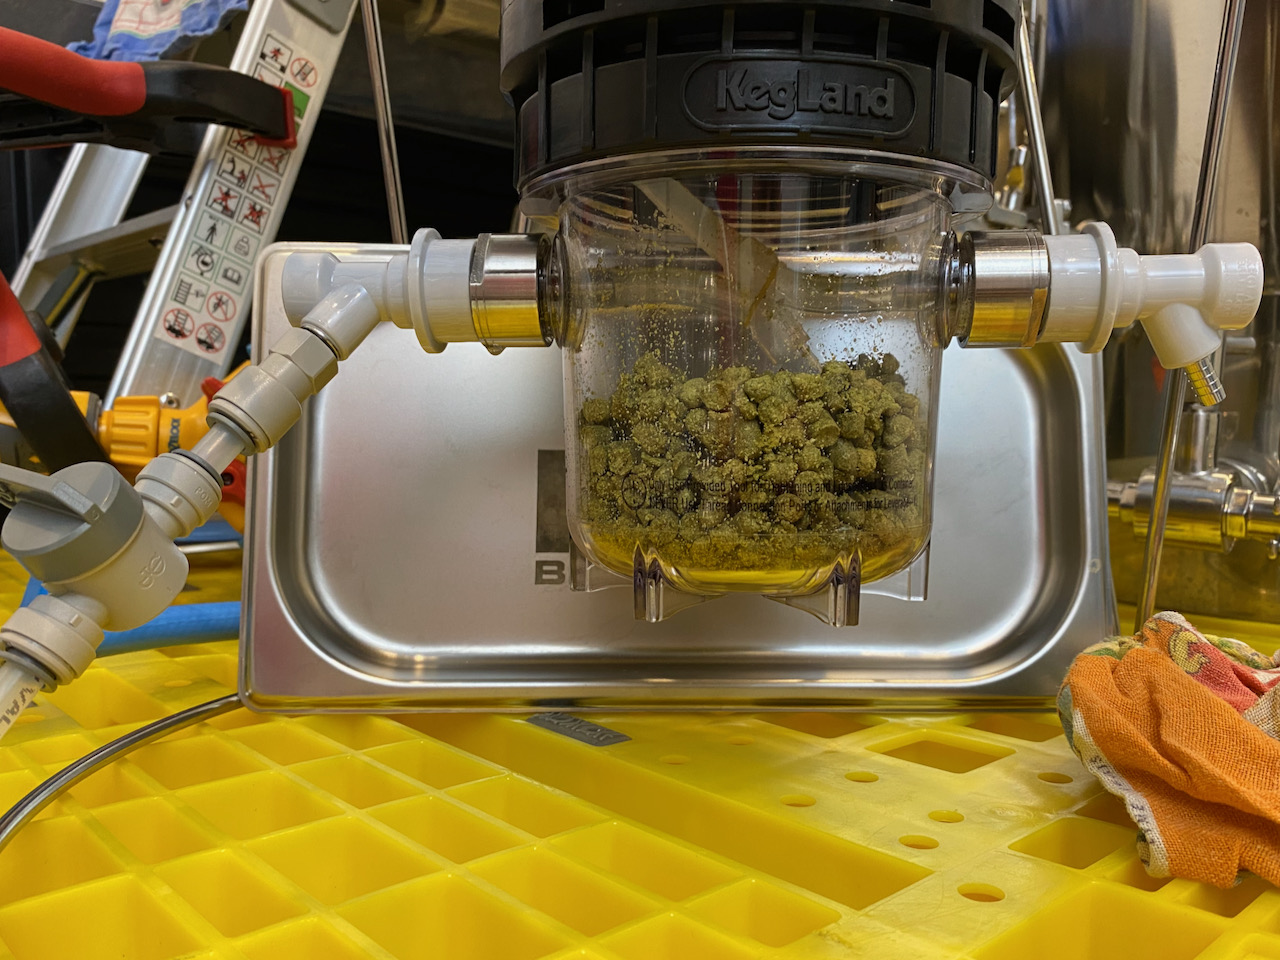
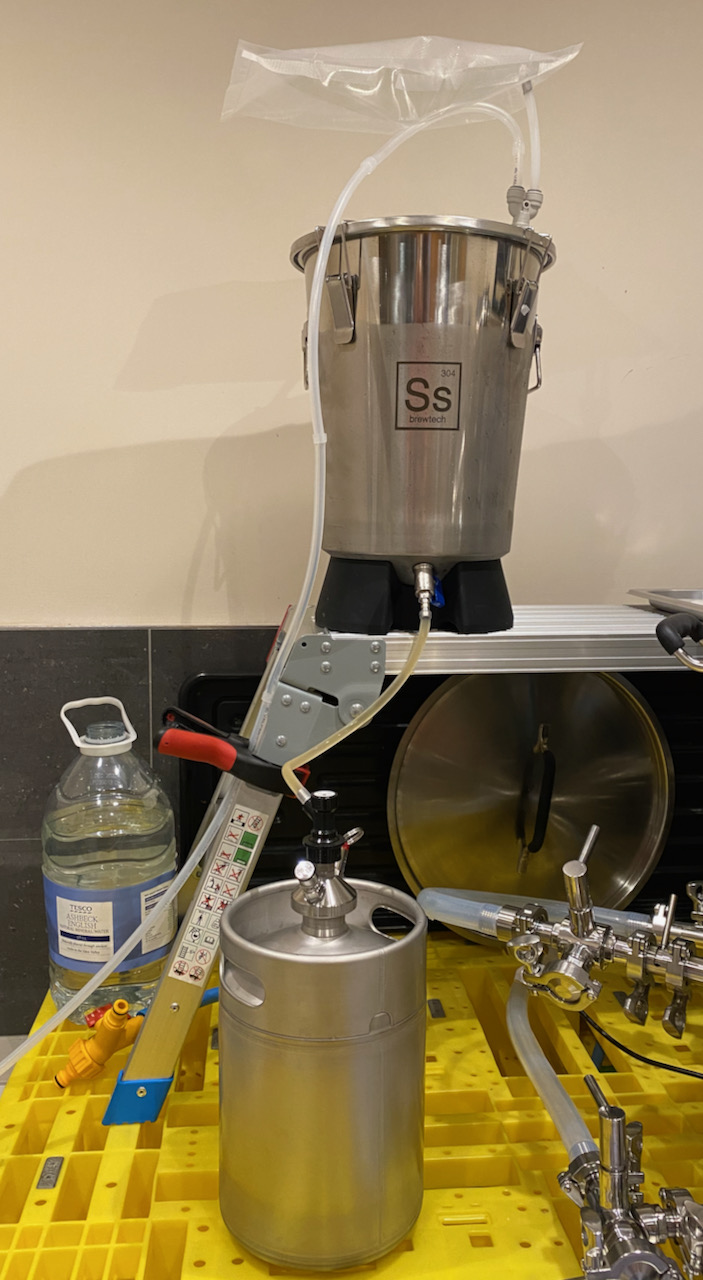
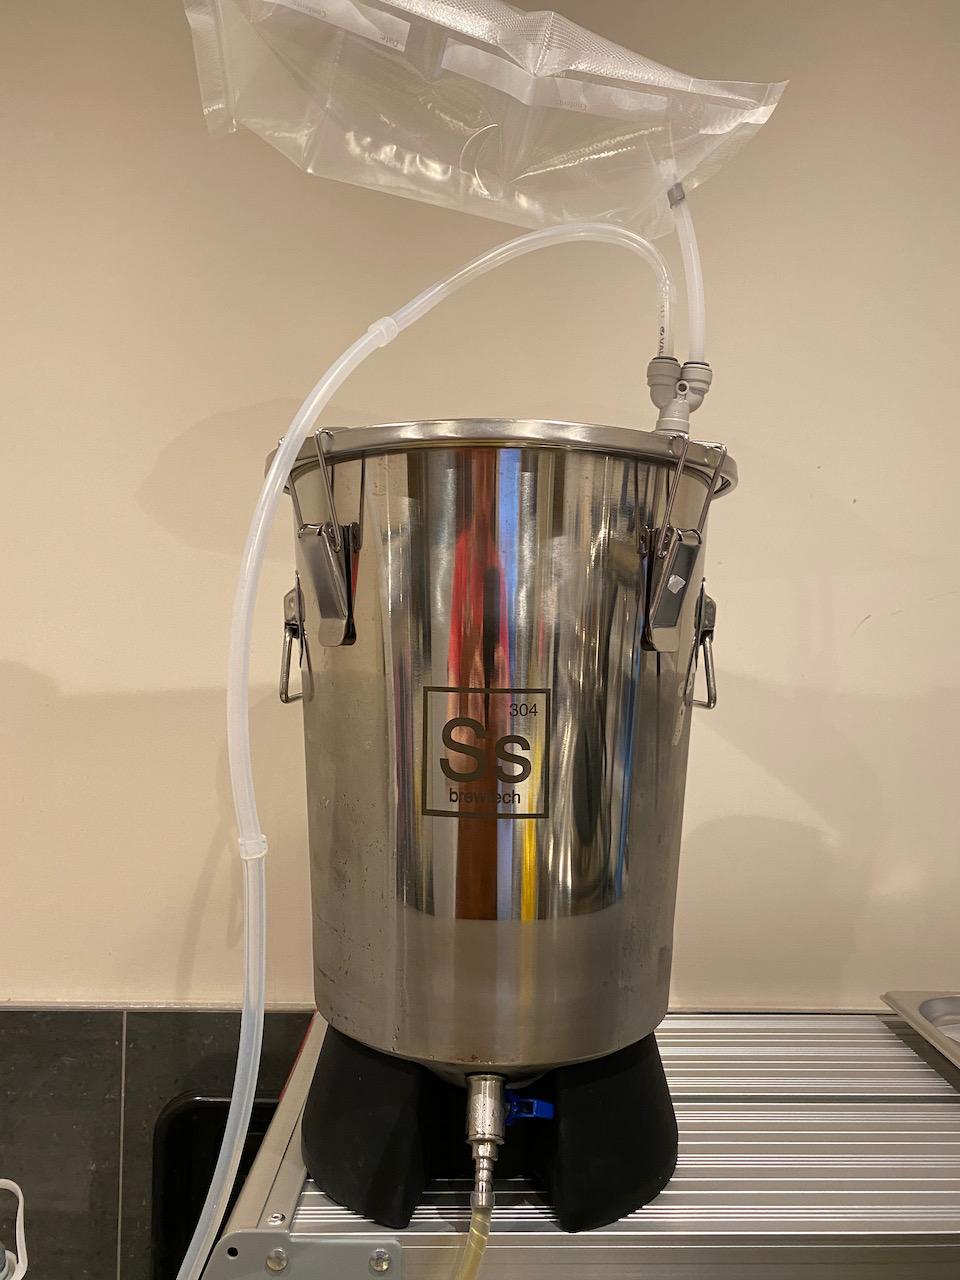
One last change today was the implementation of a device I’d been thinking about for some time, but I’m not sure what to call it yet, or if even it needs / deserves a name. Basically, flushing the hop-filled collection jar with CO2 before releasing the pellets into the fermenter is a process I’m not 100% happy with, specifically the efficiency balance between retaining as much hop aroma as possible while driving out the oxygen.

Pumping heavier-than-air CO2 into one side of the jar is all very well, but purging it by releasing a valve on the opposite side will probably just let out the same CO2 plus some hop aroma, since the lighter-than-air oxygen is out of range at the top, hiding near the butterfly valve. Today I’m trying to get around that limitation by fitting two tubes to the carbonation caps inside the collection jar, the inlet tube going to the base of my pile of hops, and the outlet tube going as high as it can without interfering with the jar’s seal or the butterfly valve.

My thinking behind this is that I’ll slowly push some CO2 into the base of the jar via that pipe on the left, while the pipe on the right lets out oxygen from the top. I’ve no way of telling if this works since I lack both a control candidate and a dissolved oxygen (DO) meter, but it’s got to be worth a shot. As before, any oxygen that made it into the FV when the butterfly valve was opened is purged via a couple of pops of the pressure relief valve, just in case. Is it worth going to all this trouble seeing as I still have the PRV method? Not sure, and no way to measure. Provided everything is sanitised there shouldn’t be any risks, so why not?

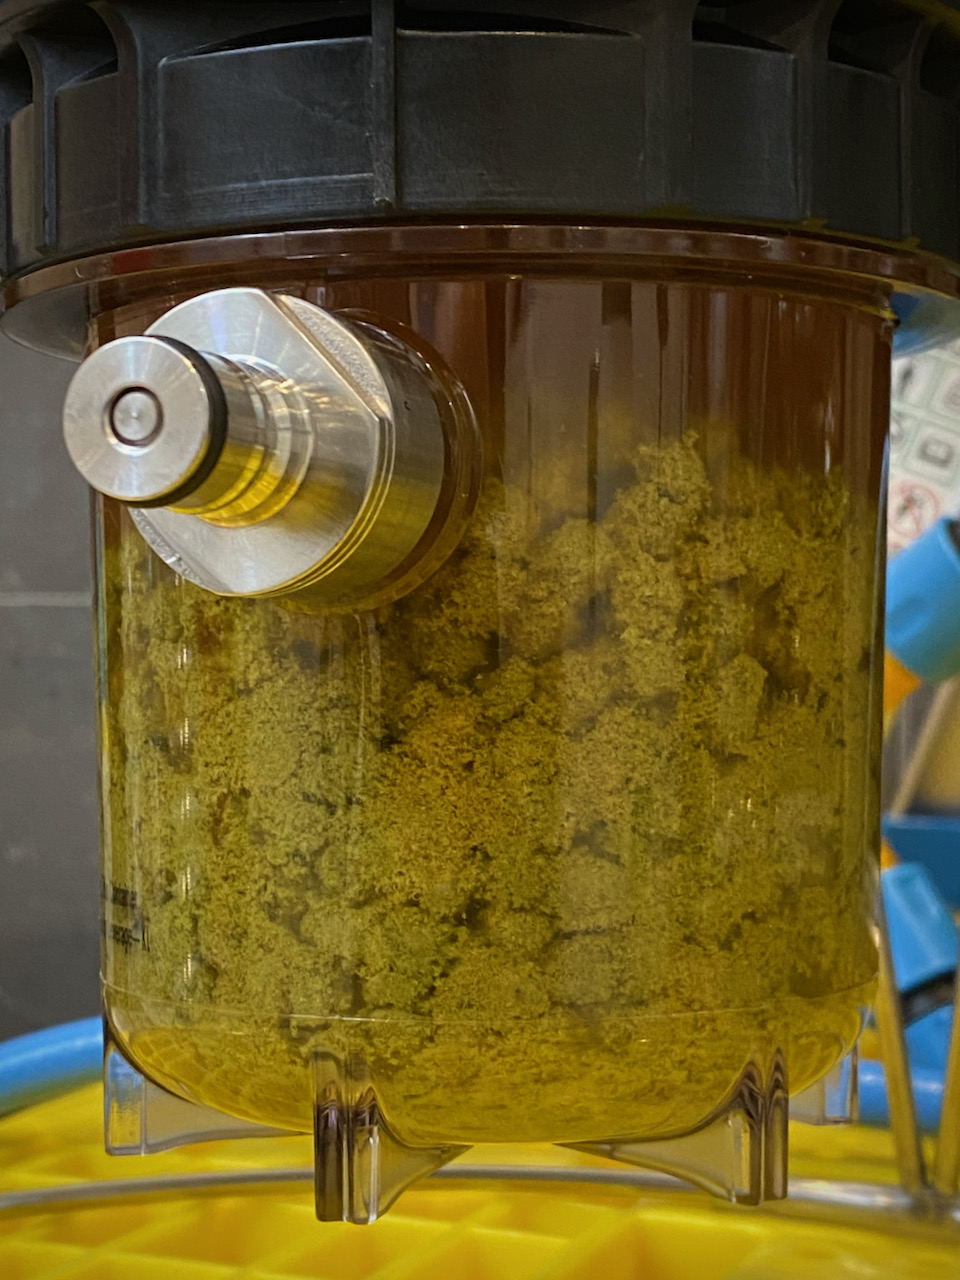
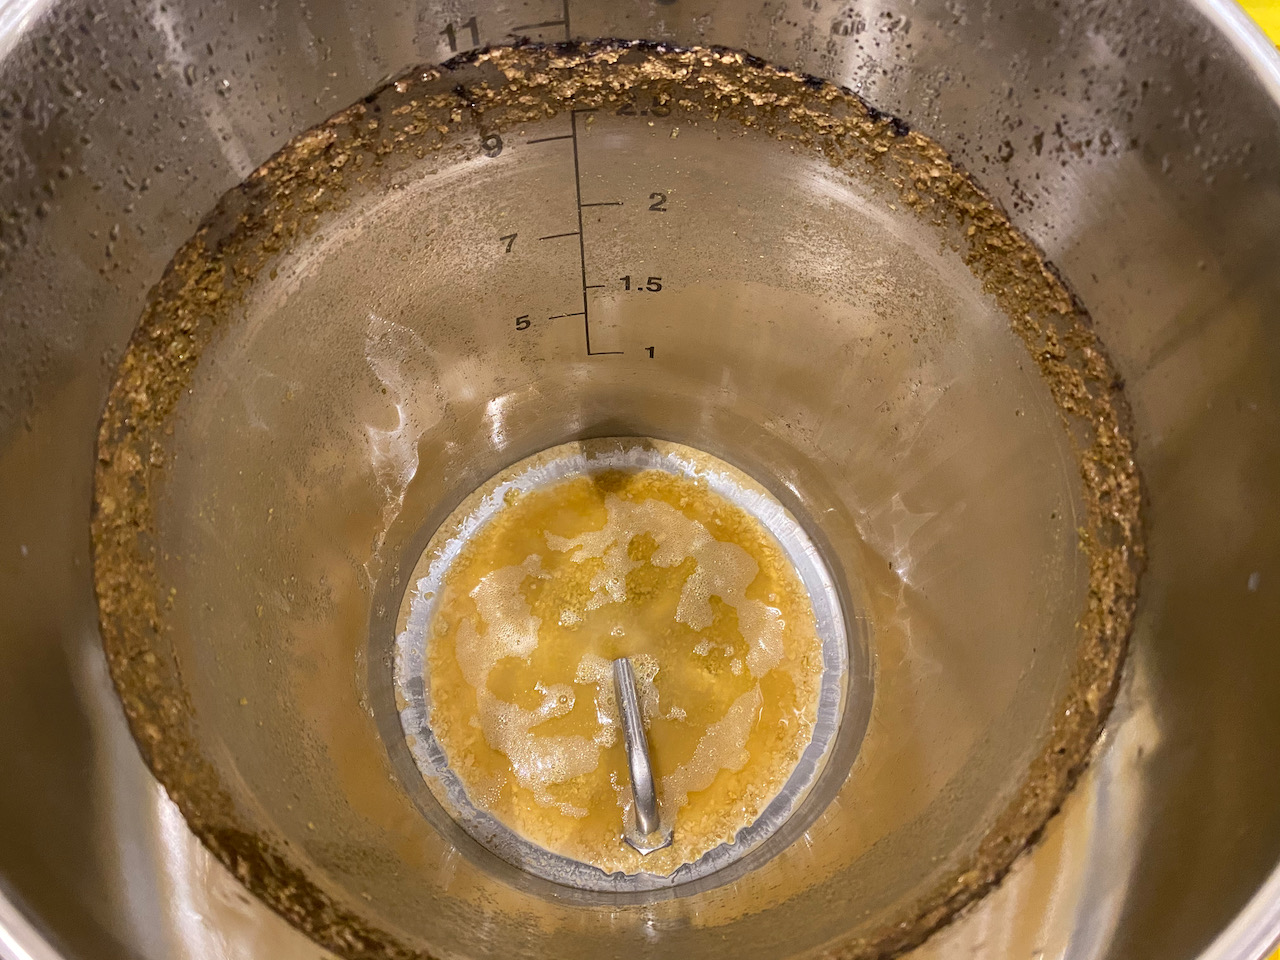
Finally, releasing the hops into the FV by opening the butterfly valve was easy as always, but also the gentlest dry-hopping to date, with hardly any commotion inside. For a few minutes I was concerned that this might not be a good thing, since I want the hop pellets to be utilised as much as possible, but they broke up soon enough and a significant portion made their way to the surface.

On a related note, I read today about a method of adding hop tea created using a cafetière (French Press, as the Septics say) instead of dry-hopping, and that’s something worth experimenting with in future I reckon. Utilisation can’t be worse than dry-hopping (even if you steep below 77 ℃ to prevent isomerisation / bittering) and it should minimise DO absorption too. To be continued …

Mar 202118Thu

After eight days in the chiller it’s time to put this one away, and I decided to fill one of my 5 litre kegs with the rest going into bottles, hopefully letting me form a comparison not only between this brew and my first extract blonde, but also between keg and bottle versions of the same batch.

Eliminating Oxygen

Keg or bottle regardless, I was keen to prevent as much oxygen from getting at the beer as I possibly could. Bag-Thing was already rigged up to the mini bucket while it cold-crashed in the fridge (used between ¼ and ⅓ of a filled bag over the week, for the record) so it was just a matter of topping up the carbon dioxide bag as I drained the beer. This was easily achieved by fitting a John Guest splitter between the bag and the bucket and splicing it to the CO2 regulator so that it could be manually topped up as needed.

Using Bag-Thing as a CO2 buffer while bottling / kegging

Before I started drawing off beer into the keg I wanted to make sure that my dip tube wasn’t about to suck up dead hops and other trub, which took some leap of faith since I had no way of telling how much was in there and nor any means to filter the output. In the end I decided that cold-crashing should have settled everything as much as it was ever going to be settled, so I rotated the dip tube to its highest setting by turning the spigot clockwise – a neat feature to have.

But I still didn’t know if the tube would be clear of the sediment, so the only way to find out was to fill a cheeky tumbler. Immediately I started getting bits of hops but the stream soon cleared up, must have just picked up some random particles while adjusting the tube. The beer wasn’t anywhere near as clear as Bure Gold – the first one I ever cold-crashed – but then again that was too was cloudier during kegging than nearer the end. This did however taste wonderful, not as bitter as the first extract attempt and with slightly more hop punch. Time for one last check of the bag setup and let’s get it done.

Kegging from the SS Brewtech Mini Bucket

Once I was confident that no oxygen would enter via the top, putting this into a sanitised & purged keg was as simple as connecting a piece of silicone hose from the elevated bucket’s spigot to a barbed beer disconnect and popping the pressure relief valve now and then. That last step grew old very quickly so I fitted a gas disconnect as well and just kept topping up the CO2 at the bag end while the keg vented it to atmosphere. I realise now that with the bag being such an effective buffer I could easily have used the extraneous gas from the keg to top up the bag and made for a truly closed loop – definitely something to try next time.

I used the “cold finger” method again and left the keg with about 2 inches of head space before pressurising it to 30 PSI and putting it in the chiller. I’ll reduce this gradually after 3 or 4 days to 10 PSI serving pressure, hopefully that should then be ready to sample.

… and now Bottling

I really wanted to use my Blichmann Beer Gun to continue the oxygen-free theme but there was one small problem: I needed the JG 2-way splitter in order to provide the gun with gas, but that piece was in use by Bag-Thing. (sorted for next time: an adapter is on the way)

To overcome the equipment shortage I temporarily borrowed the CO2 supply and crudely purged some clear flip-top bottles by flushing them with carbon dioxide after I’d dropped in two carbonation drops in each, targeting 750 ml. Yes, overdoing it a bit there, but those drops were all I had left and I couldn’t be arsed to mess about weighing out loose dextrose for the sake of a couple of bottles. Once they were gassed and carbed it was easy to rest the flip-top stopper on the mouth of the bottle until each could be filled via the same silicone tube I used while kegging, just without the disconnect attached.

All this went fairly well until I started drawing bubbles halfway into the first bottle – guess that dip tube must be quite long after all. Seeing bubbles during filling is never good, but I kept telling myself that it should be OK since the bottles were filled with CO2, and it’s better to splash some gas about than set the tube too low and draw in unwanted rubbish. This method of constant adjustment saw me filling four 500 ml clear flip-tops while lowering the dip tube gradually before I hit the hops on the fifth bottle.

While cleaning the vessel after bottling I noted that the trub-line was roughly equal to the conical part. Obviously this will vary wildly depending on what’s added to the brew during fermentation, but it’s good to have this guide and reassuring to know that there’s quite a bit of adjustment on the dip tube – the guys at SS Brewtech have clearly done their homework.

In closing, one thing’s just occurred to me: by cold-crashing before bottling I may have removed the yeast that I need to turn my carbonation drops into carbonation. If these turn out to be flat then I need to learn from this, and draw off that part of the batch which is to be bottled before cold-crashing. As always, fingers crossed …

#wisdom: cold-crashing the mini bucket for a week uses between ¼ and ⅓ of a filled Bag-Thing, no need to worry about having to refill it partway.

#wisdom: if filling a purged keg from the brew bucket, use the gas that’s being driven out of the keg to refill the bag on top of the bucket.

Mar 202108Mon

I couldn’t decide how to best avoid oxygen ingress during dry-hopping, so I carefully poured 25g Citra hop pellets through the airlock bung hole before flushing the headspace with CO2 via a plastic tube inserted a little way. It’s probably not 100% effective since doing so only dilutes the oxygen introduced with the hops, but it’s better than nothing.

Going forward I’m hoping to rig something to the inside of the lid which will allow me to insert the hops right at the start of fermentation. I’ve seen several devices which use magnets to keep the hops suspended in a kind of hammock at the top of plastic fermenters, but that’s not going to work with a metal bucket which you can’t see into. At any rate such a device needs to be airtight until deployment time if there’s any truth in the theory that the CO2 produced during fermentation can take away some of the hop oils as it vents out of the vessel.