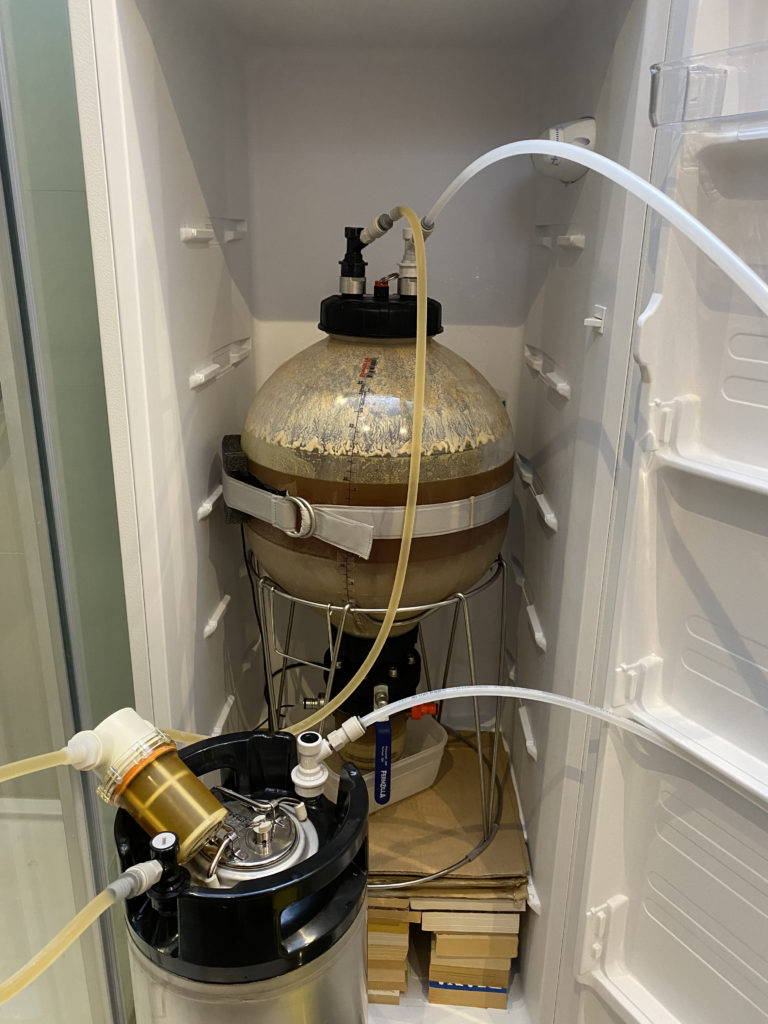
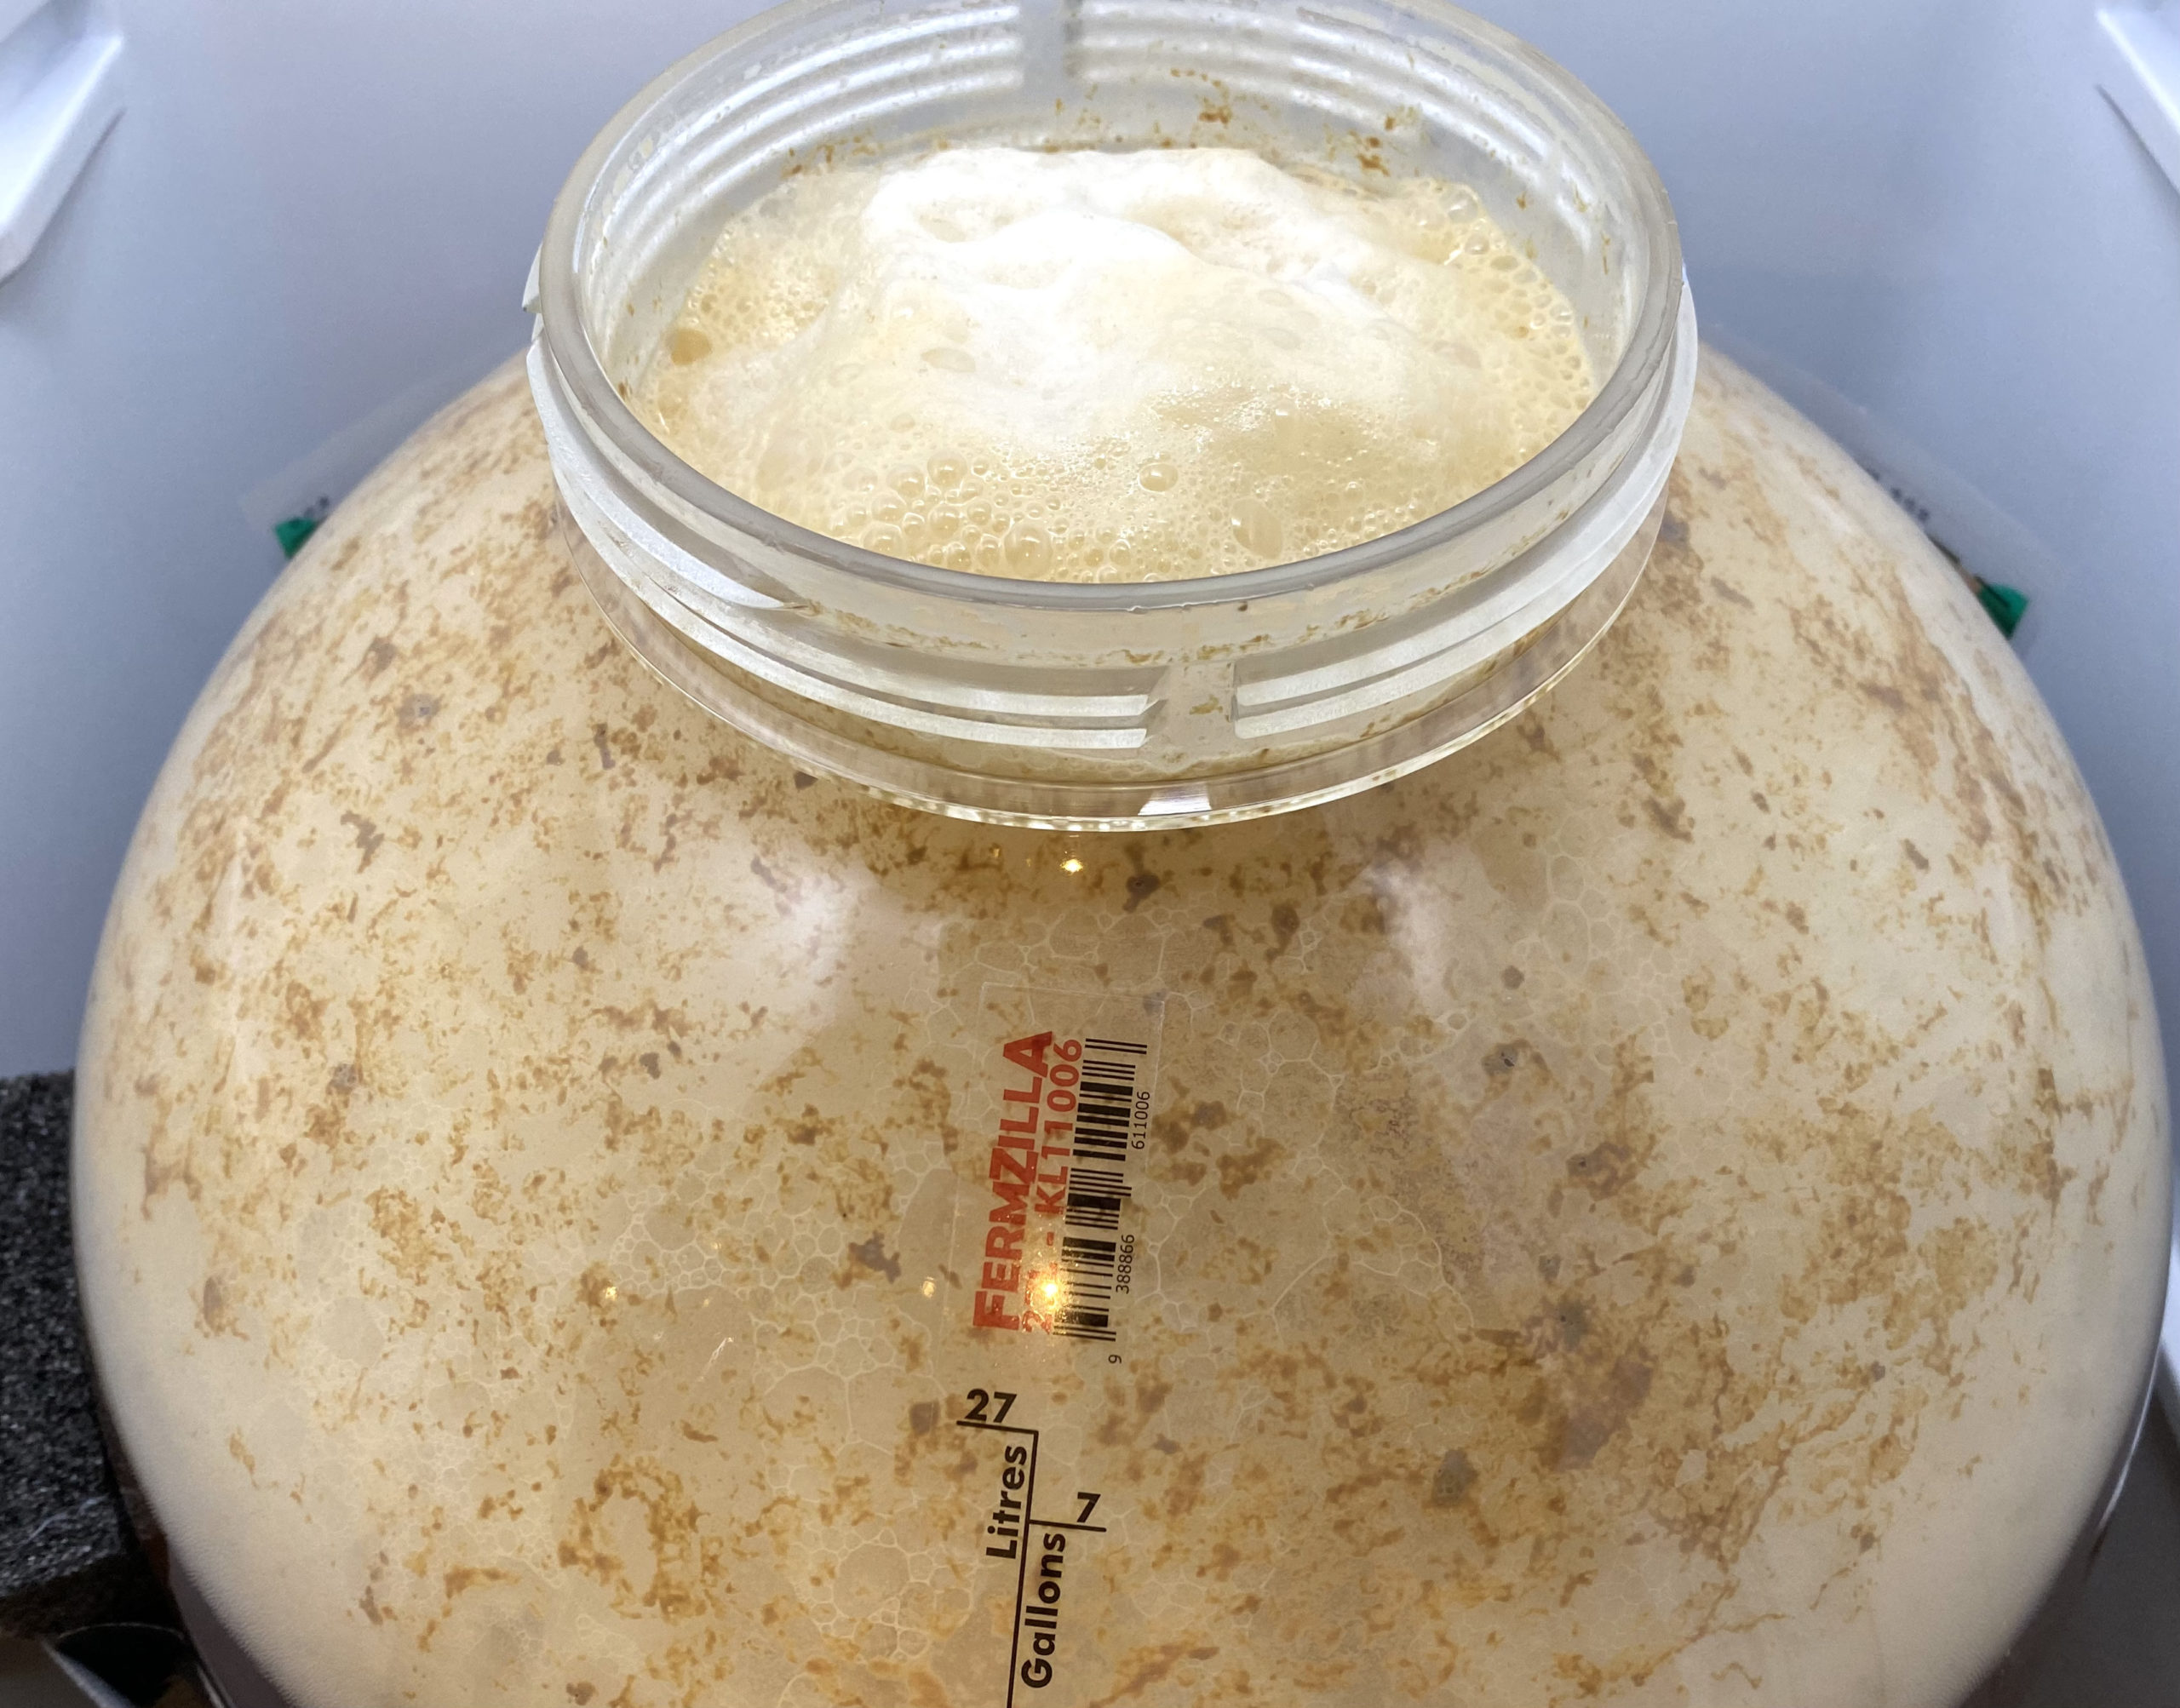
Looks like selecting the smaller of my stainless fermenters was a bad idea, because evidently Yeti needs more than 3 inches head-space.
Continue readingJan 202420Sat
Looks like selecting the smaller of my stainless fermenters was a bad idea, because evidently Yeti needs more than 3 inches head-space.
Continue readingI’m sure there was method amongst the madness, at least at the beginning: aim for a smaller batch and see if we can push the ABV past 10%. I dialled the recipe back to 11 litres fermenter volume and increased base malt to get the percentage up, tweaking the darker hops to taste.
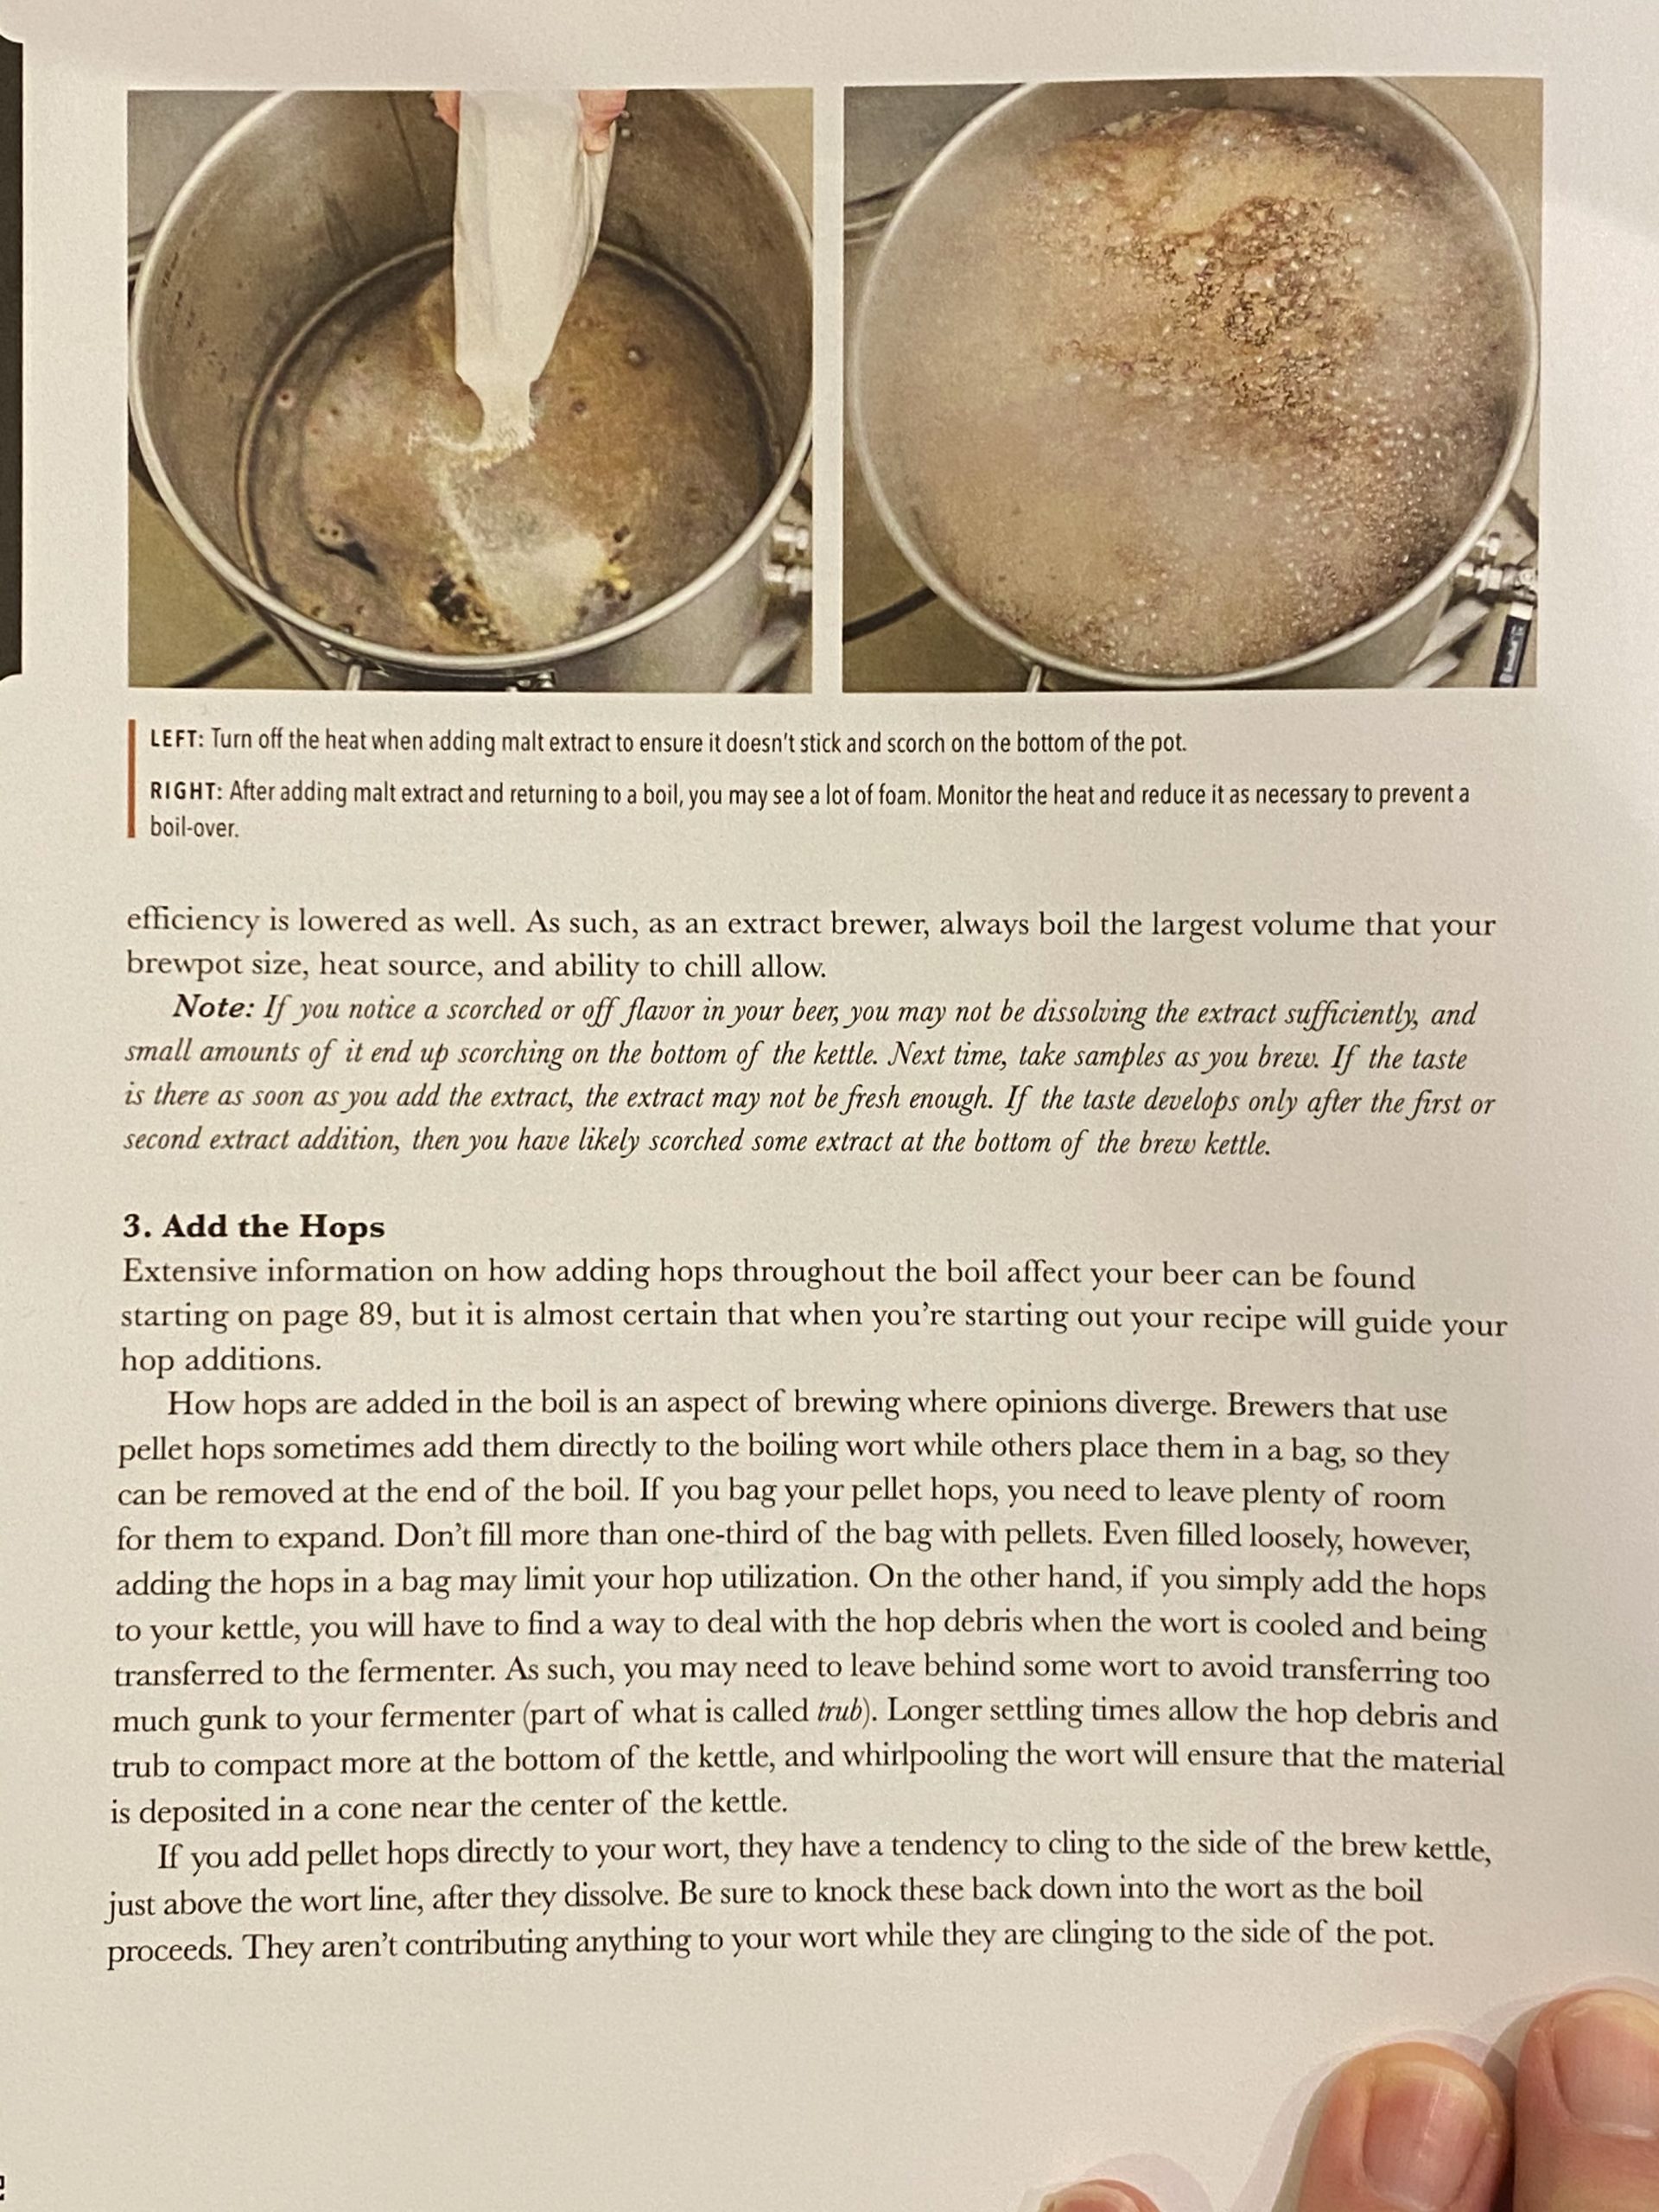
Brew day itself was OK, no major mishaps but once again I didn’t quite get the yield I was expecting from my mash and unintentionally compensated with boil-off, which nearly exposed the heating elements enough to cause problems. Two key take-aways from this brew day:
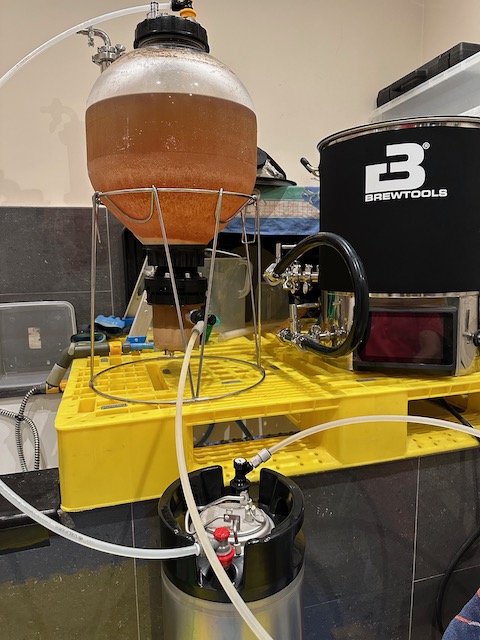
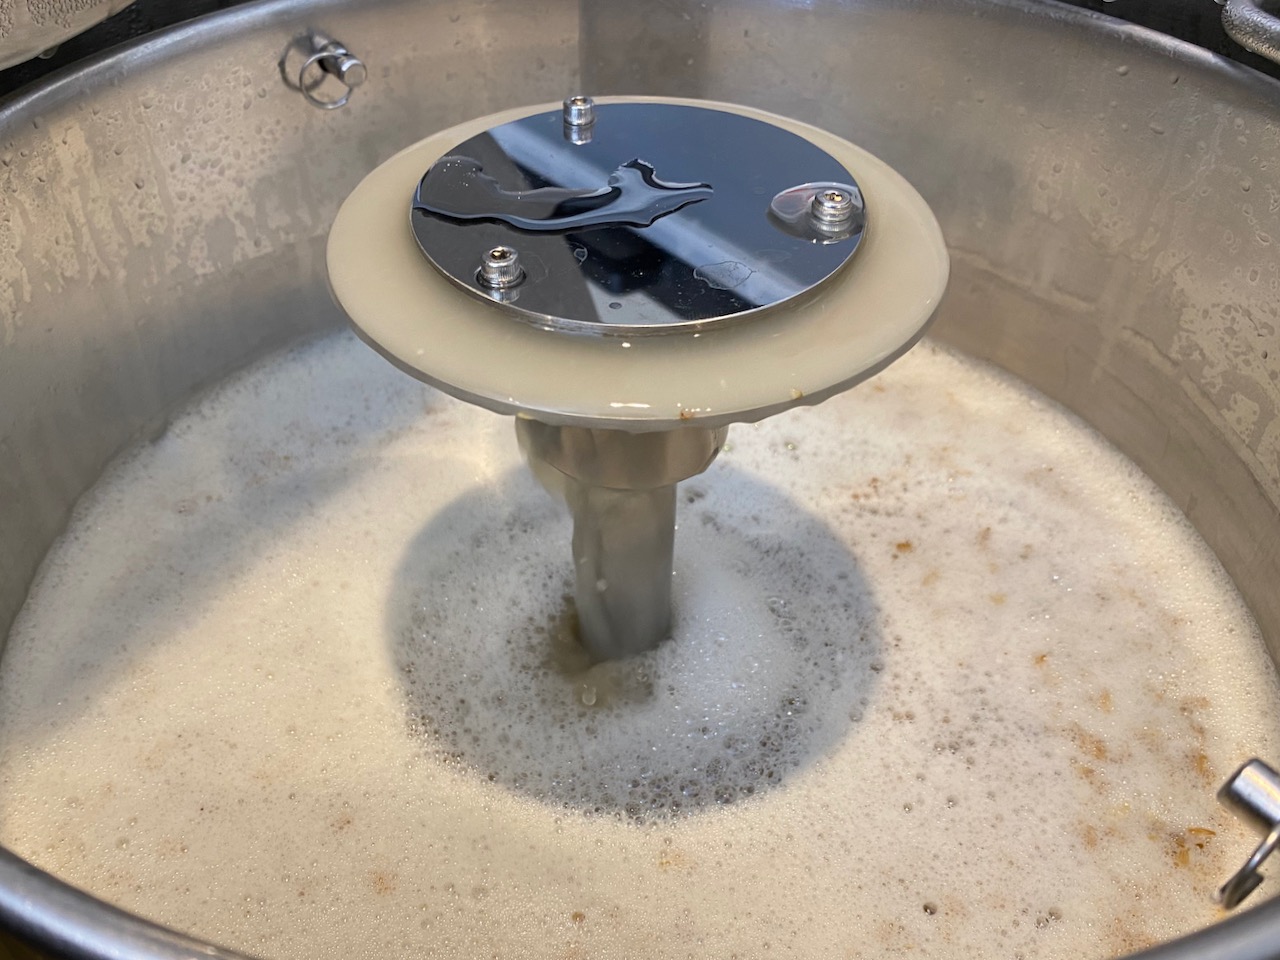
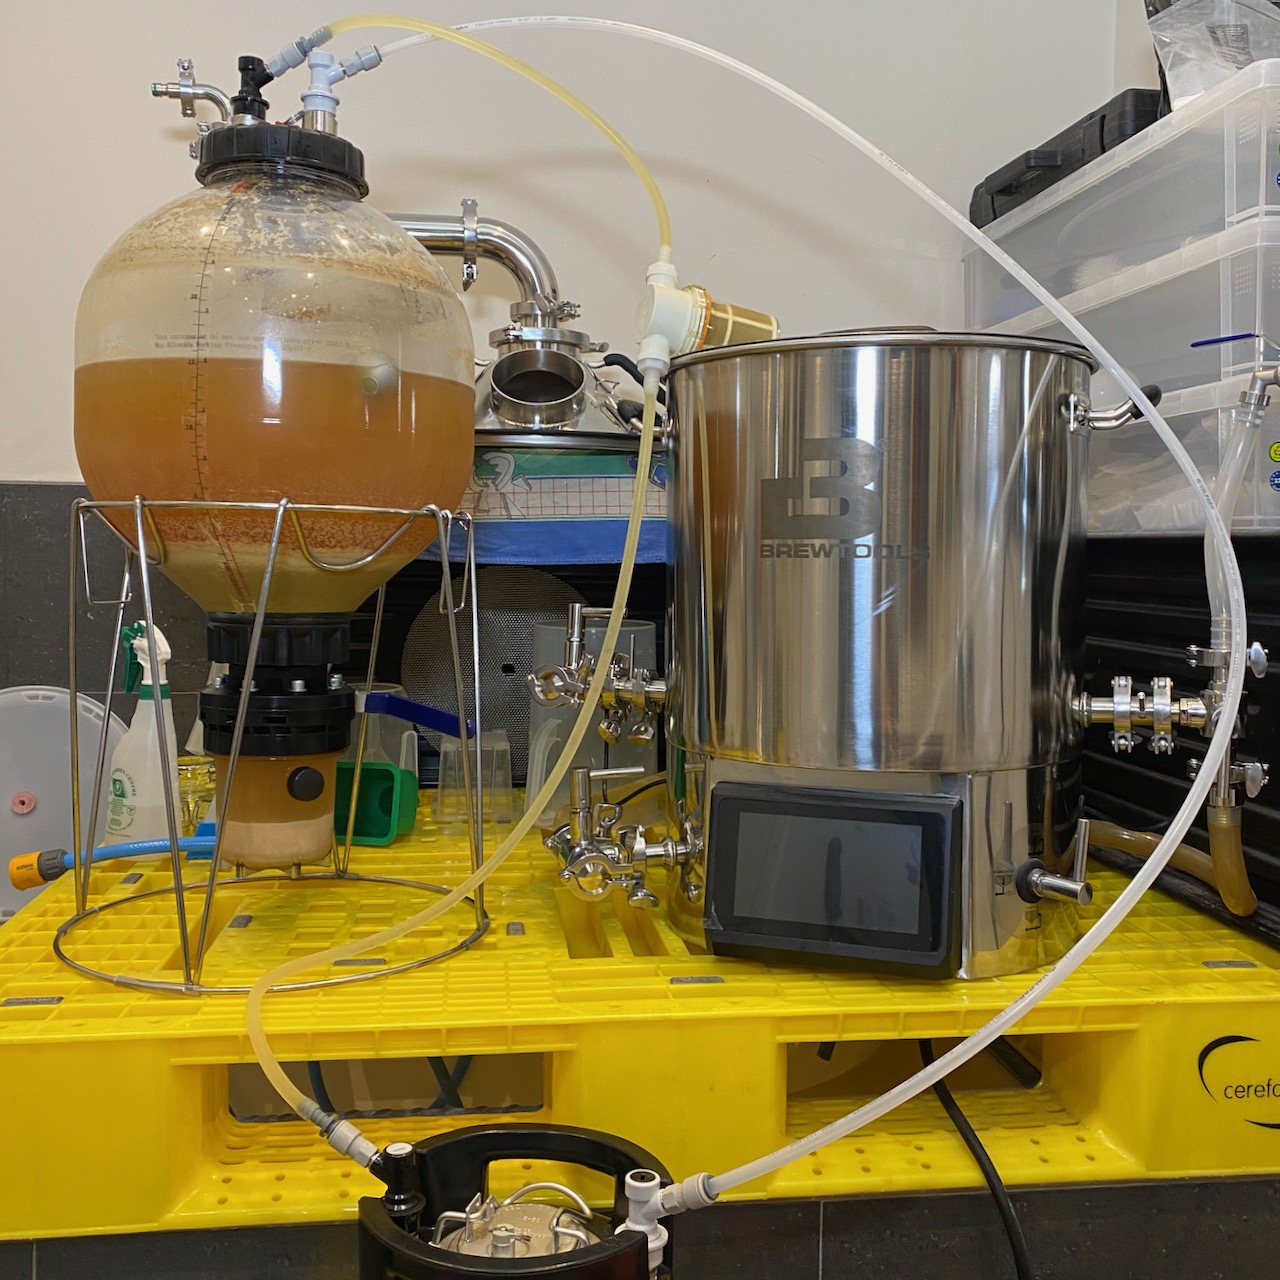
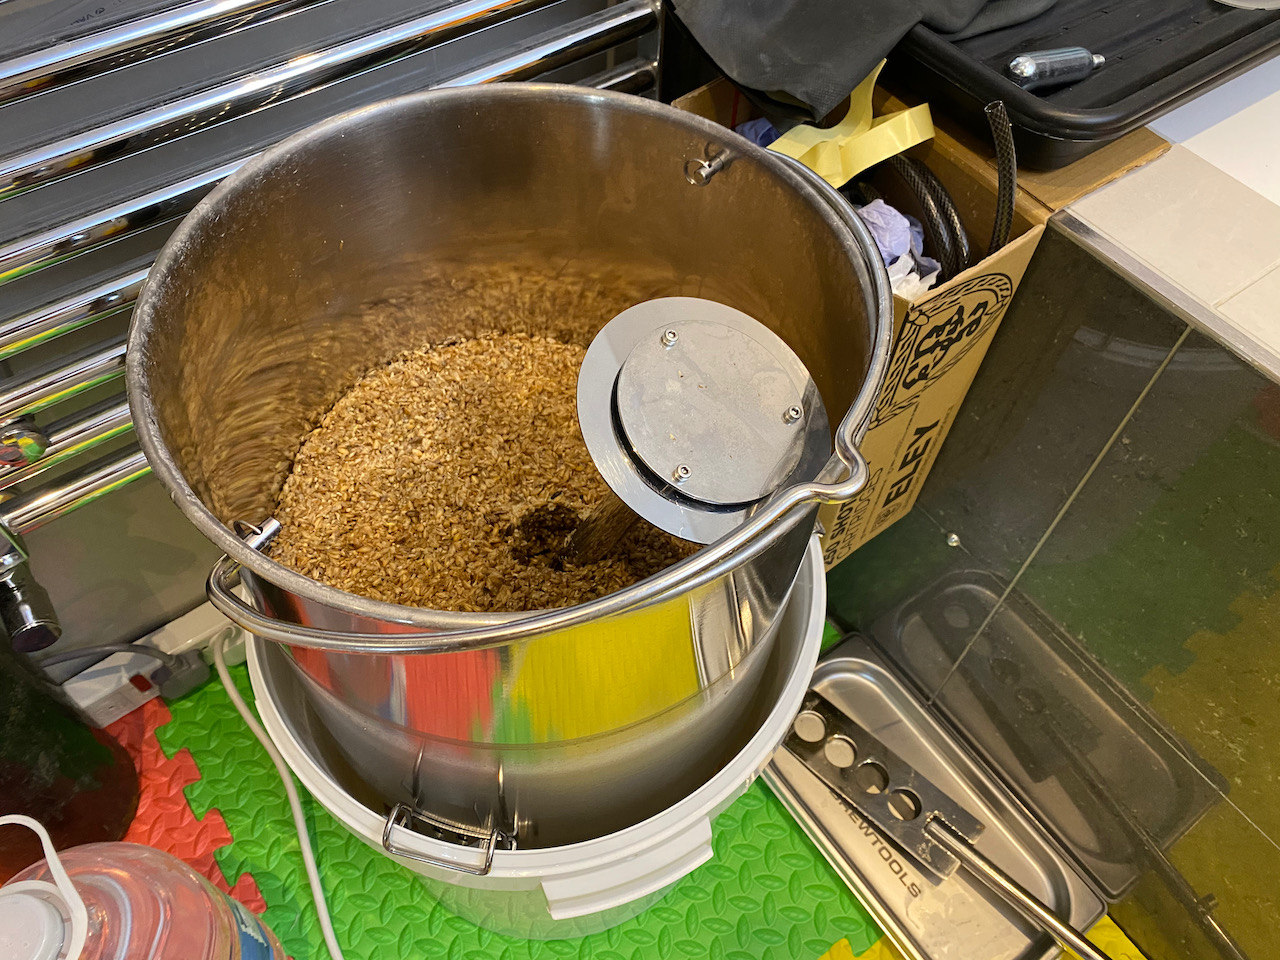
Continue readingCan’t believe this is my tenth go at an imperial stout! Each version has been slightly better than the last, and I’m getting closer and closer to hitting those magic efficiency numbers. This time around I’m also using two new pieces of equipment; an auxiliary temperature probe for the mash, and a brand new recirculation manifold from Brewtools.
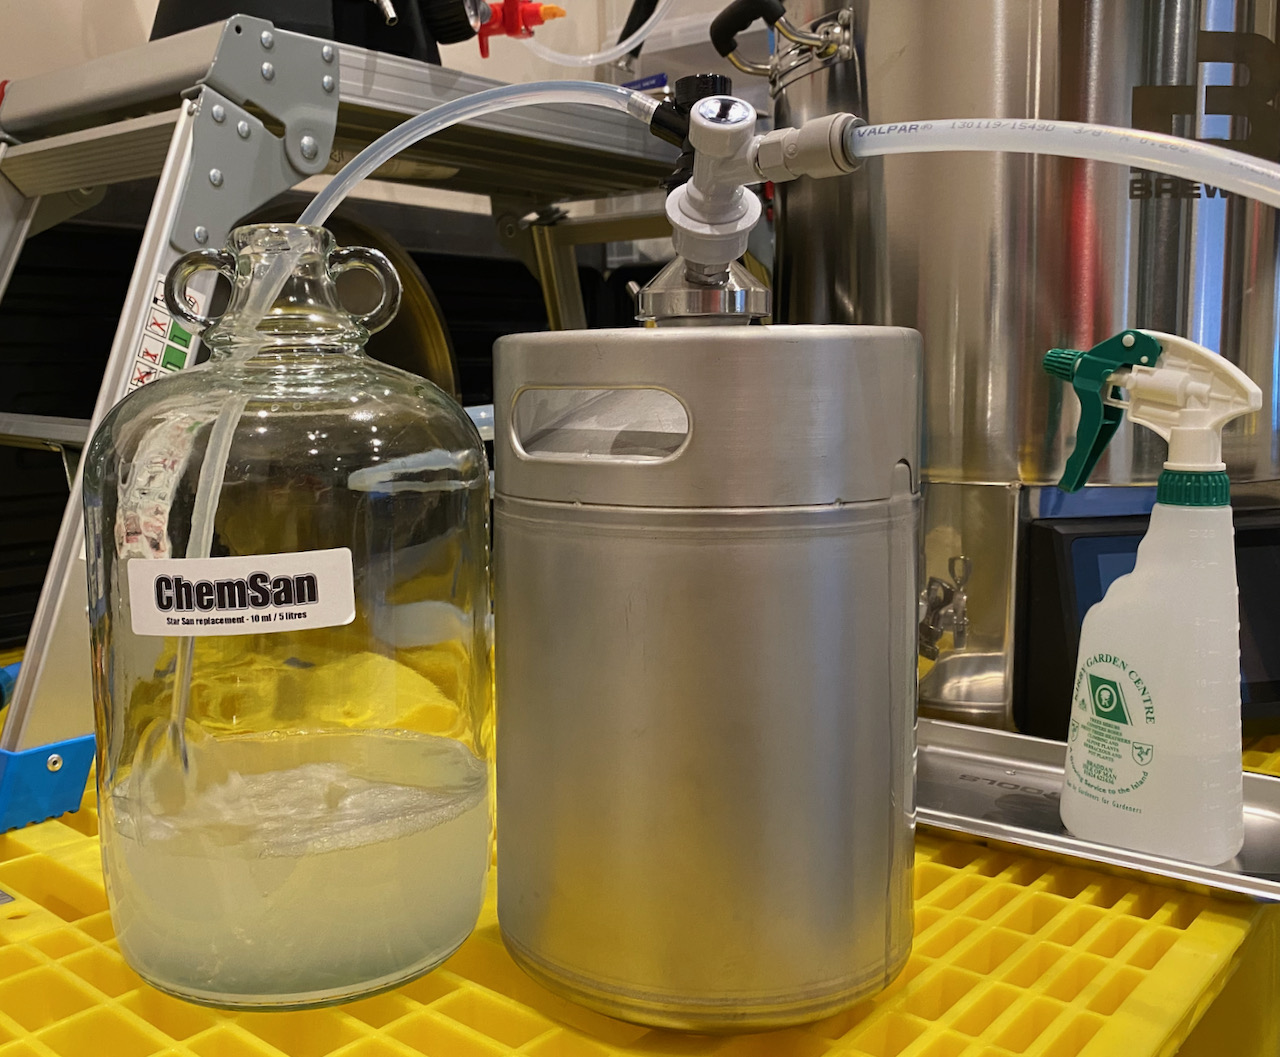
Continue readingI just filled one sanitised, purged Cornelius keg and hoped to get another 2 or 3 litres into an MJ Mini, but as soon as I started transferring to the second vessel it became clear that there was mostly just hops left over. In the end I think we got just over a litre into the second keg, which was hardly worth bothering with.
#wisdom: when kegging a hop-forward brew like Geronimo, FV volume of 21 litres is about right for a 19 litre Corny.
Kegged 24 litres just now; 19 into a Corny and 5 into an MJ Mini. There’s practically no headspace in those kegs so I think we may have some very slow carbonation, but that’s fine as I plan to condition this one for as long as possible.
I did notice that during cold-crashing the pressure I added via a Sodastream cylinder was very quickly absorbed, which makes me think that I’m still having difficulty sealing those stainless carbonation caps. When prepping the FV ahead of brew day I saw that I overtightened one or two of them and had to re-seat the seal, so perhaps that caused the pressure to drop at the end of fermentation when CO2 was no longer being produced. Odd.
#wisdom: prepare Fermzilla ahead of brew day, leave pressurised long enough to highlight any issues with loss / leaks.
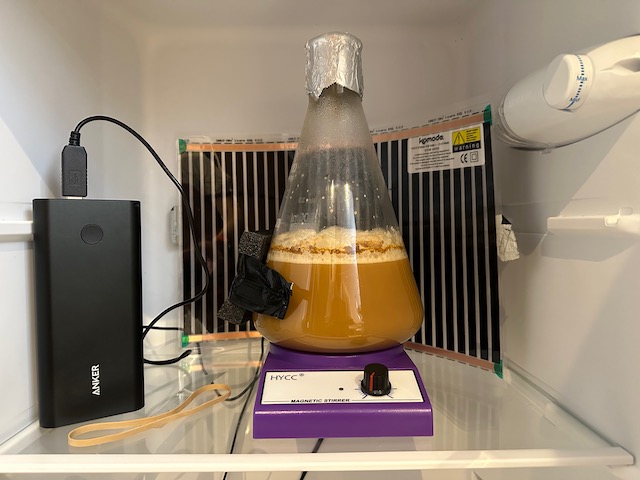
I prepared the starter yesterday for tomorrow’s brew, keeping it on the stir plate with the smaller, banded spinner for around 24 hours. When I switched it off it rapidly went for good Krausen, but this evening it seems to have receded and looks almost lifeless. Too long on the stir plate / too far in advance of the brew? Will prepare just 24 hours ahead next time. Didn’t use the fermentation chamber either this time around, instead keeping it in the cool bathroom at around 19℃.
I was planning to pitch my remaining packet of dried yeast instead of this apparently lifeless starter, but there’s still the tiniest signs of fermentation from the layer of yeast at the bottom, so I’ll throw it in anyway and will follow up with dried yeast if nothing happens after 24 hours.
#wisdom: let’s keep starter time to 24 hours ahead of brew, with half of that on the stir plate.
I set out to prepare the yeast starter for this brew as usual, boiling up and then chilling DME 2.5 days before the brew day, but I couldn’t get the magnetic stir bar to operate consistently and found that it wanted to jump out toward the edge of the flask all the time, leaving the starter inanimate.
1.5 days after pitching I decided to make another starter in my second flask, this time picking a different stir bar on the basis that my usual go-to bar may have become differently magnetised or otherwise worn out. I did note that the old one lacked the small ridge around the middle, which made for a larger contact area with the base of the flask and therefore increased the amount of friction. Was that enough to upset the apple cart once the viscosity started to change?
Following a successful trial in water using a smaller, ridged stir bar I sanitised it and deployed it to my second starter, where it performed flawlessly for just over 24 hours until pitching, at which point a decent head of Krausen was observed.
#wisdom: the ridge is there to help the stir bar move more easily. Always use a bar with a ridge. 1.5 days seems fine for Lallemand Koln (Kölsch) yeast, ignore the funky packaging / rehydration instructions and prepare starter as usual, observing temperature suggestions.
It’s not without irony then that this brew, Bernsdorfer TTZ, is as difficult to start as the ETZ 250 after which it’s named.

Bit of a disjointed brew day. I forgot to update the equipment profile to the latest version when I planned this brew from a previous batch recipe, so my efficiency values are all over the place. Not that this is a huge problem overall since the pump jammed again during transfer and I had to resort to gravity transfer instead. In hindsight perhaps I should have done this from the dip-tube rather than removing the centre column straight away, because I clogged the Bouncer filter after barely a minute on the finest mesh and still ended up with huge losses once I switched to the medium mesh. Oh well, live and learn.
#wisdom: have a plan in place for jammed pump during transfer – fail over to least messy option!
Continue readingBit of a mixed bag on this one. While making the starter on Tuesday I was pushing my luck with 1.6 litres of water and 184g DME, adding a good dollop of Lipohop to keep from boiling over, but forgetting to throw in any yeast nutrients. When it was time to sterilise the magnetic stir bar I forgot to take the Erlenmeyer flask off the boil, and as soon as the little white pill hit the boiling wort it ejected violently all over the hob, losing about 200 ml of volume. I went on to make the starter anyway, but let’s not do that again.
#wisdom: don’t throw stir-bar directly into boiling wort
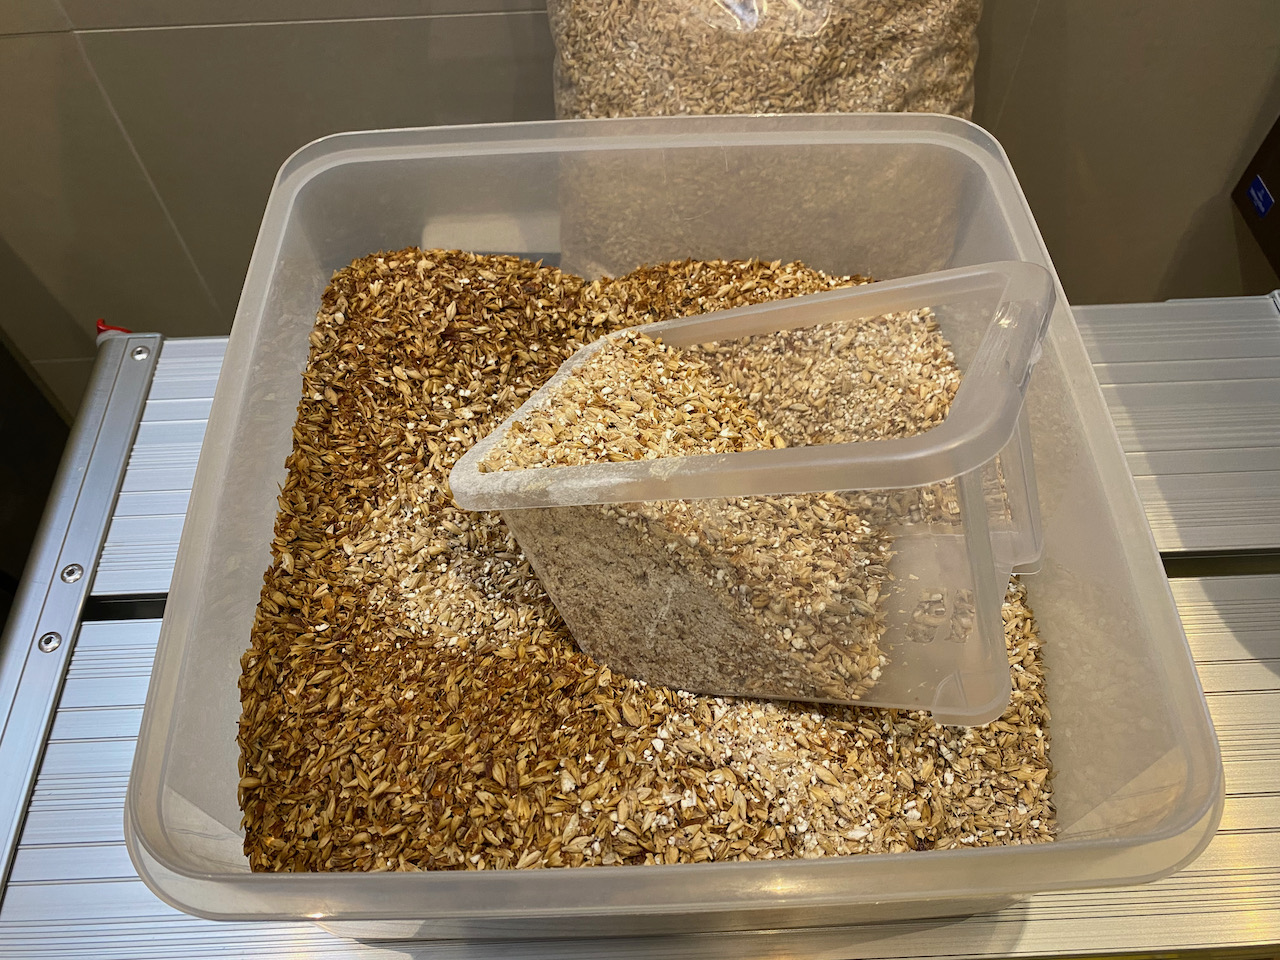
I measured out the grain on the evening before the brew day, and only afterwards noted that the recipe I was following was based against the old B40 equipment profile, before I adjusted GAR. Switching to the updated profile in Brewfather caused the grain amounts to adjust in order to hit the same 23 litres fermenter target, which in any event went through the mash limits. I so reduced the target to 18.5 litres (now only 140 ml over) and reset the grain bill to what had already been measured and mixed, which should see me hit 10% ABV all being well.
All wasn’t well, and despite being pretty much spot-on with my volumes throughout the day I wasn’t able to extract as much from the mash as I’d hoped, ending up 13 points short of my pre-boil gravity and 18 points short on OG. So no fermenter top-up today.

Fairly good brew day today, the only mishap was spilling some of the whirlpool hops onto the steam hat instead of chucking them in cleanly. Well, that and a near boil-over when coming back from cutting the chiller in, but let’s draw a veil over that.
My numbers were still a bit off with losses of around 2 litres during mashing, which I made up for by sparging longer. I accounted for this using 2 litres fermenter top-up, adding another 2 litres actual fermenter top-up when I was left with only 19 litres after transfer.
On a positive note, I’ve been chatting with the creator of Brewfather via Discord, and learned that:
#wisdom: enter temperature-corrected hydrometer readings in Brewfather, not raw values.
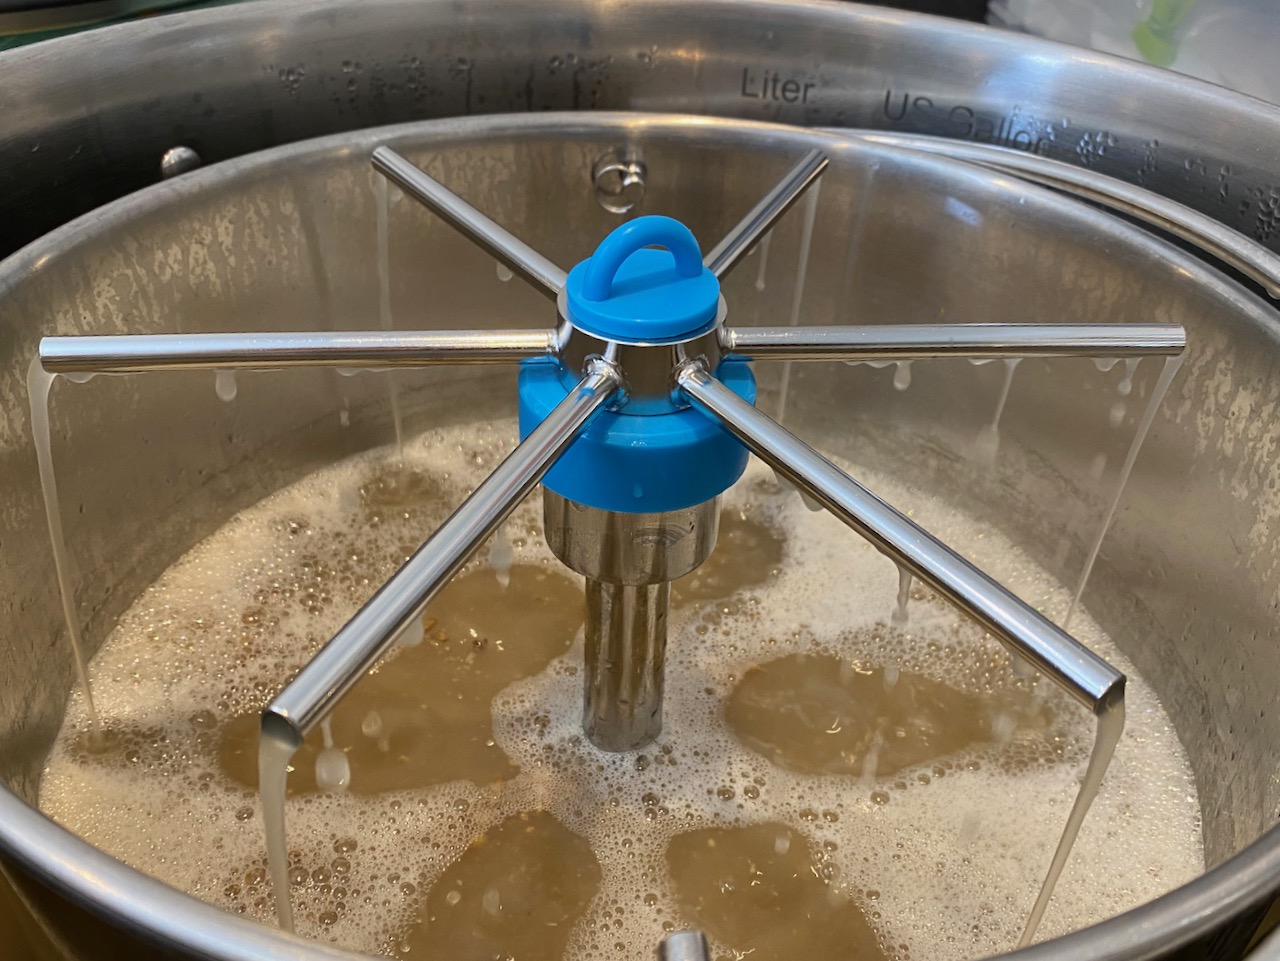
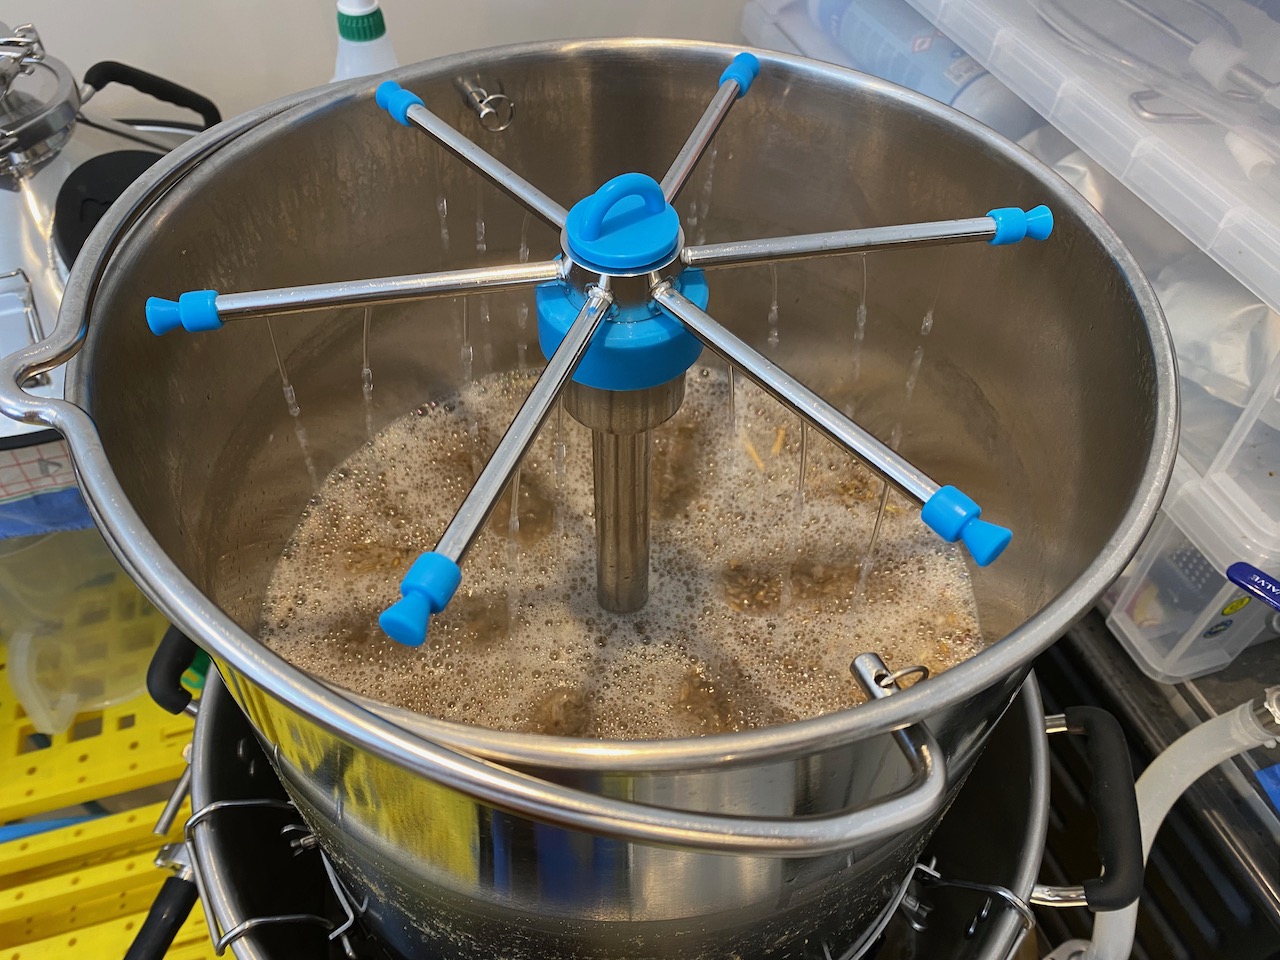
I also discovered that the sparge manifold can be used in vorlauf – and probably also during mashing – when I accidentally swapped it out for the mash hat before mash-out rather than after. Rather than undoing the change I simply removed the end caps so that the small holes along the bottom of the manifold wouldn’t get blocked, and it worked really well, distributing the wort better than the mash hat does. I’m not sure if the manifold arms are wide enough to work right from the start of a mash, or if it’d just get in the way of stirring and be a right pain, but it’s an interesting one to maybe explore later.
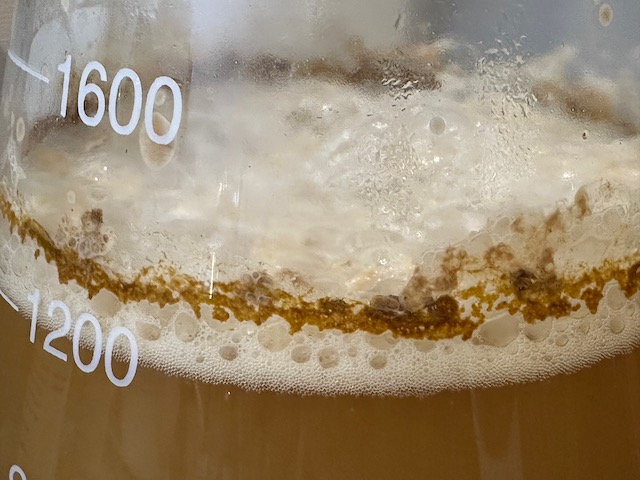
Checked in on my imperial stout just now, and maybe I should have fitted a blow-off tube right from the start, because it seems we’ve had something of an explosion. I’m not sure what caused the airlock to separate into two halves and explode toward the top of my fermentation fridge, but I was half expecting to find a dent in the ceiling.
Replacing the stricken part with a taller type of airlock caused that one to fill up immediately as well, so I did what I should have done yesterday and fit a blow-off tube filled with sanitiser. Let’s hope this one doesn’t erupt.
#wisdom: Air-locks are for beginners, just use a blow-off tube from the start.

* the original brew day was delayed 24 hours by a ‘gastric episode’ which may or may not have been related to rare duck.
A fairly uneventful brew day today with just two small hiccups, #wisdom to follow: I fitted the wrong batteries to my blue Tilt, and I may have been logging gravity readings totally wrong in Brewfather up to now.
After removing the failed lithium AA batteries from my blue Tilt Pro a few weeks ago, I fitted some high-capacity alkaline batteries which I had to hand, mainly out of curiosity to see how long they’d last. Turns out that the digital hydrometer is actually calibrated to use Energizer Lithiums and any other AA battery won’t work, not because of the voltage but because of the weight. My blue Tilt sank like a stone and had to be fished out – didn’t even send any readings back while it was down there because the angle was wrong and it had gone back to sleep.
#wisdom: when replacing batteries in a floating digital hydrometer, use the same ones that it shipped with.
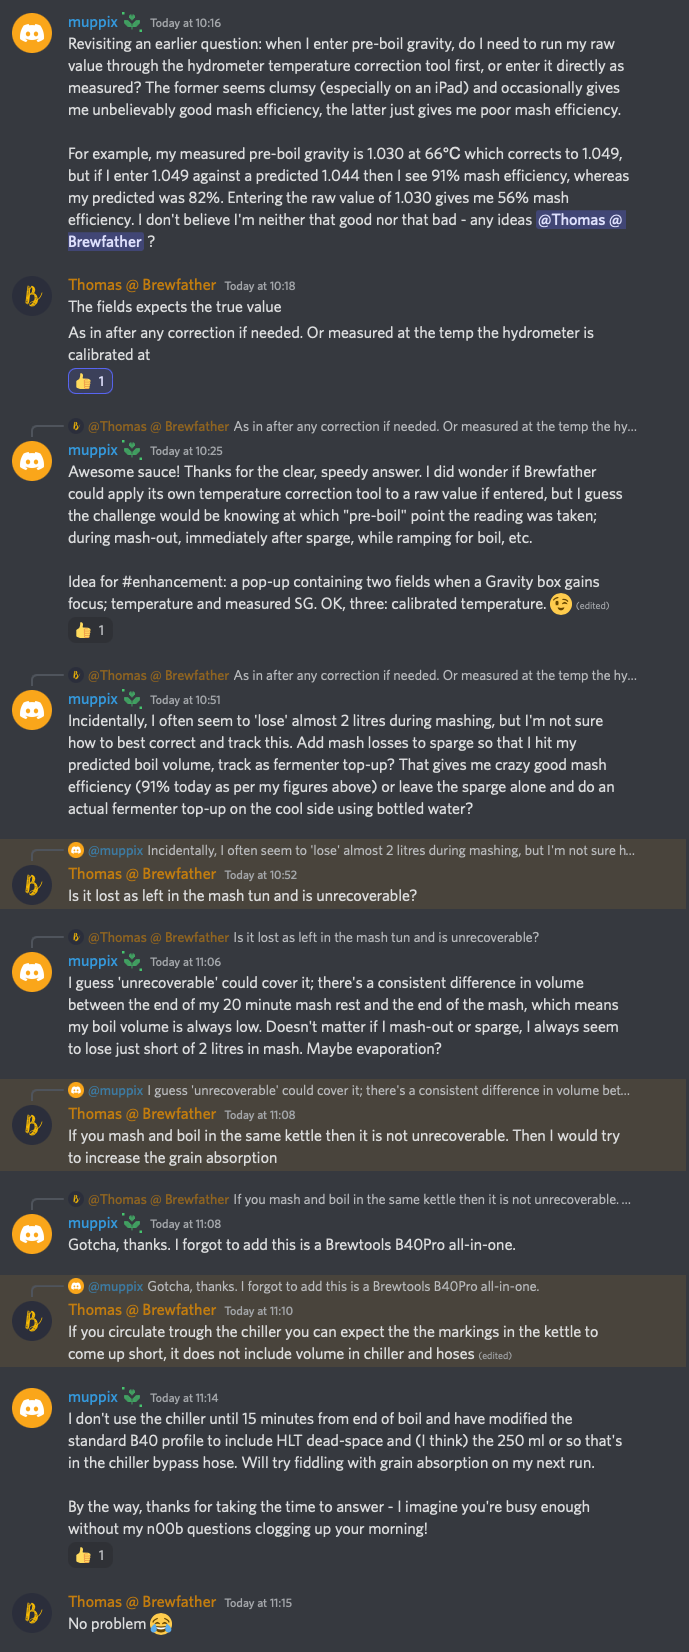
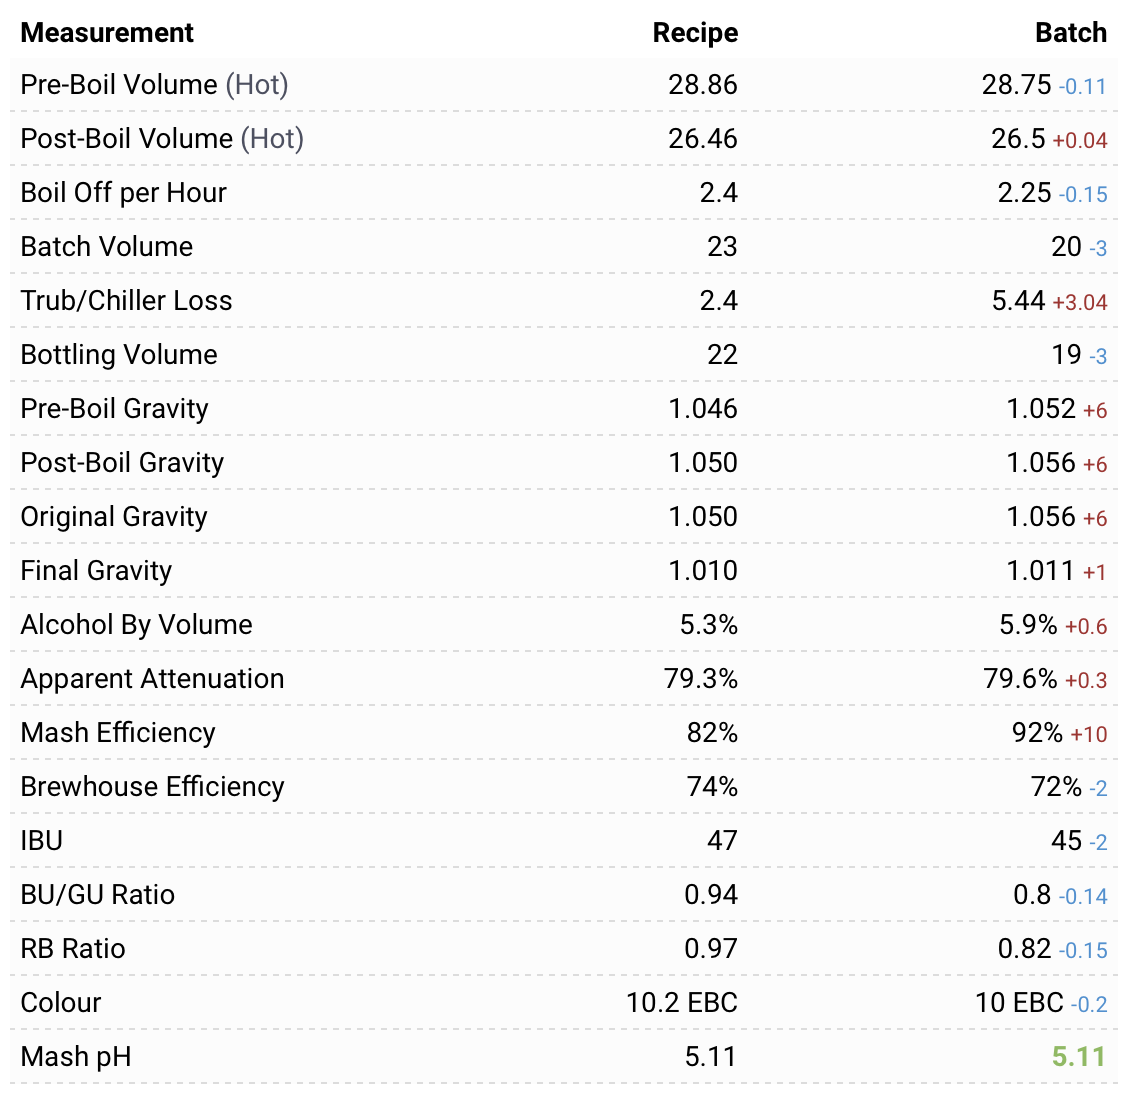
My brewhouse efficiency had been suspiciously good these last few brews, and I was beginning to think I’ve got this licked, but today a thought occurred to me: maybe I should be logging pre- and post-boil gravity values raw, and not correct them for temperature.
Take today’s pre-boil gravity for example. I read 1.046 at 62.8℃, which corrects to 1.063. Slide over to Brewfather and the pre-filled pre-boil gravity field shows a predicted value of 1.048. My corrected value is an enormous 15 points over that, which is an unrealistic level of efficiency. Same story for the post-boil, where I read 1.058 at 51.9℃ – corrected as 1.070 – against a predicted 1.052. Here’s how those two scenarios compare:

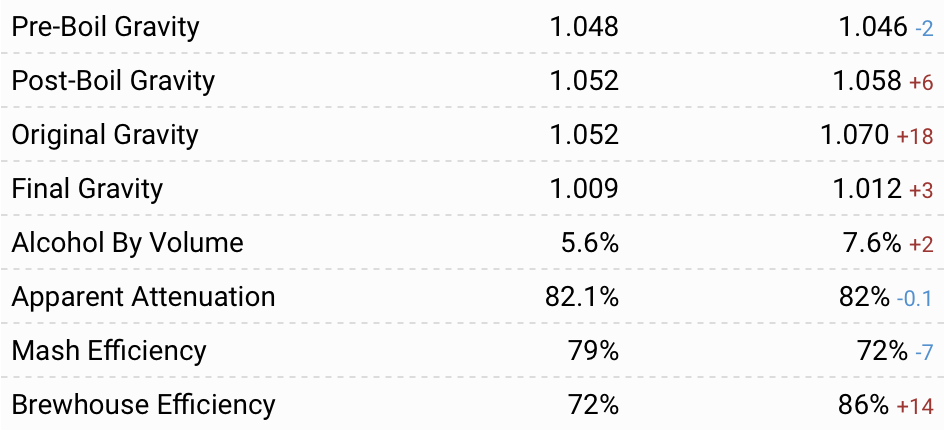
I think it’s safe to say that I’m not going to get 98% mash efficiency when a community sourced equipment profile for the Brewtools B40Pro expects 79%, so I’ll have to grudgingly admit that I’ve probably been entering pre- and post-boil gravity incorrectly up until today. I do have the raw values (cheers to decent brew notes!) but I don’t think I’ll bother going back in order to correct the stats for beer that’s already been drunk. Let’s treat this is a learning opportunity instead.
#wisdom: enter ‘hot’ figures for pre- and post-boil gravity in Brewfather. Pre-boil will be straight after sparge (or mash, if there is no sparge) and post-boil will be before chilling.
Update 15 Sept 22: Brewfather expects temperature-corrected hydrometer readings, not raw values.
A fairly good brew day with no mishaps and me almost hitting all of my numbers, just a bit low on fermenter volume at just 20 litres which I’m putting down to inaccuracies between the kettle’s scale and that of the Fermzilla, and also some elevated trub losses since I started using the Trubinator for hoppy brews.
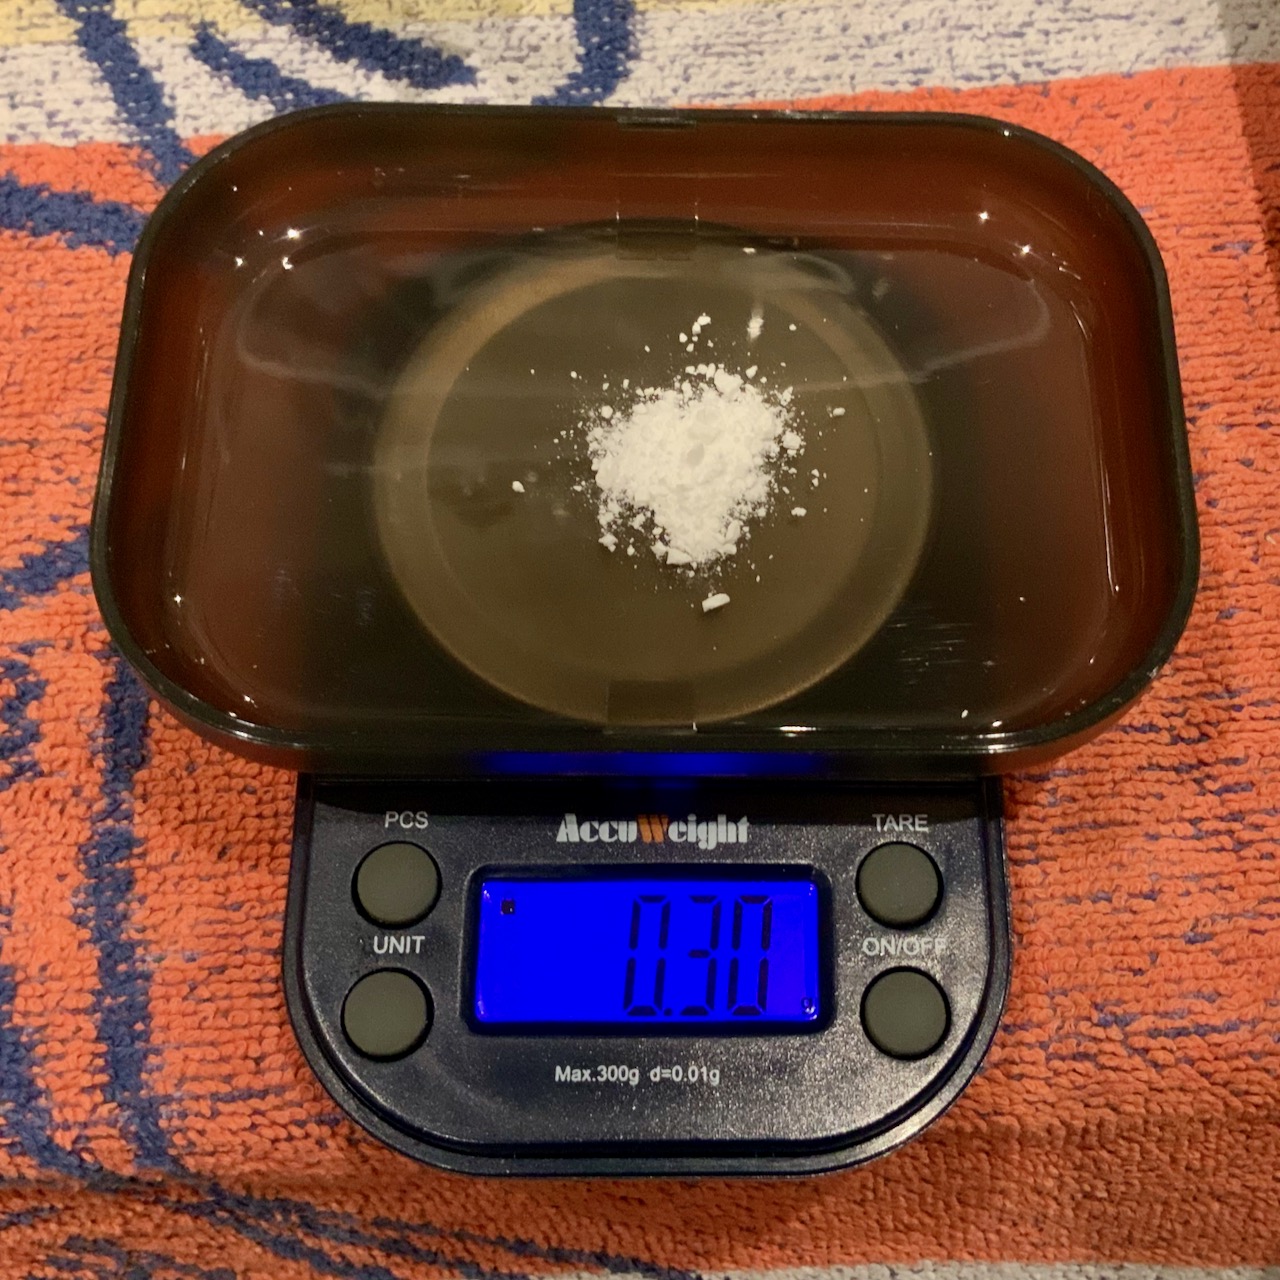
Continue readingHaving gone in quite heavy on the hops for this recipe I want to make sure the flavour lasts as long as possible, and that means minimising cold-side oxidation. In addition to purging the keg before filling I’m going to have a go at adding Sodium Metabisulfite (SMB) to the keg since some people think it’s good at scrubbing oxygen. Surely worth a go? If I’m happy with the hop retention as I drain the keg over the coming weeks I may well carry out my own A/B test on a future brew. Today however I simply added 0.3g of SMB (crushed Campden tablet) to the purged keg before refitting the lid and purging it again, like the first time by slowly blowing 70/30 into the out-post with the PRV pulled for a couple of minutes.
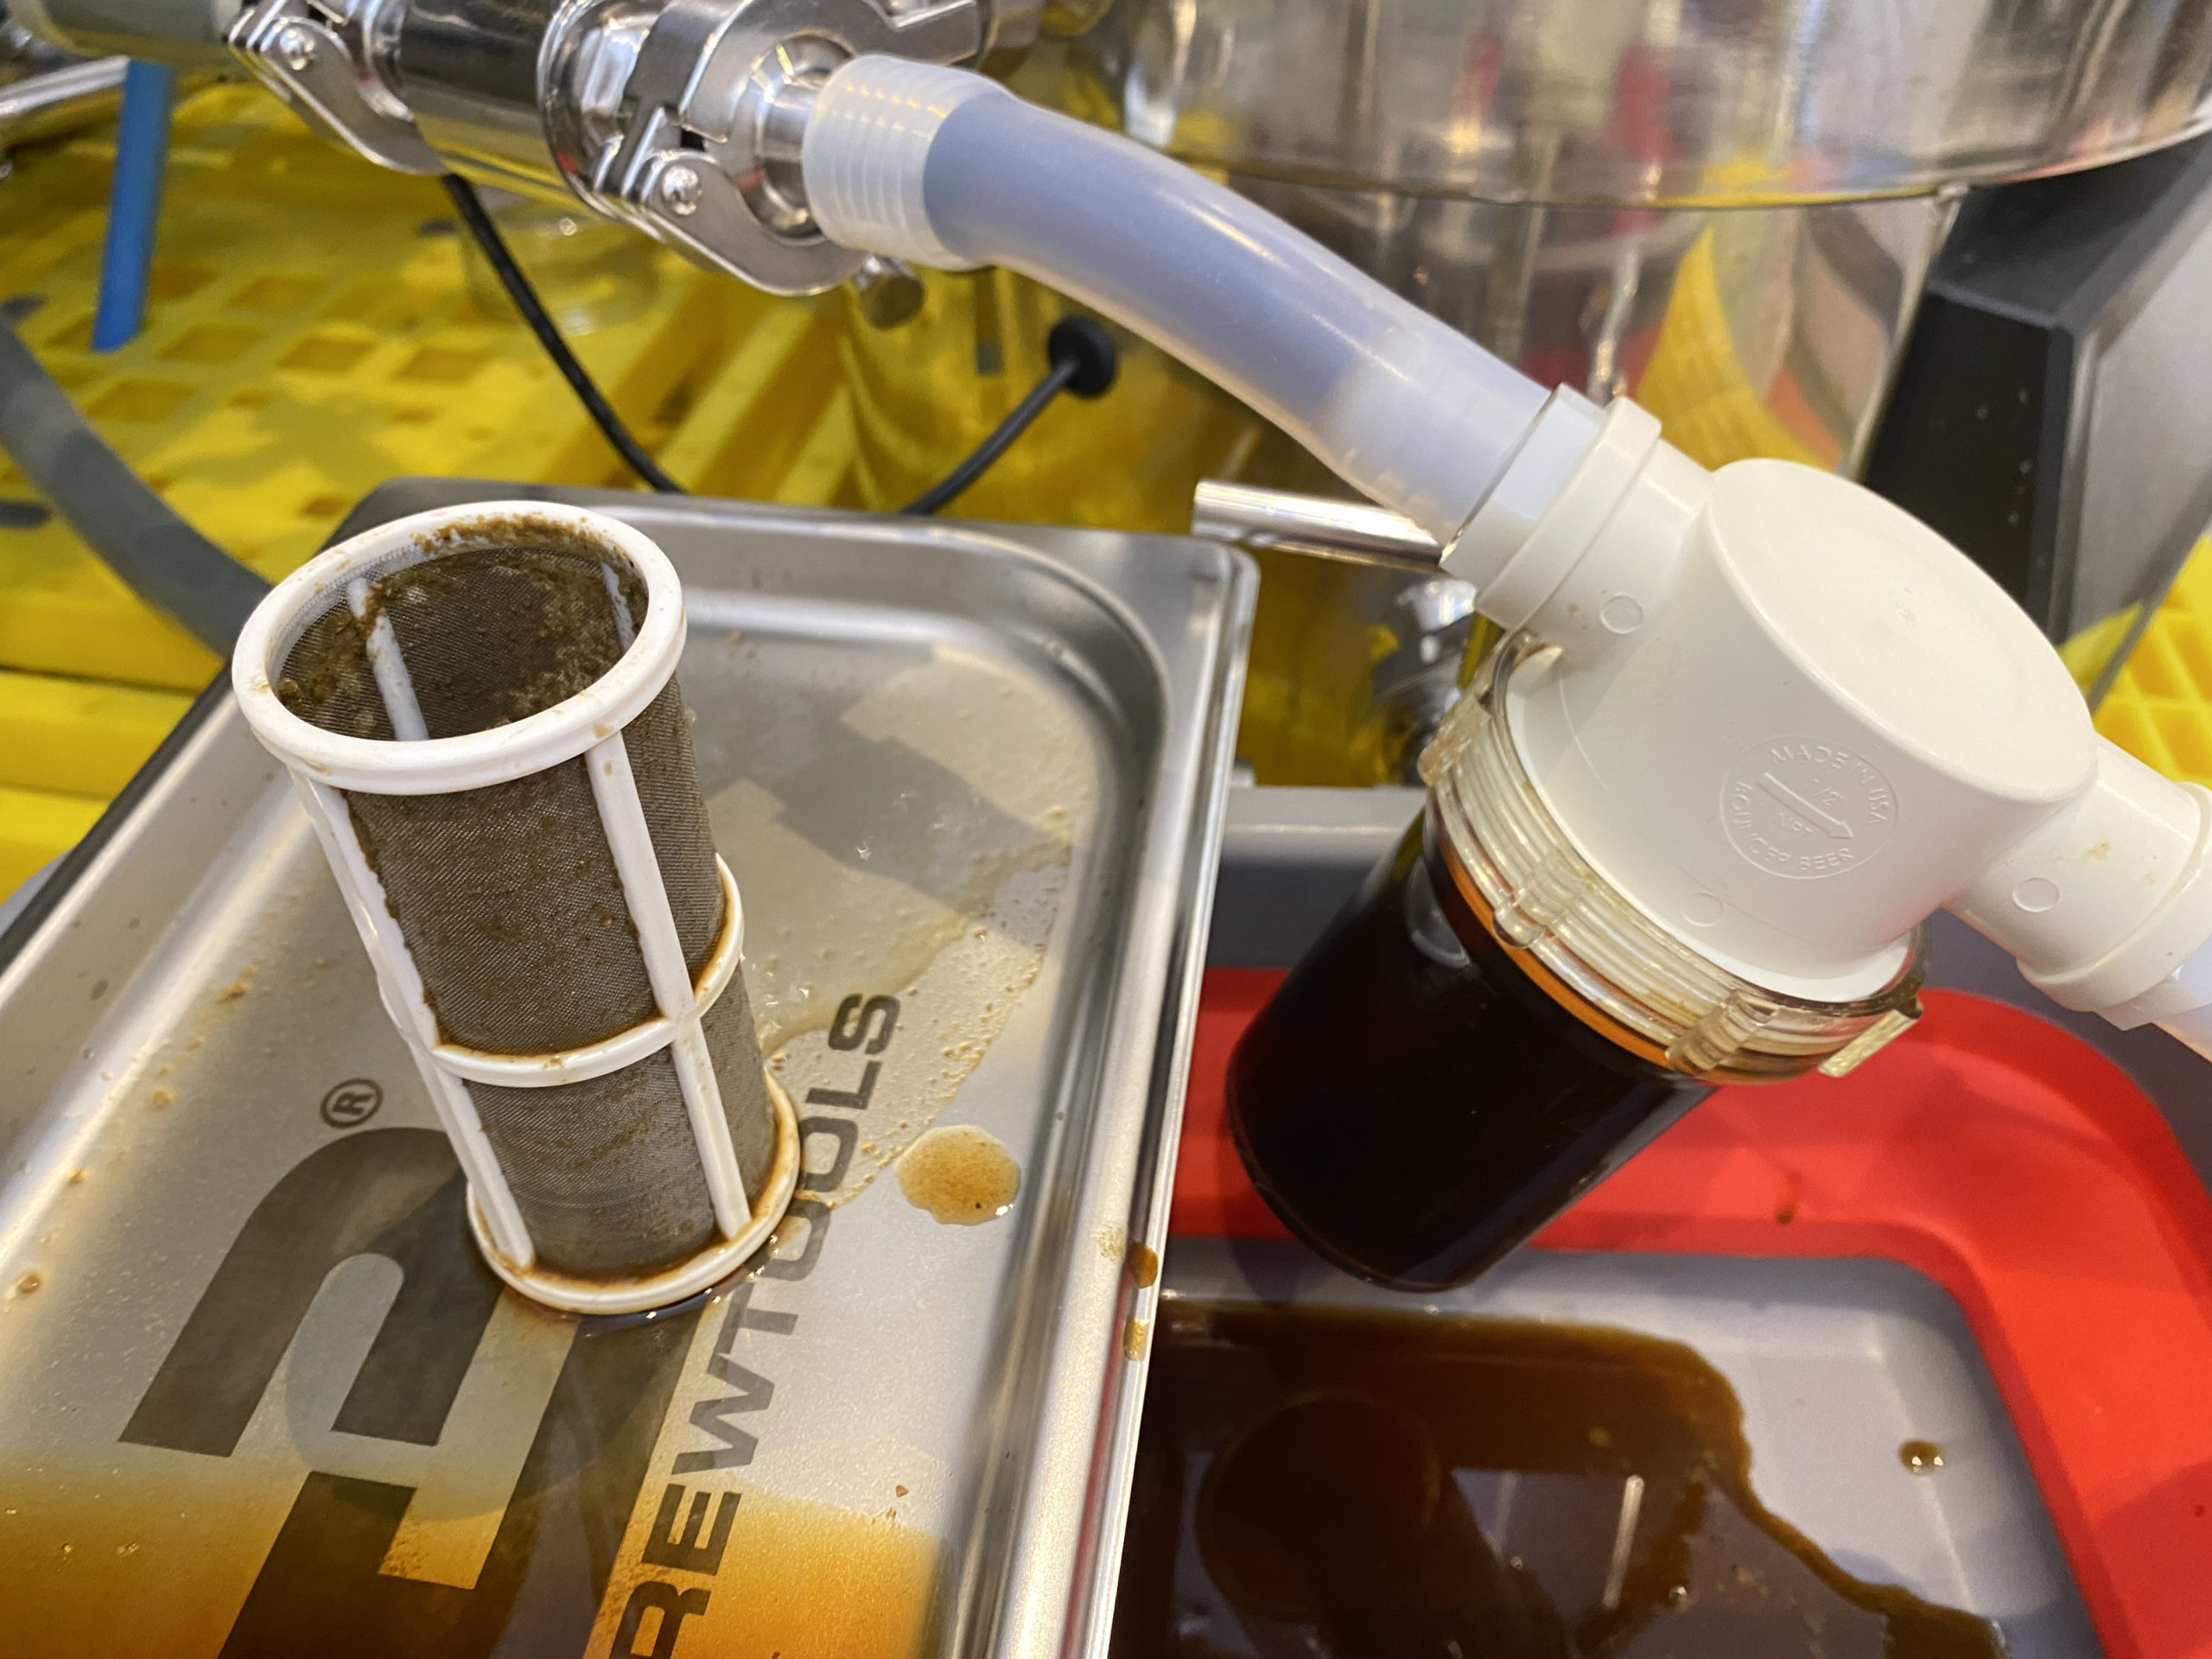
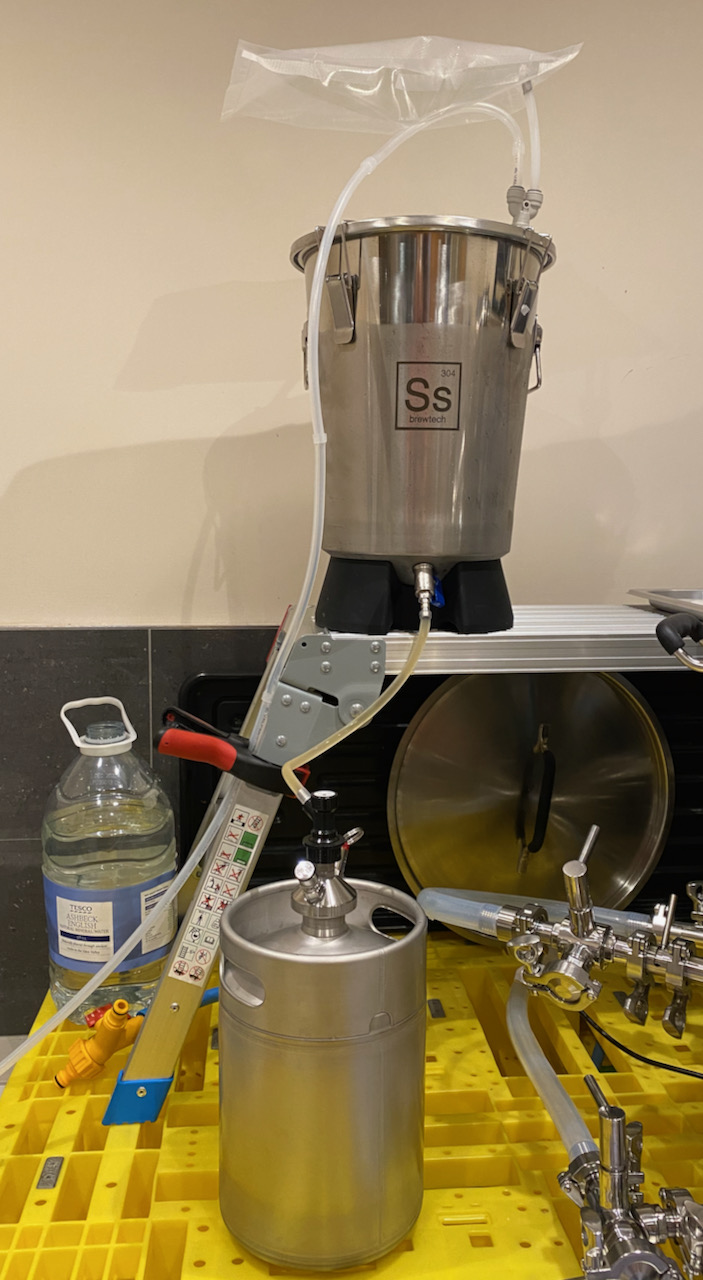
Anyway, the beer was transferred from my Fermzilla to a 19 litre Cornelius keg using the floating dip tube coupled with my finest inline filter, because it’s a double dry hopped brew and there may still be some crud transferred as we get near the end, despite the cold crashing. The filter’s barbed connections coped happily with 12 PSI of pressure on transfer, but I did have to screw the bowl on extra tight as there was some evidence of sanitiser leakage during purging / pressure testing ahead of deployment. I think this is due to the mesh cartridge being slightly too tall for the housing, or the gasket being slightly too thin – either way she wants a good hard twist to make sure everything’s sealed.
Once the 19 litre keg was filled I wanted to put what looked like almost 4 litres of surplus into a mini keg via the post on the collection jar, but although I was fairly careful the trub became disturbed using this method, and went from being settled below the take-off post to getting fairly well mixed with the rest of the brew, which by now had also picked up much of the settled hops from the sloped sides of the vessel. I was going to transfer the murky solution anyway, thinking that I can always crash it out in the keg, but for some reason the flow stopped and I got barely 2 litres. Guessing that this was due to the filter finally being clogged I just binned the rest when I really should have switched to a straight transfer tube, but during clean-up the filter actually looked pretty clear, making me wonder again if it’s worth bothering with if kegging crashed beer. Let’s make a note:
#wisdom: stop using inline filter by default if kegging cold-crashed brew, at least until a concrete reason for doing so arises.
#wisdom: if transferring FV dregs to a mini keg rather than dumping them, use a straight tube (without filter) and don’t worry about trub, which can be cold-crashed out later.
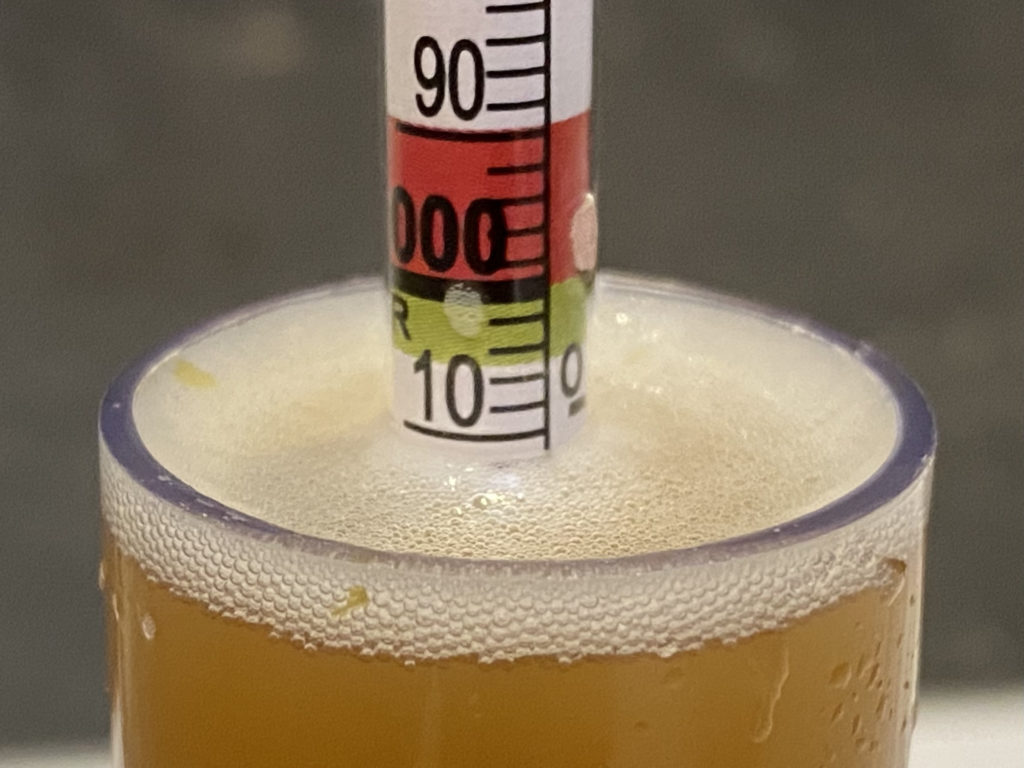
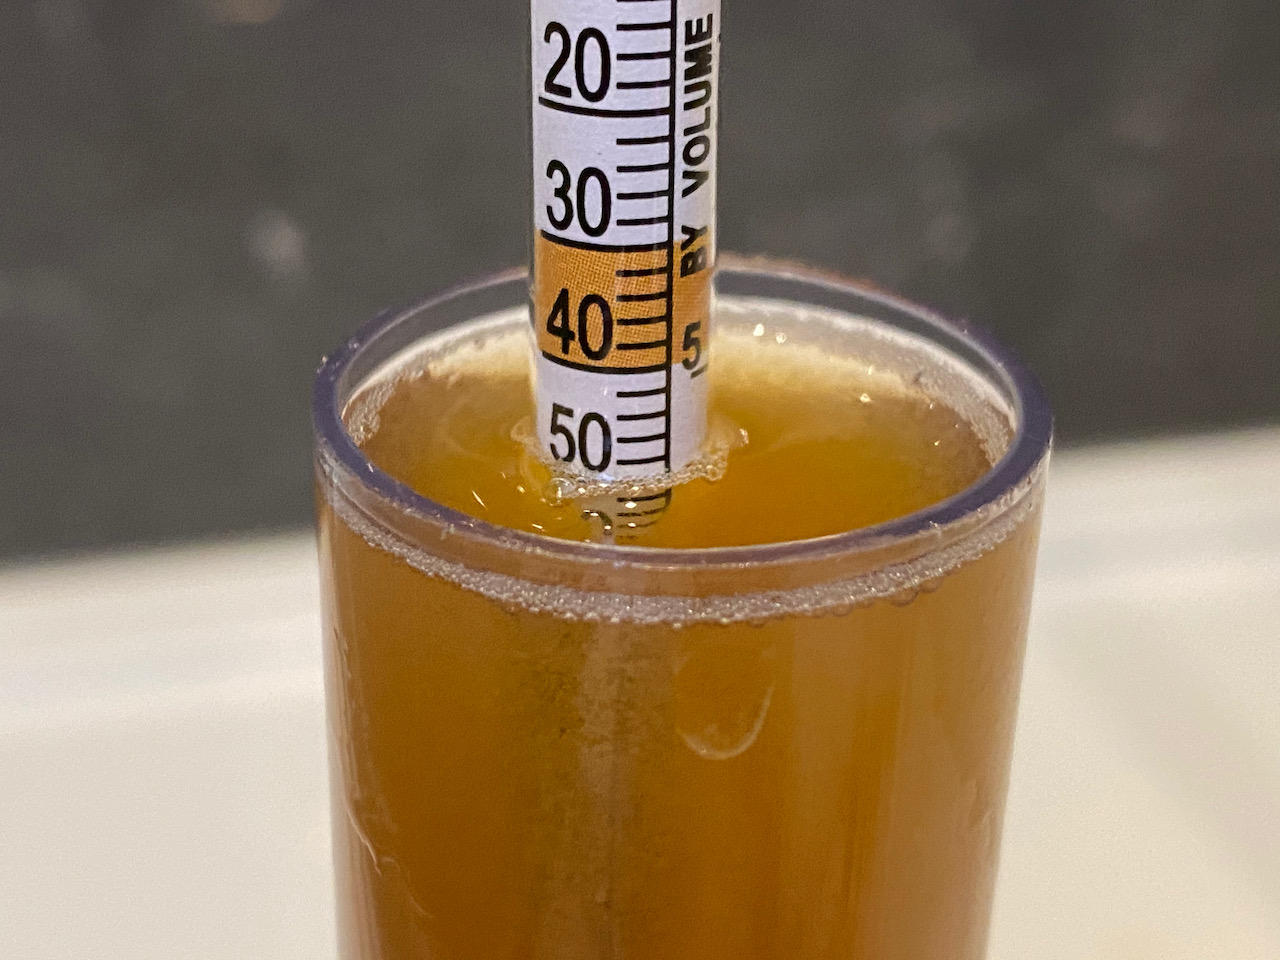
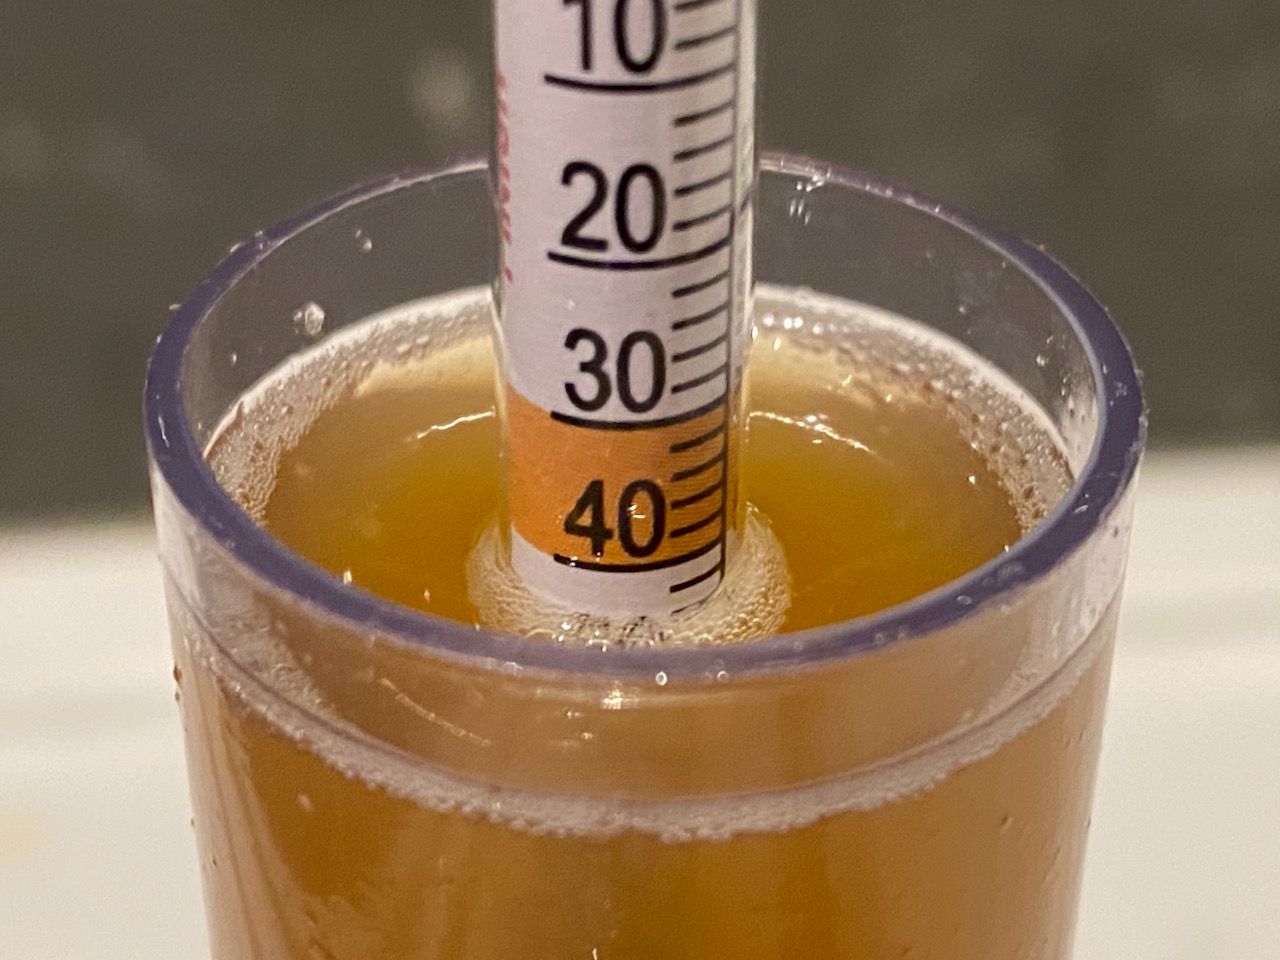
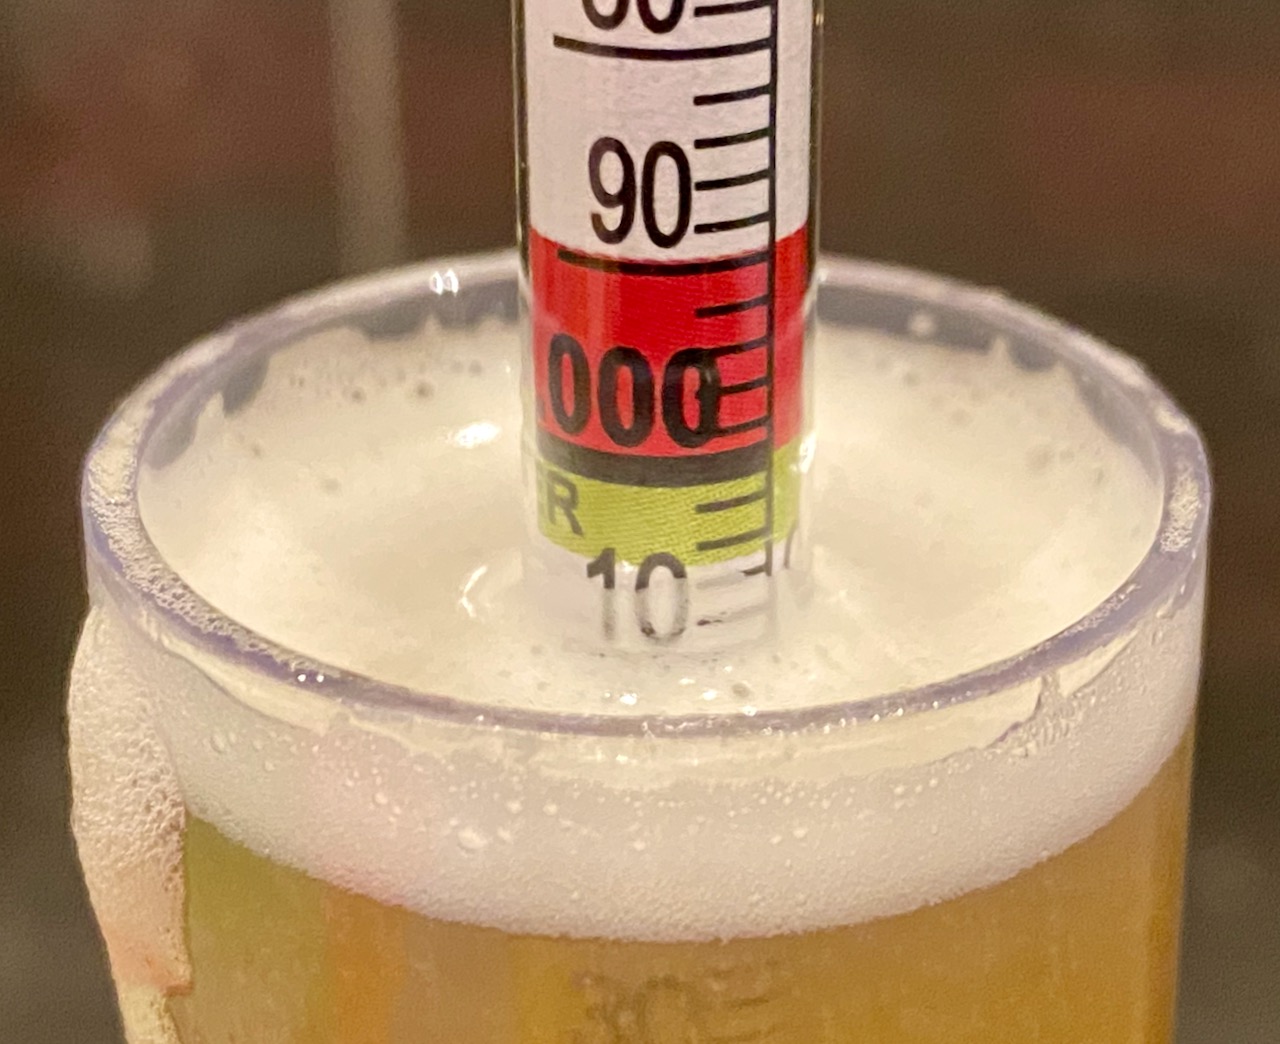
While filling the first 19 litre keg I let it run a tad too long using condensation on the side as my fill guide, and ended up with some liquid coming back out of the gas post near the end. In order to recreate some head space and also give me a sample to measure, I fitted a small tap to the liquid post and filled my trial jar, setting it aside while cleaning up in order for the foam to settle. Even so it was difficult to get a decent reading, because dropping in the hydrometer caused more bubbles to rise in the carbonated brew. Maybe I should have chilled and wetted the hydrometer first? Anyway, I measured a FG of 1.008 (very approximately) at 16.9 ℃ which makes for 1.007, and 5.6% ABV. Happy with that, and extremely happy with the hoppy taste from the trial jar. Let’s hope the SMB does it’s job and we get to enjoy this one for weeks to come!
Not much to add today other than the brew notes. This one went pretty darn close to the numbers in terms of gravity and also volumes, so I’m happy to have breached the 80% marks for mash and brewhouse efficiency.
There was only one hiccup: when I filled the Fermzilla with sanitiser while boiling wort, I thought I may as well apply some pressure in order to see if everything’s screwed together properly. Pressure did start dropping, indicating a loss of almost 1 PSI every couple of minutes according to the spunding valve. To determine if the leak was from the top (not serious) or from the bottom (potentially messy) I added some more sanitiser so that the collection jar and cone were fully covered, then reapplied pressure with the FV standing over a plastic bowl.
At 20 PSI I got half an egg-cup in around 10 minutes, and it turned out to be due to a partially deformed o-ring between the cone and the Butterly valve, with some irregularity in the roundness of that part also. That bit worried me as I swapped out the o-ring for my only spare but subsequent pressure testing validated the fix. Thinking back on it, I do recall that there was a suspicious dribble of sanitiser on previous tests under pressure, and I thought it could be from the butterfly valve itself, which I’d disassembled and checked without change. Could be that the o-ring was on its way out for some time, and the last cleaning strip-down sealed its fate. Either way, a replacement part is on the way.
The only other thing worth noting is my dissatisfaction with starter number 2, which I supplemented by pitching my other sachet of CML Ale yeast on top of the starter. Hope that works out all right.
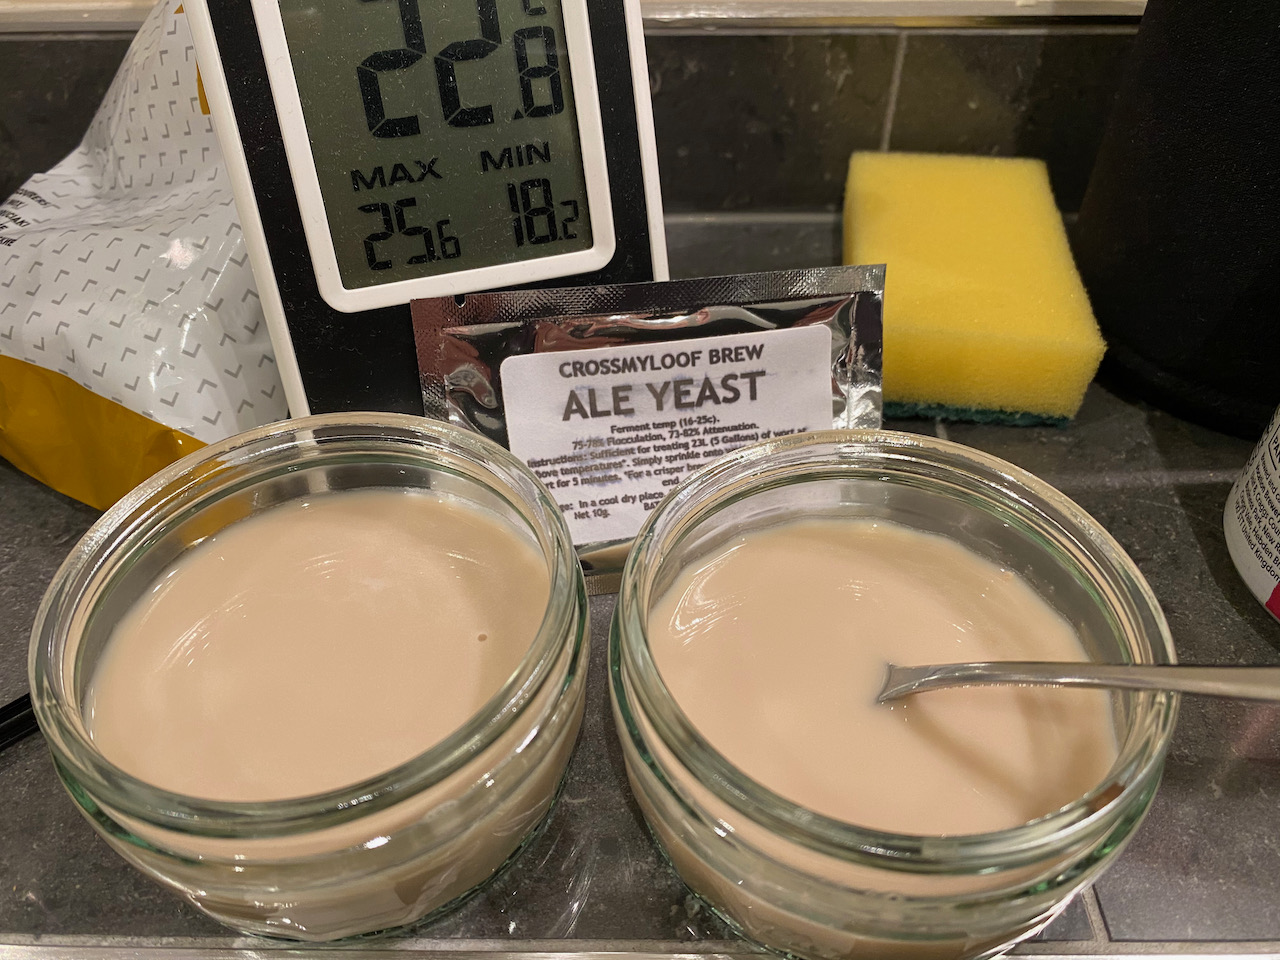
Continue readingI prepared the usual starter yesterday in preparation of tomorrow‘s brew day, but it didn‘t work out. Not sure what went wrong, the only thing I can think of is that the Crossmyloof Ale yeast (which I‘d previously only used dry) was either out of date (label says June 2022, so 7 months away) or that I did something very wrong.
Brewfather‘s recipe called for 800 ml water with 79g DME, which was duly boiled up (along with a nib of Lipohop and some yeast nutrient) and shoved onto the stir plate overnight. By next morning there was a small amount of foam despite the stirrer, which was a good sign, but when it came to switching off time by mid afternoon (just under 24 hours on the plate, 24 hours to go) there was no foam at all, and over the next couple of stationary hours it started to separate, just like a dead yeast thing. I‘m not using this.
Having evicted and bottled Allotment Riot from the fridge, I poured away the starter and am making another one, identical recipe. This time I‘m going to leave it on the stir plate for just a couple of hours until the yeast is dissolved and the wort aerated, then allow it to ferment at room temperature overnight and throughout the brew day. I think this may be the best approach since I‘ve heard that Crossmyloof can get going very quickly, so if I‘ve got another dud at pitching time tomorrow then I‘ll chuck in the 1.5 packets of US-05 I‘ve also got hanging around.
Fermentation appears to be well underway now, with a good head of foam atop the starter, though not yet what you’d call High Krausen. On agitating the starter I knocked the foam back considerably, and after the second stir it looks almost dead, with a darker layer of liquid starting to separate out on top. It has started to ferment again, but I’m going to say that CML (Crossmyloof) Ale yeast is sensitive to stirring / shaking, and only needs minimal time on the stir plate.
#wisdom: don’t over-stir or shake CML Ale yeast!
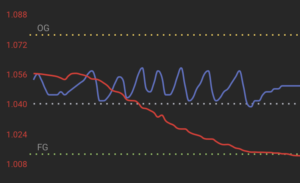
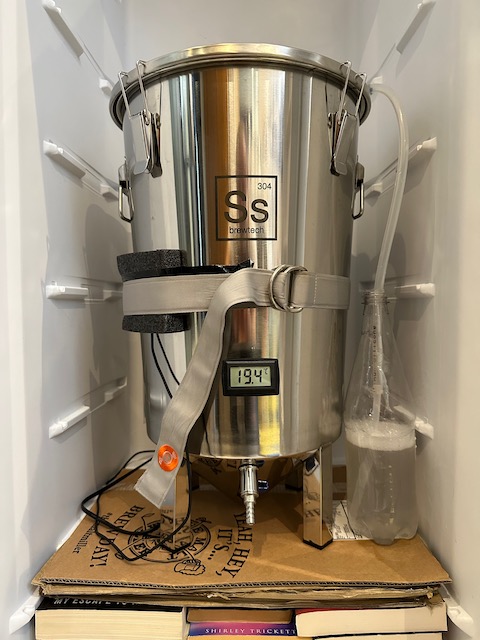
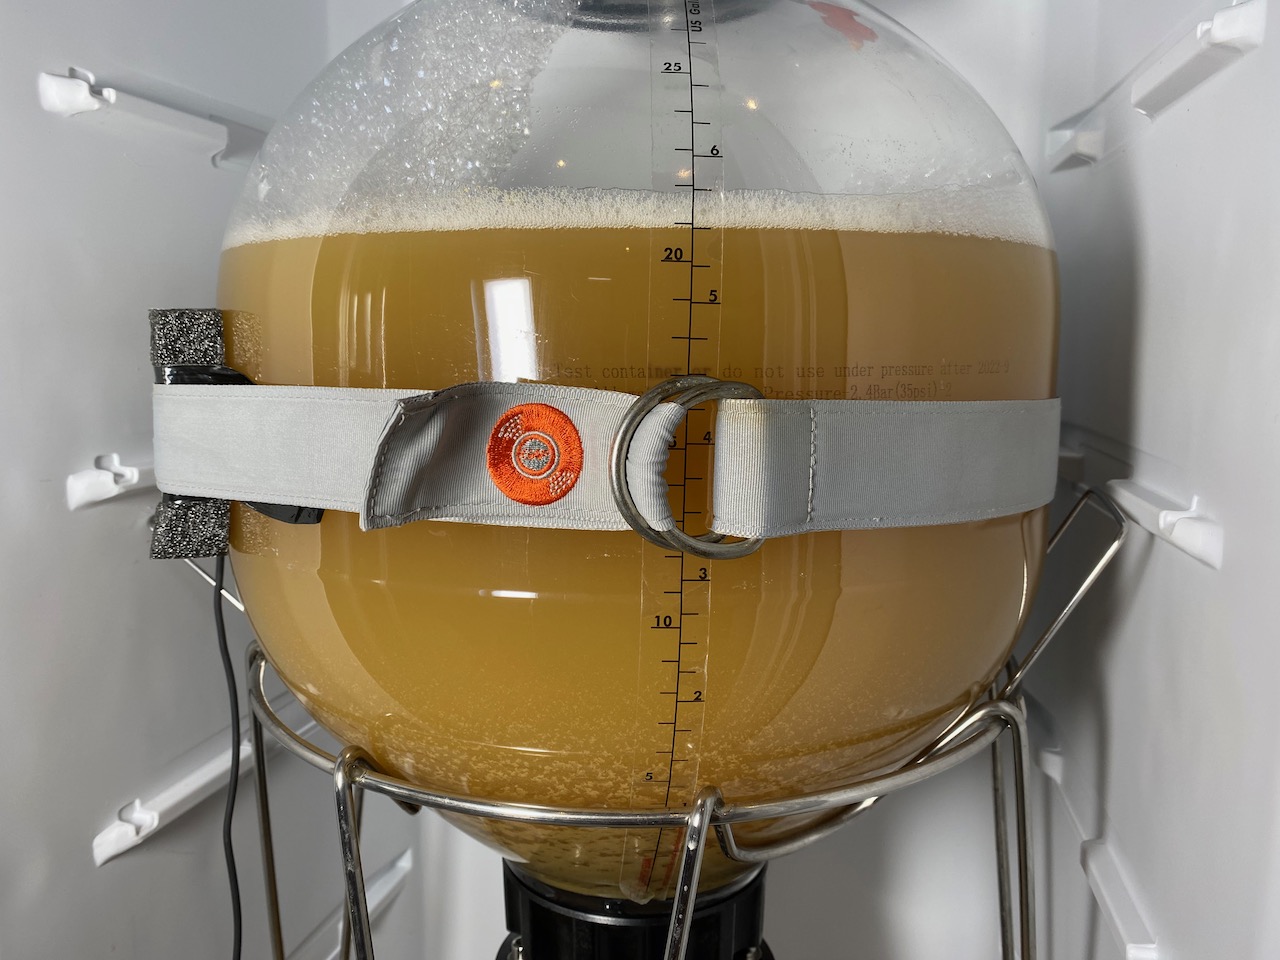
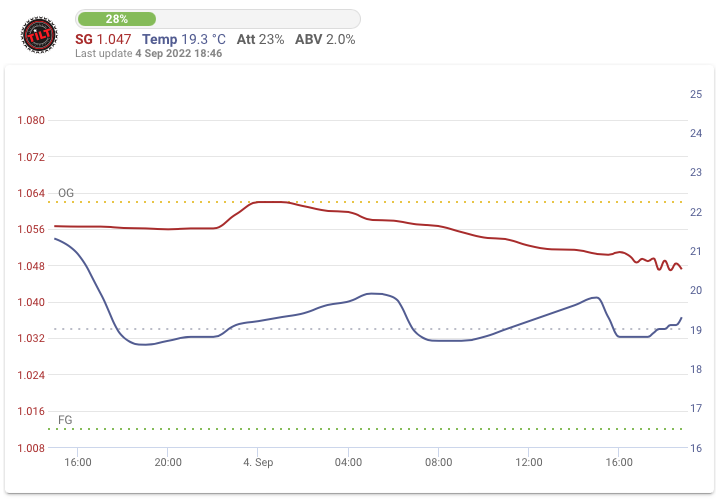
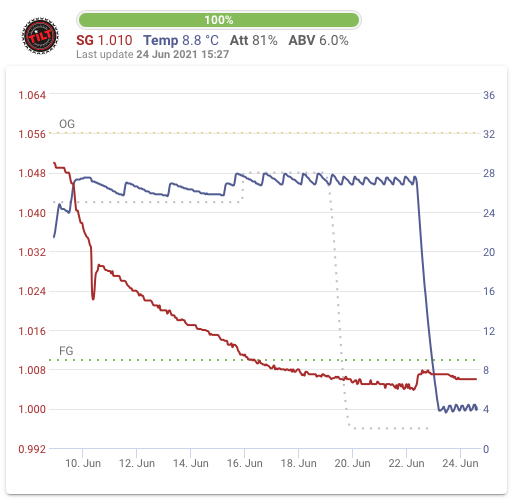
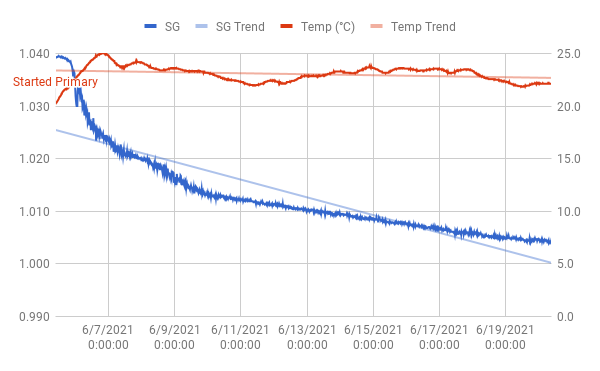
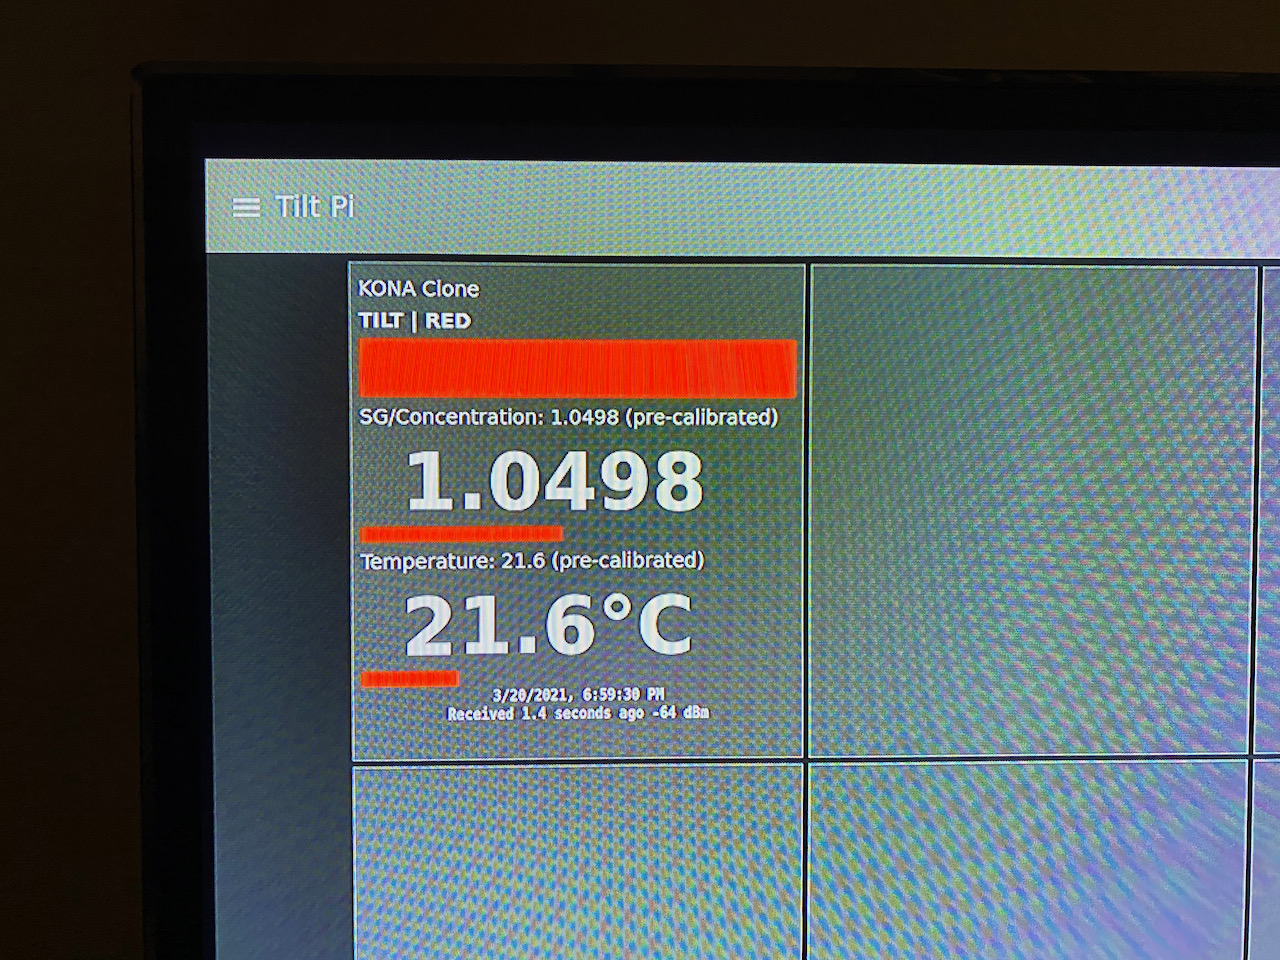
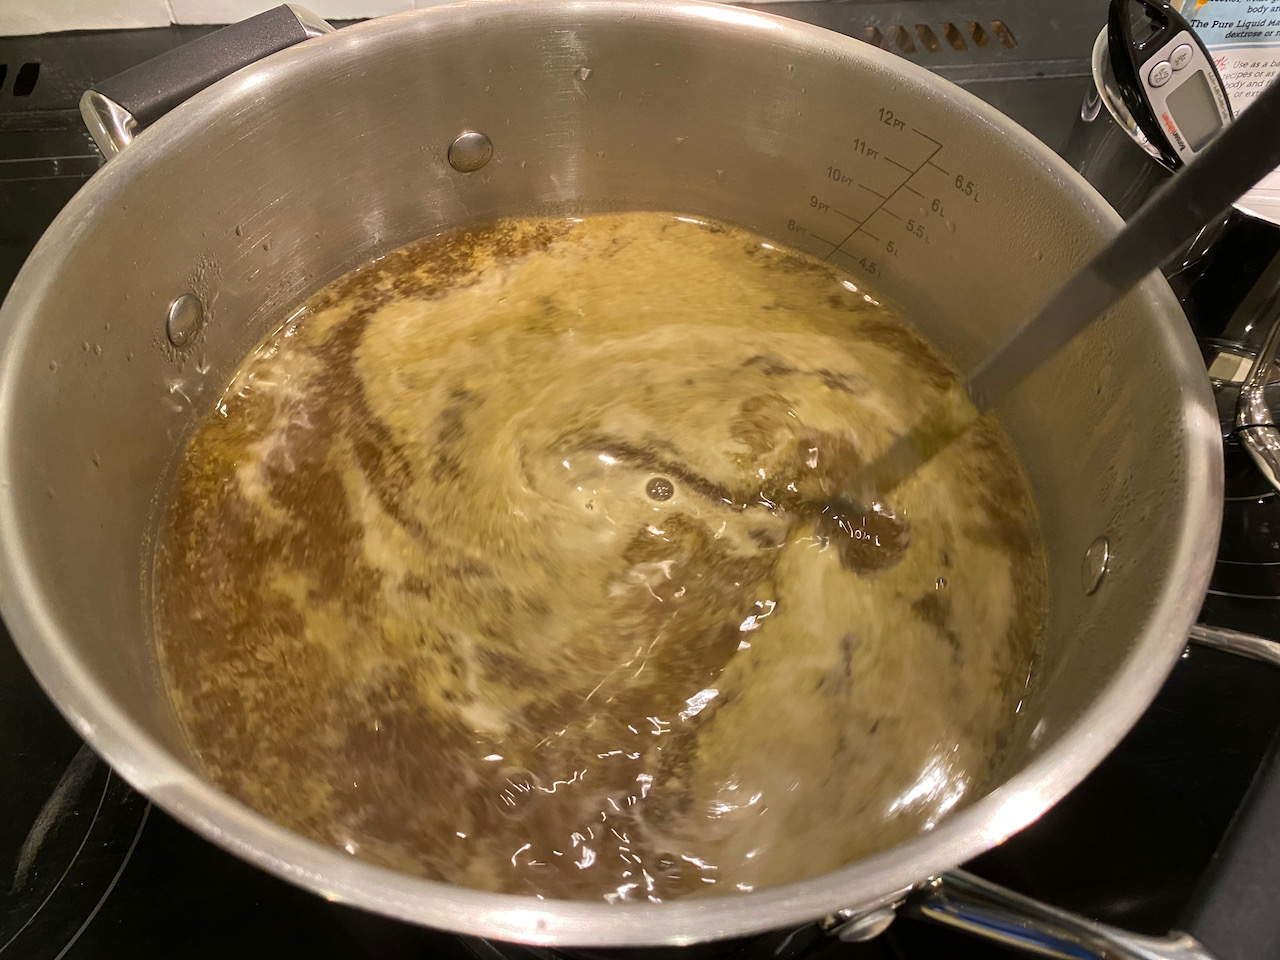
Fermentation has drastically slowed on Yeti. Brewfather’s graph shows a distinct flattening of the gravity curve just below expected FG, and the chiller’s cooling cycles have elongated and now stopped in response to a drop in yeast activity.
This isn’t unusual in and of itself, but I don’t think I’ve seen it just three and a half days after starting primary fermentation. The successful starter probably had a lot to do with it, so I’m going to flag this as #wisdom and will repeat the recipe (especially the timings) next time around. The only question now is whether I let it ride the full 2 weeks (and cold crash from 2-5 December while we’re away) or do I try to crash for a day and keg it early?
Not a bad brew day today, despite a persistent cold resulting in relentless sneezing and sniffling. But the starter was ready, so we have to press on. Briefly then …
Using my edited Brewtools equipment profile with the chiller empty at the start seems to be the way forward, with boil-off losses working out about right, but I need to remember to measure those levels before cutting the chiller in.
I’m still losing a litre or so during mashing that I can’t account for, but that’s not the main problem: I need to get more regimented at measuring levels at the right time, and at setting reminders to deploy equipment like chiller and Trubinator correctly.
Even so I don’t see how I can be 10 points off post-boil and I’m going to blame this on the ingredients, all of which except 5.0 kg of Pale had been sitting around for a couple of months, albeit sealed in plastic bags and stored as cool as can be. Wonder how much better I’d do with my own mill?
I need to sit down and run through the entire brew day in fine detail, maybe while the sparge water is heating, so that when it comes to implementing the plan I’ve not missed anything. Let’s do this by implementing a shortcode:
Continue readingWell, that was weird. I poured a glass of Runt from the keg in order to check up on carbonation progress, and it was totally flat yet impossibly sweet! Not believing my taste buds I offered it to Patience for a second opinion, and she not only praised it highly but declined to return the glass – a first if ever there was one.
When I poured myself a fresh glass it was much less sweet, and almost back to the expected levels of dryness, i.e. sour. Thinking about it for a moment, it became clear that when I added the sugar to the keg and then poured in the cider it must have not mixed properly with the sugar, which had sunk to the bottom and was the first thing that was dispensed via the dip tube. Interesting.
Having guessed that we were now back to square one in terms of sweetness I mixed 300g of Xylitol with some water, which I then poured into the keg before well and truly agitating it. 24 hours on and it tastes uniformly sweet after several glasses, and now there’s some headspace in the keg we’re also beginning to see first signs of carbonation.
#wisdom: 300g of sugar is about right for 10 litres of cider (so 600 – 650g for a Cornelius keg) but it needs to be dissolved in water and thoroughly mixed in, not just chucked into the keg before cider is filled.
Not the greatest of brew days. Everything was going well until it was time to start the transfer to my SS Brewtech Bucket, when the flow became a dribble after barely a cup of wort had gone across. I decided that the inline Bouncer filter was to blame, or rather my use of too fine a mesh, when I noticed that I’d fitted the filter the wrong way around – not that this should actually matter in terms of flow.
Regardless, I swapped out the mesh for a larger one and corrected the filter’s orientation, but there was still nothing coming out so I decided to remove the filter altogether and risk the odd bit of trub in my FV. When still nothing came out I switched the lower left-hand valve to recirculate, and still nothing. Looks like the pump was jammed. With no means of pumping my wort to the bucket via the chiller it was either a case of using the racking cane and muslin filter, or I could just remove the centre pipe and set the right-hand valve to ‘drain all’.
It had been a long day so I went for the latter option, knowing that I’d get a tremendous amount of trub as a result but at least there would be practically no wasted wort, even if I’d have to spend additional time chilling. In hindsight I should have swapped the bucket for the Fermzilla at this point, since I could have used the collection jar to remove some trub once it had settled, but that’s hindsight for you.
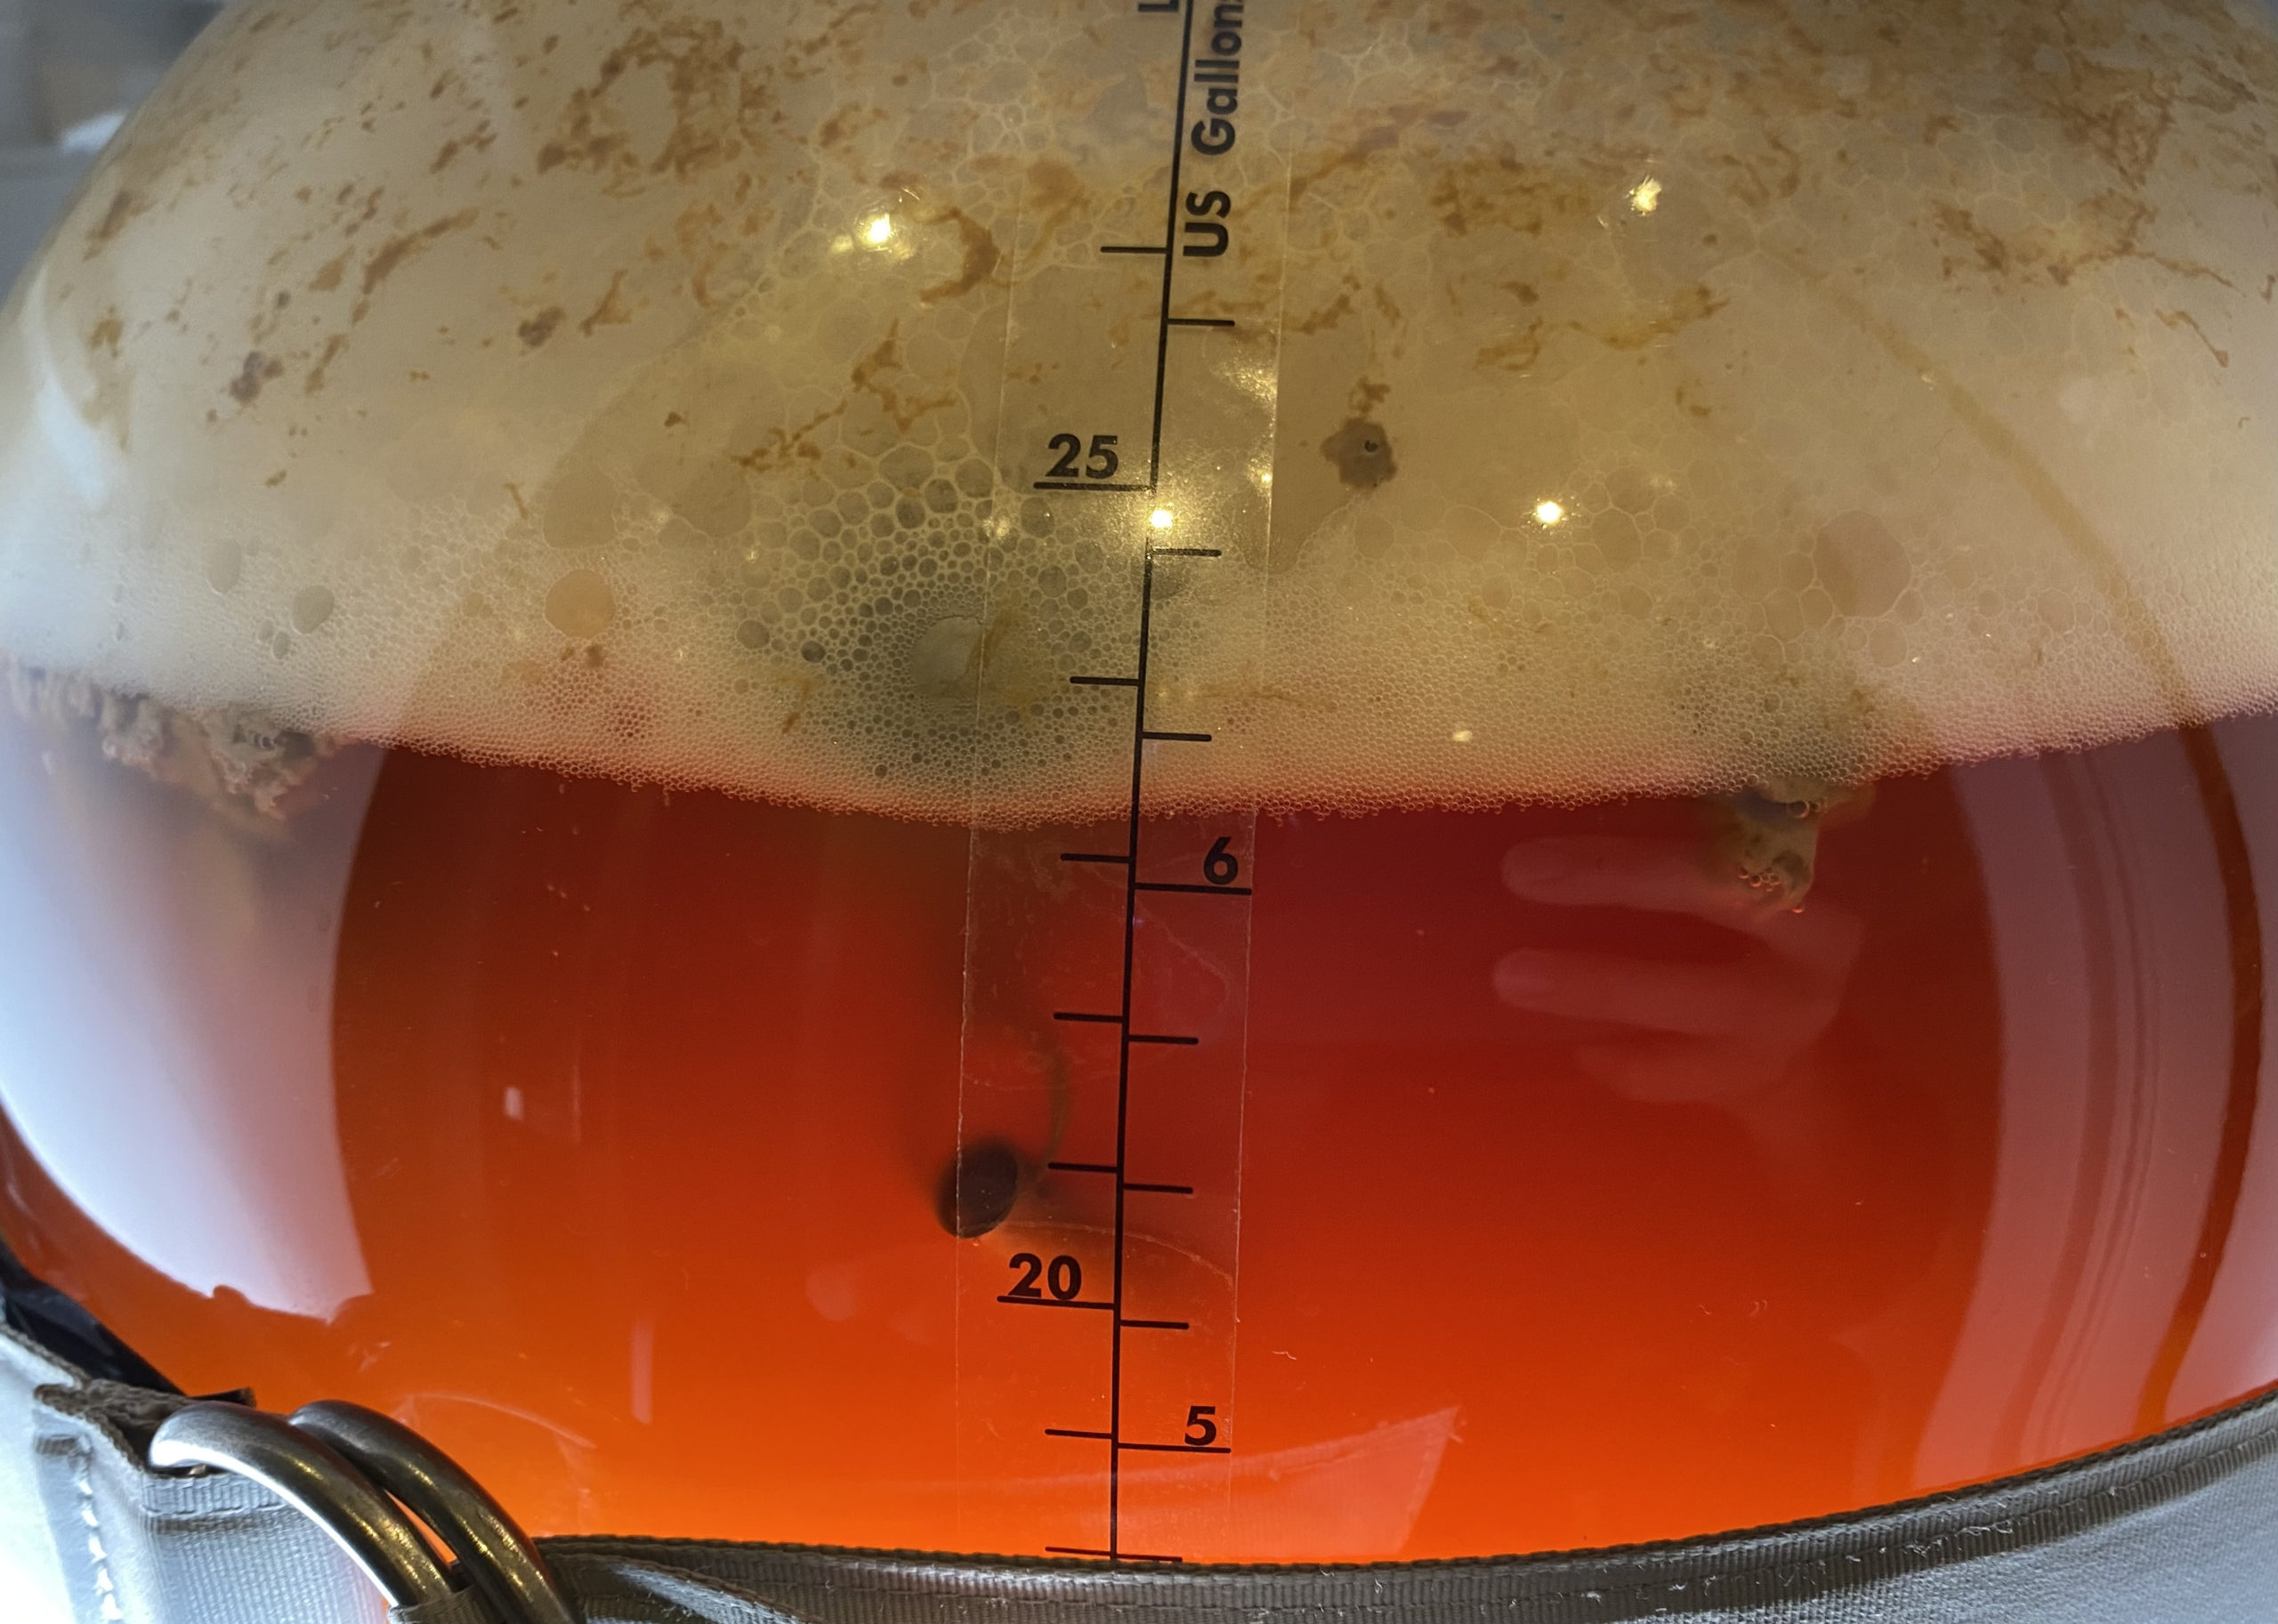
I transferred to FV and got about 21 litres against my planned 15, so I don’t mind if I need to leave 2 or 3 litres behind. Good job I can rotate the dip tube on this vessel. The bucket went into the ferment fridge dialled to 22℃, which was the temperature of my patiently waiting yeast starter. Took a couple of hours to get there, then I pitched my yeast and dialled in 19℃ for optimum fermentation. Strong stream of bubbles by next morning tells me the yeast at least is happy – let’s just hope there are no off flavours from all that trub.

08:20 – Started dough-in, water level at 25 litres with chiller and link pipe filled.
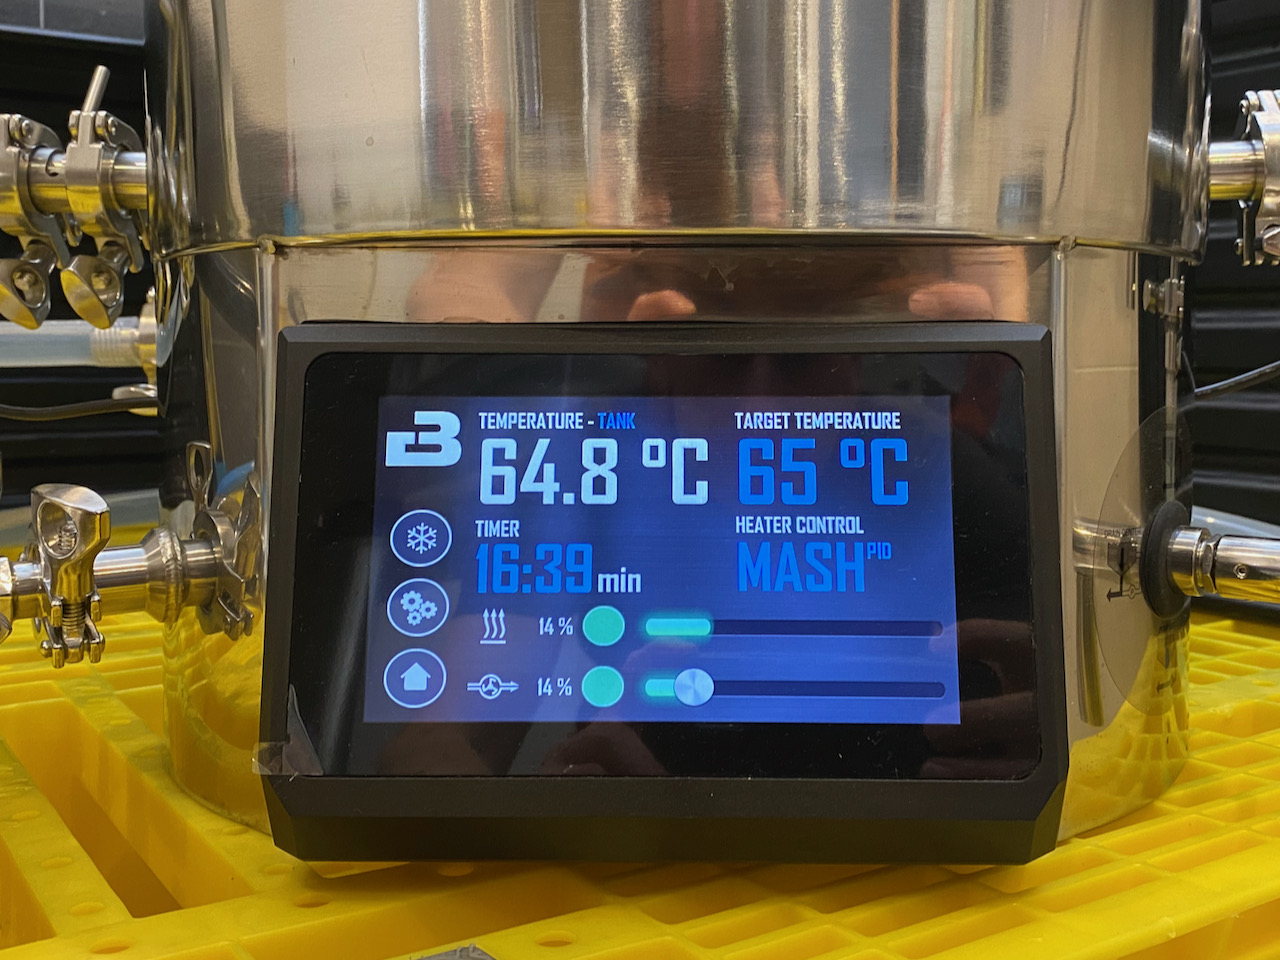
08:35 – Dough-in finished, heaters to 65℃ for mash rest. Needed quite a bit of tamping to get everything wet.
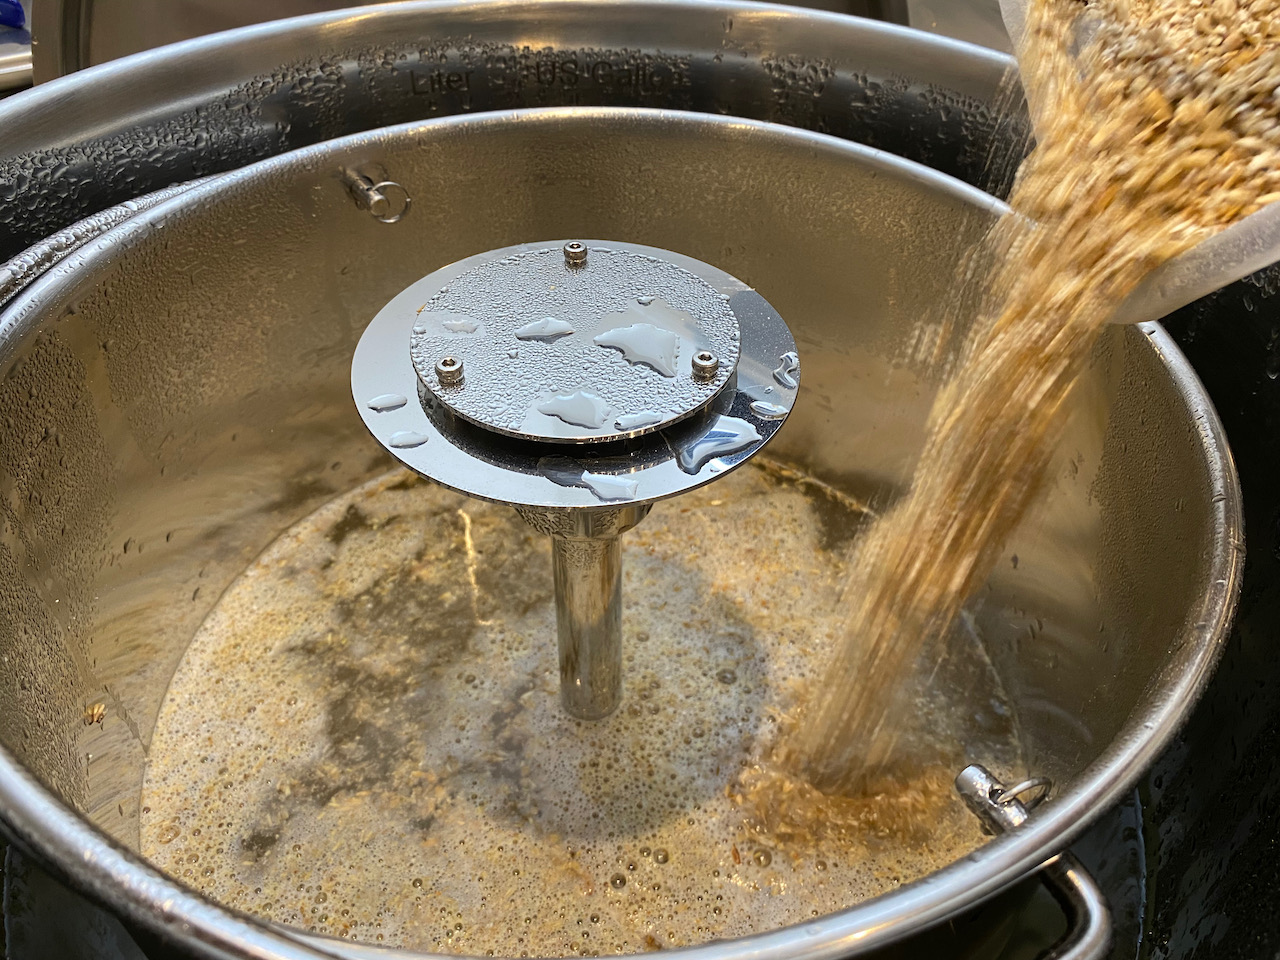
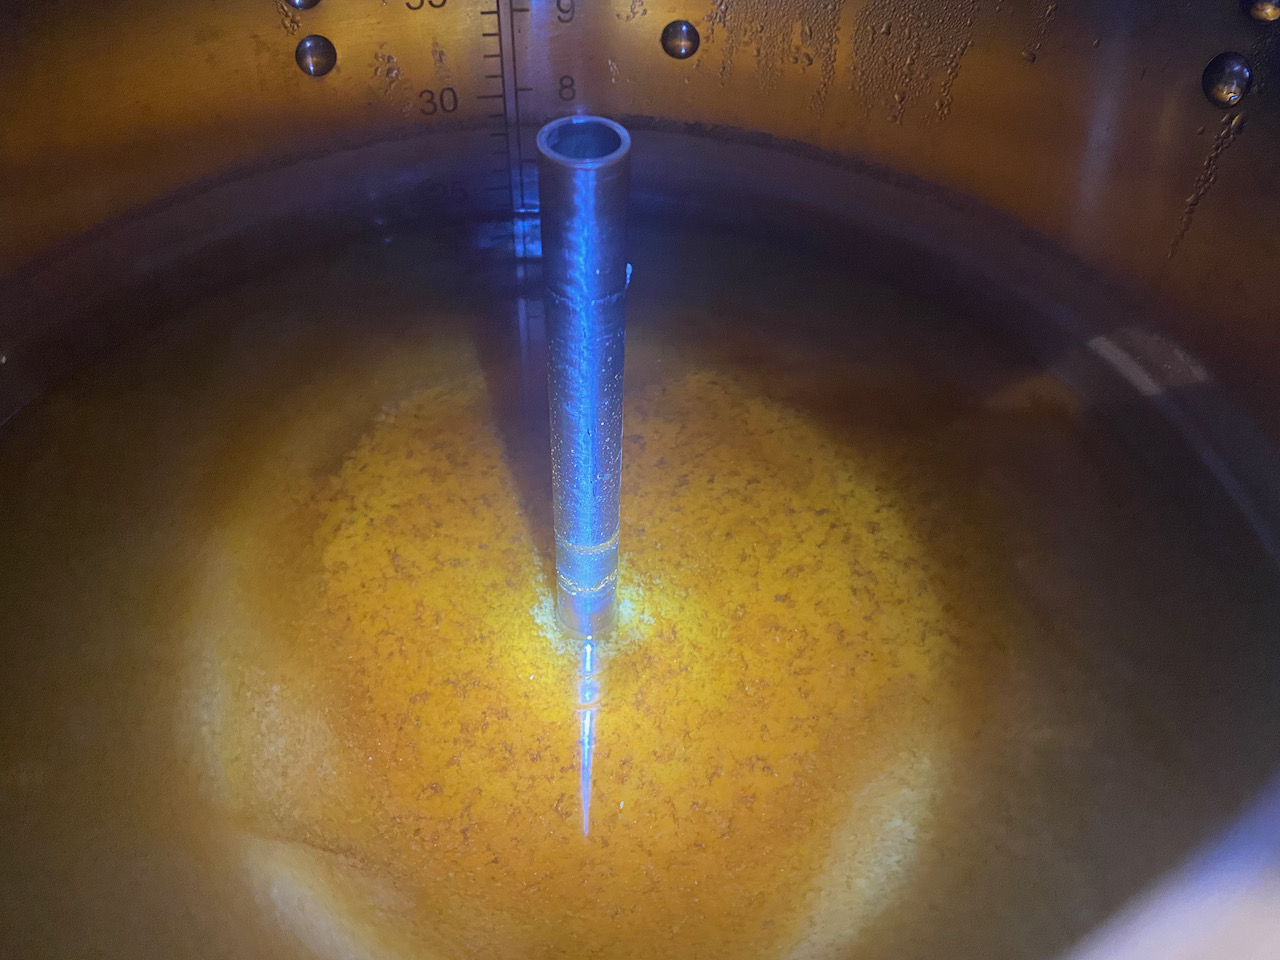
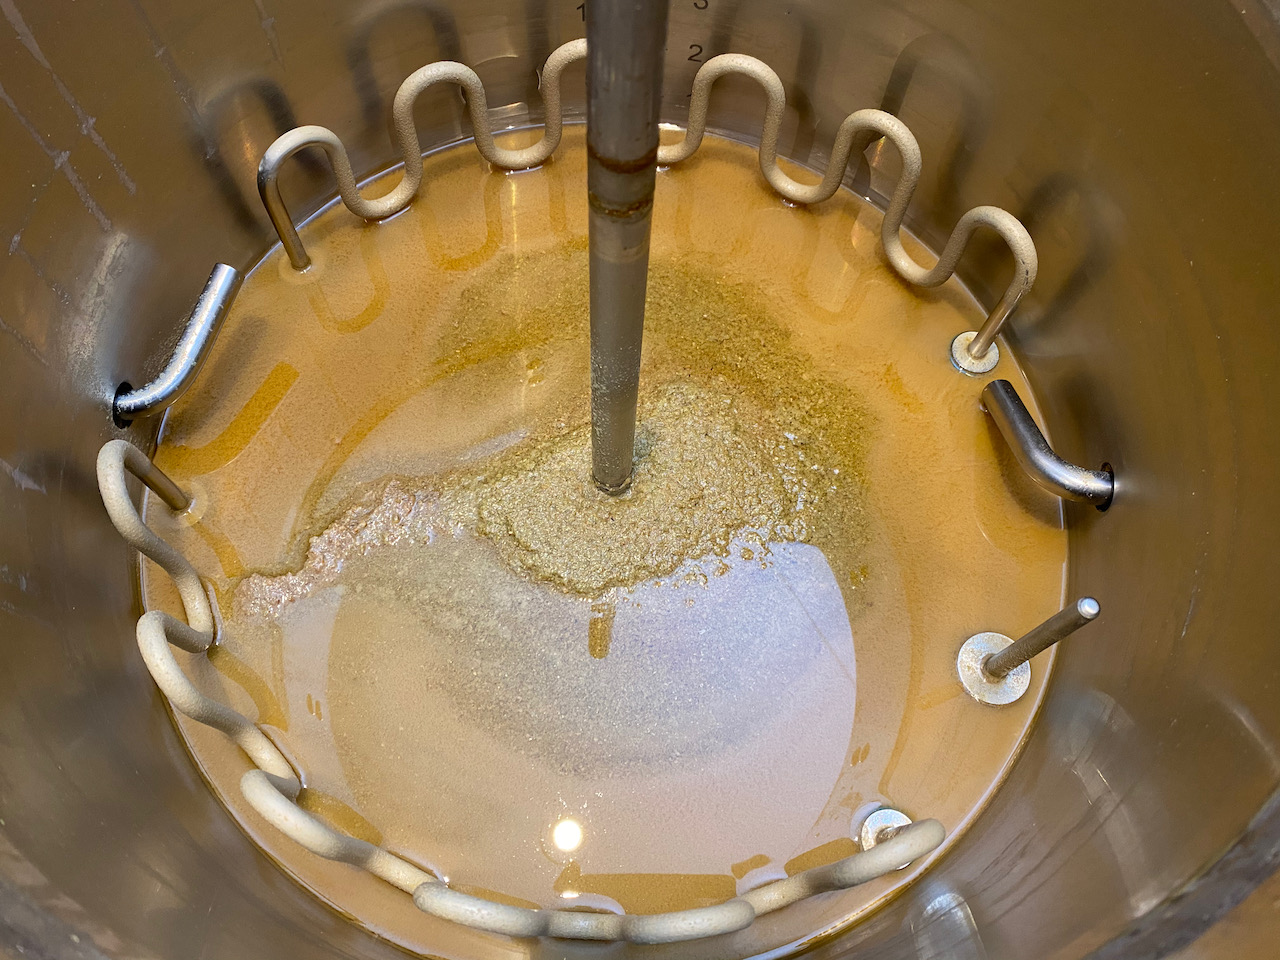
08:59 – Starting mash. Internal levels measured at 30 litres. Wort is light at first but quickly begins to darken.
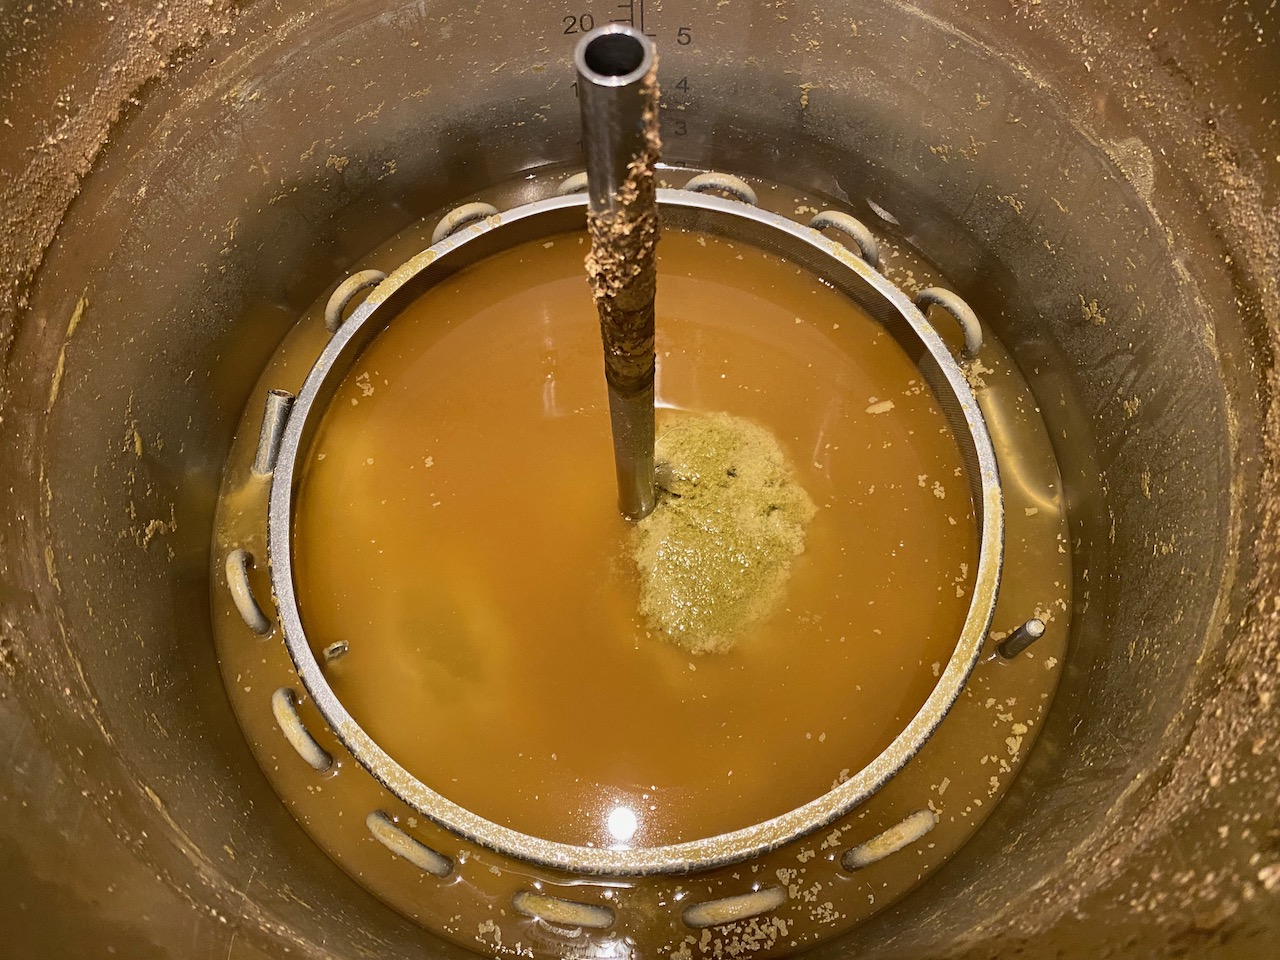
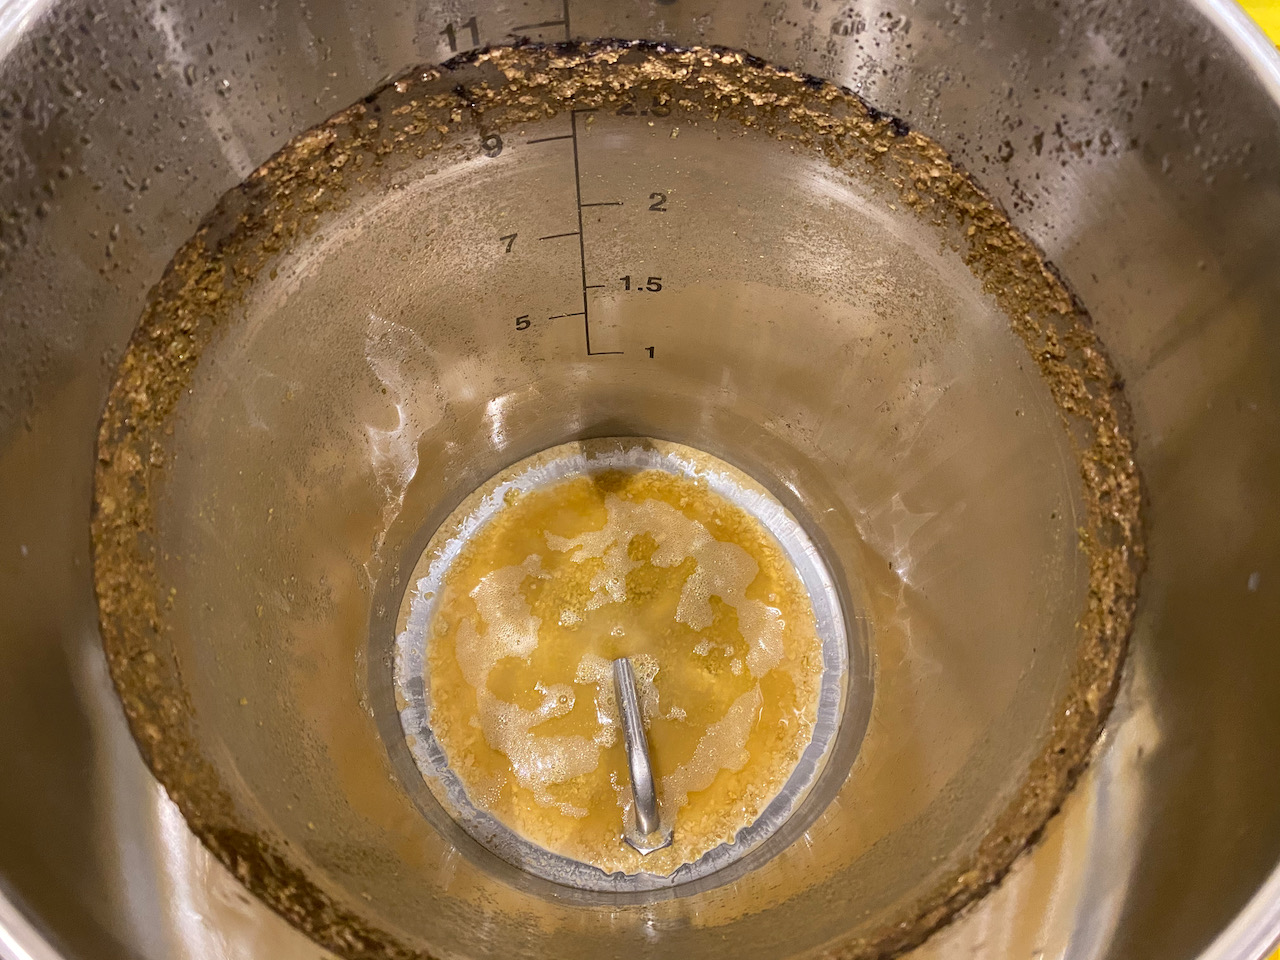
09:09 – First stir, check for dough balls. All good. Definitely seeing less material making its way through the new screen than before, but flow also appears restricted and stirring doesn’t drop the level in the malt pipe as much as with the old mesh. Sucking air pretty soon, need to cut back on the centre pipe flow.
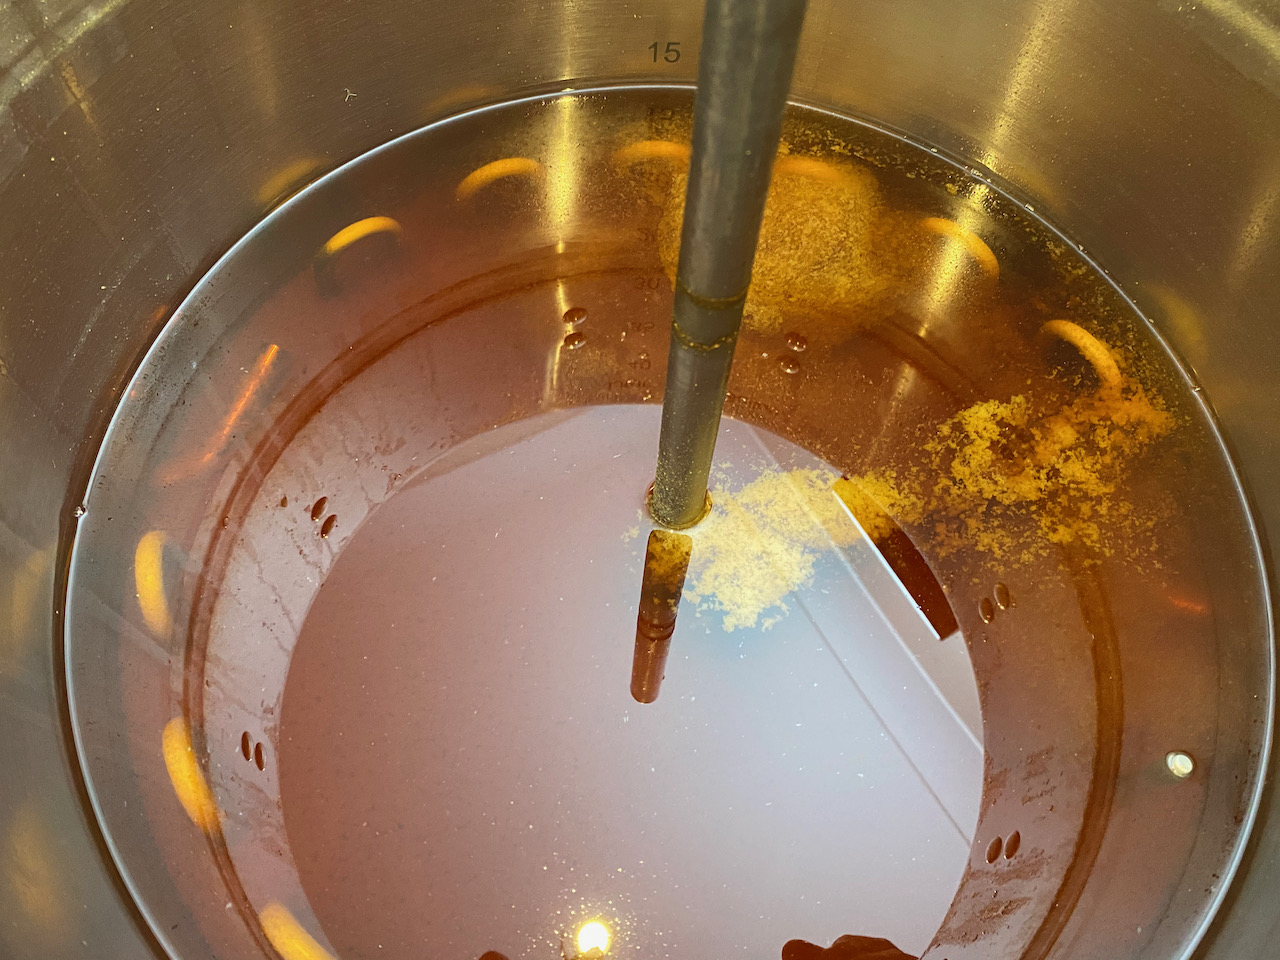
09:39 – Second stir, and this time I’m seeing the levels in the malt pipe drop nicely as the mash is agitated. Cut flow to centre pipe for a minute or two and we have balance, so I check the levels: 29.5 litres on the internal scale. On resuming flow I’m able to use the centre pipe more without the levels dropping, which should help to get better mash efficiency. 15 minutes to run.
09:59 – Mashing complete, heating to 75℃ for mash-out. One objective here is to make the viscosity of the mash thinner by raising the temperature so that sparging is easier, but we’re not sparging on this recipe. Still, it may allow the mash to drain better which will help minimise losses.
10:04 – Switching to manual heater control mode since mash mode can’t shift the temperature above 72℃. Need to be careful here to avoid 77℃ and with it off-flavours from tannins. Heaters at 65% for now.
10:06 – Starting mash-out at 75℃, heaters back to mash mode to see if they’ll hold it.
10:16 – Mashing complete. Quick check of levels and pre-boil gravity: 29.5 litres and 1.069 (1.049 @ 67.4℃) against Brewfather’s predicted 1.077. Seven points short isn’t great.
10:22 – Raising malt pipe for drain, heaters to 100% for boil. Boil volume is 19.75 litres against Brewfather’s 20.5 which means I’m short on volume and gravity. Balls.
10:49 – Boil tracker started, 60 minute additions in.
11:18 – 30 minute additions are in.
11:33 – 15 minute additions in, quick stir to release high tide hops, cut in chiller to sanitise. It’s already filled so won’t impact levels, which I’ll measure at the end.
11:50 – 5 minute additions are in. Plumbed in the transfer filter while circulating through chiller.
11:54 – End of boil, start chilling. Temperature 99.3℃ in tank. The yeast starter is at 22℃ so that’s roughly what I’m aiming for in my chiller return temperature before I start transfer.
12:10 – Return temperature is down to 25℃ so I’m starting transfer now. Quick check on the levels shows an optimistic post-boil volume of 17 litres / 36.6℃ (tank temp) against Brewfather’s 18.13. Probably about 1.5 litres short.
12:30 – Nightmare. Pump seems to have seized, possibly as a result of the transfer filter clogging, being in the wrong way round, then the larger grade replacement mesh clogged too. In the end I had to remove the filter, centre pipe and transfer using gravity, getting a load of crud into the FV as a result. Still, looks as though there’s no trub / chiller loss with a fermenter volume of 21 litres versus Brewfather’s predicted 15 litres. Post-boil gravity 1.072 (1.070 / 27.3℃) against predicted 1.088 – double balls. Be lucky to scrape 8% ABV at this stage. Not pitching yeast into FV at 29.5℃ so off to the ferment fridge until you calm down, with a quick blast of oxygen on the way so that at least I can clean everything.
13:50 – Cleanup finished. FV temp 27.8℃.
18:00 – FV has been at 22℃ for an hour or two, time to pitch the yeast starter and throw in a Tilt.
Standard story here with no drama; began as a closed loop pressure transfer at around 5 PSI (had dropped from 15 to 5 during cold-crashing) and filling a 19 litre Cornelius keg via floating dip tube to liquid-out post. After a while I grew bored with the trickle of beer from one vessel to the other so I junked the gas line and rigged the Fermzilla straight to my CO2 cylinder while popping the PRV on the keg now and then.
There seemed to be between 23 and 24 litres in the Fermzilla, so having filled a 19 litre Corny keg I decided to try something I’ve been thinking about over the past couple of weeks: getting the remains into some bottles without making an almighty mess. Turns out that it’s not too hard at all, provided you have some threaded PET plastic bottles and a spare carbonation cap. Simply pop the liquid disconnect off the Corny keg once its full, and whack it onto a carbonation cap fitted to a plastic bottle. Originally I wanted to use the plastic T-piece on my bottles because that would allow me to have dedicated liquid and gas posts – just like a keg – but I was down to my last carbonation cap and therefore had to use it for liquid, venting out gas to keep the flow going by unscrewing the cap a few turns.
It worked pretty well, and although I pre-ressurised my first bottle so as to match the keg and minimise foaming via the dip tube on the bottom of the cap, by my second bottle I’d forgotten to do this and it didn’t seem to make any tangible difference. In the end I filled two and a half 1 litre bottles with practically no mess, unlike those tap-mounted counter pressure fillers you see now and then. The only downside is that when removing the carbonation cap after filling a bottle it effectively vents the headspace to atmosphere before the plastic cap is fitted, which may affect carbonation, and the exposure to oxygen may lead to oxidation too. Don’t care – with no way to carbonate these plastic bottles any further I’ll just have to drink them fresh while the keg matures, which is something I can live with.

Both the Opshaug Pale and Bure Gold that I’m brewing with my resident Opshaug Kveik are still fermenting when they should have finished out a couple of days ago, though to be fair the trend graphs provided by Tilt Pro are now beginning to flatten out a little so I’m looking forward to getting both of these put away in the coming week.
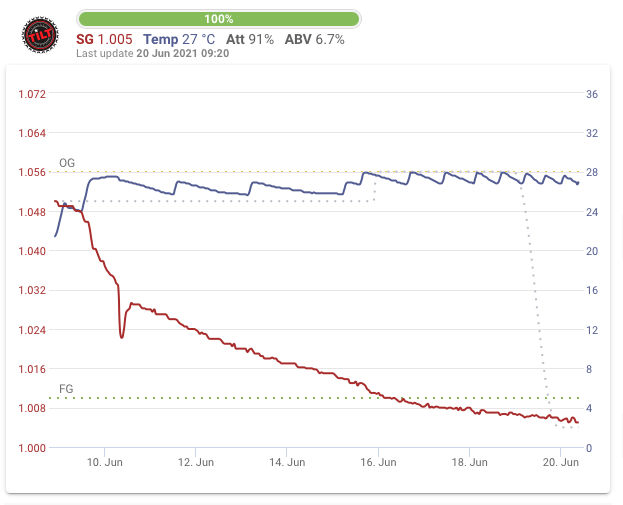
I don’t pay attention to the absolute values reported by Tilt, but I think it’s safe to say that both of these brews are going to be way stronger than they’re supposed to be; Bure Gold should be around 4.3% (previous efforts were 4.3 and 4.2%) and Tilt thinks we’re nearer 4.6% right now, Opshaug Pale was aiming for 5.3% in the recipe (5.9% adjusted for actuals) and I’m presently in the neighbourhood of 6.7%.
The only negative aspect of this continued fermentation is that my finishing hops will have had their contribution diminished a little due to the production and venting of CO2, but there’s nothing I can do about that now other than record what’s happened and adjust subsequent brews using this yeast accordingly.
#wisdom: I’m not sure if it’s a trait of WLP518 or the way I’ve harvested / re-used it, but my Opshaug Kveik has not started as furiously as expected, and taken much longer to ferment. If the Opshaug Pale turns out well then let’s repeat it, but dry-hop much later.
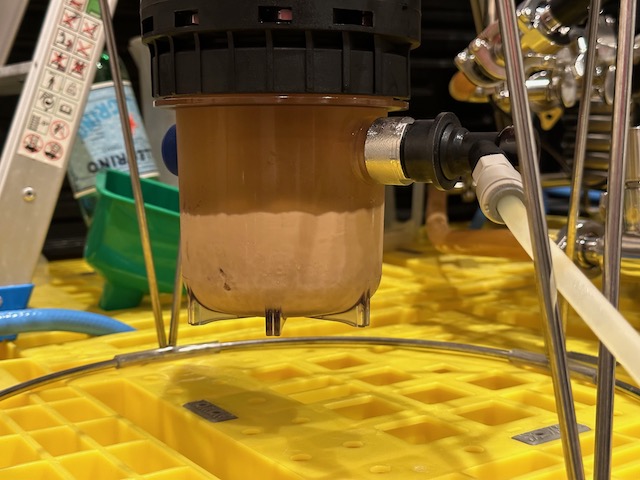
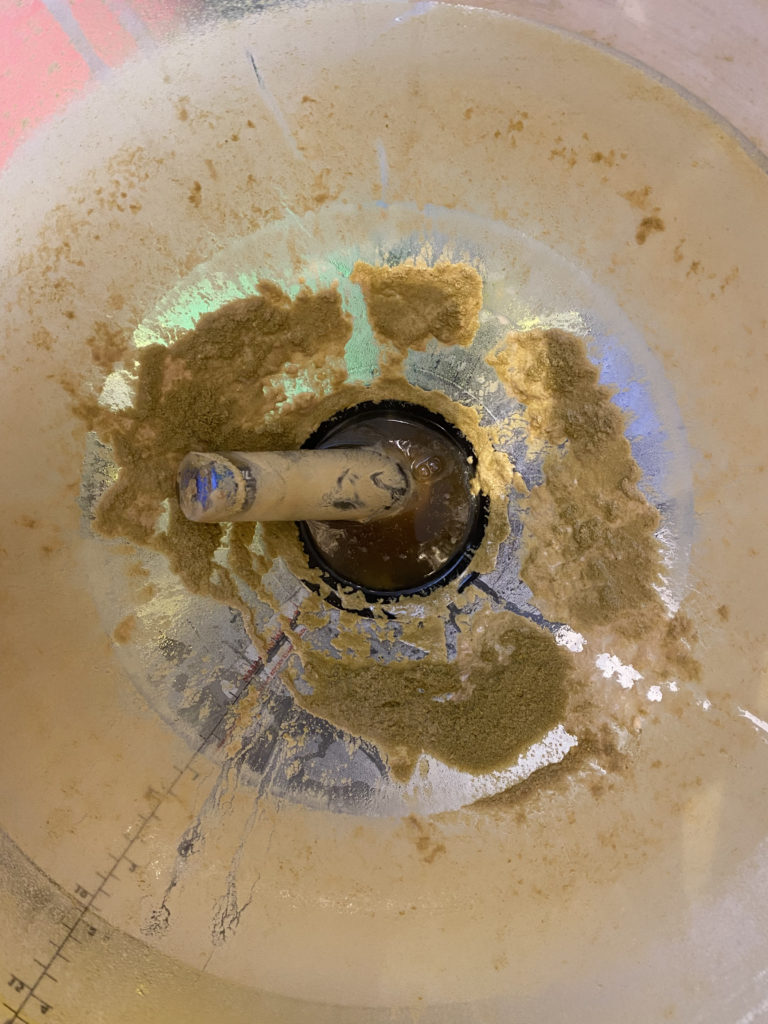
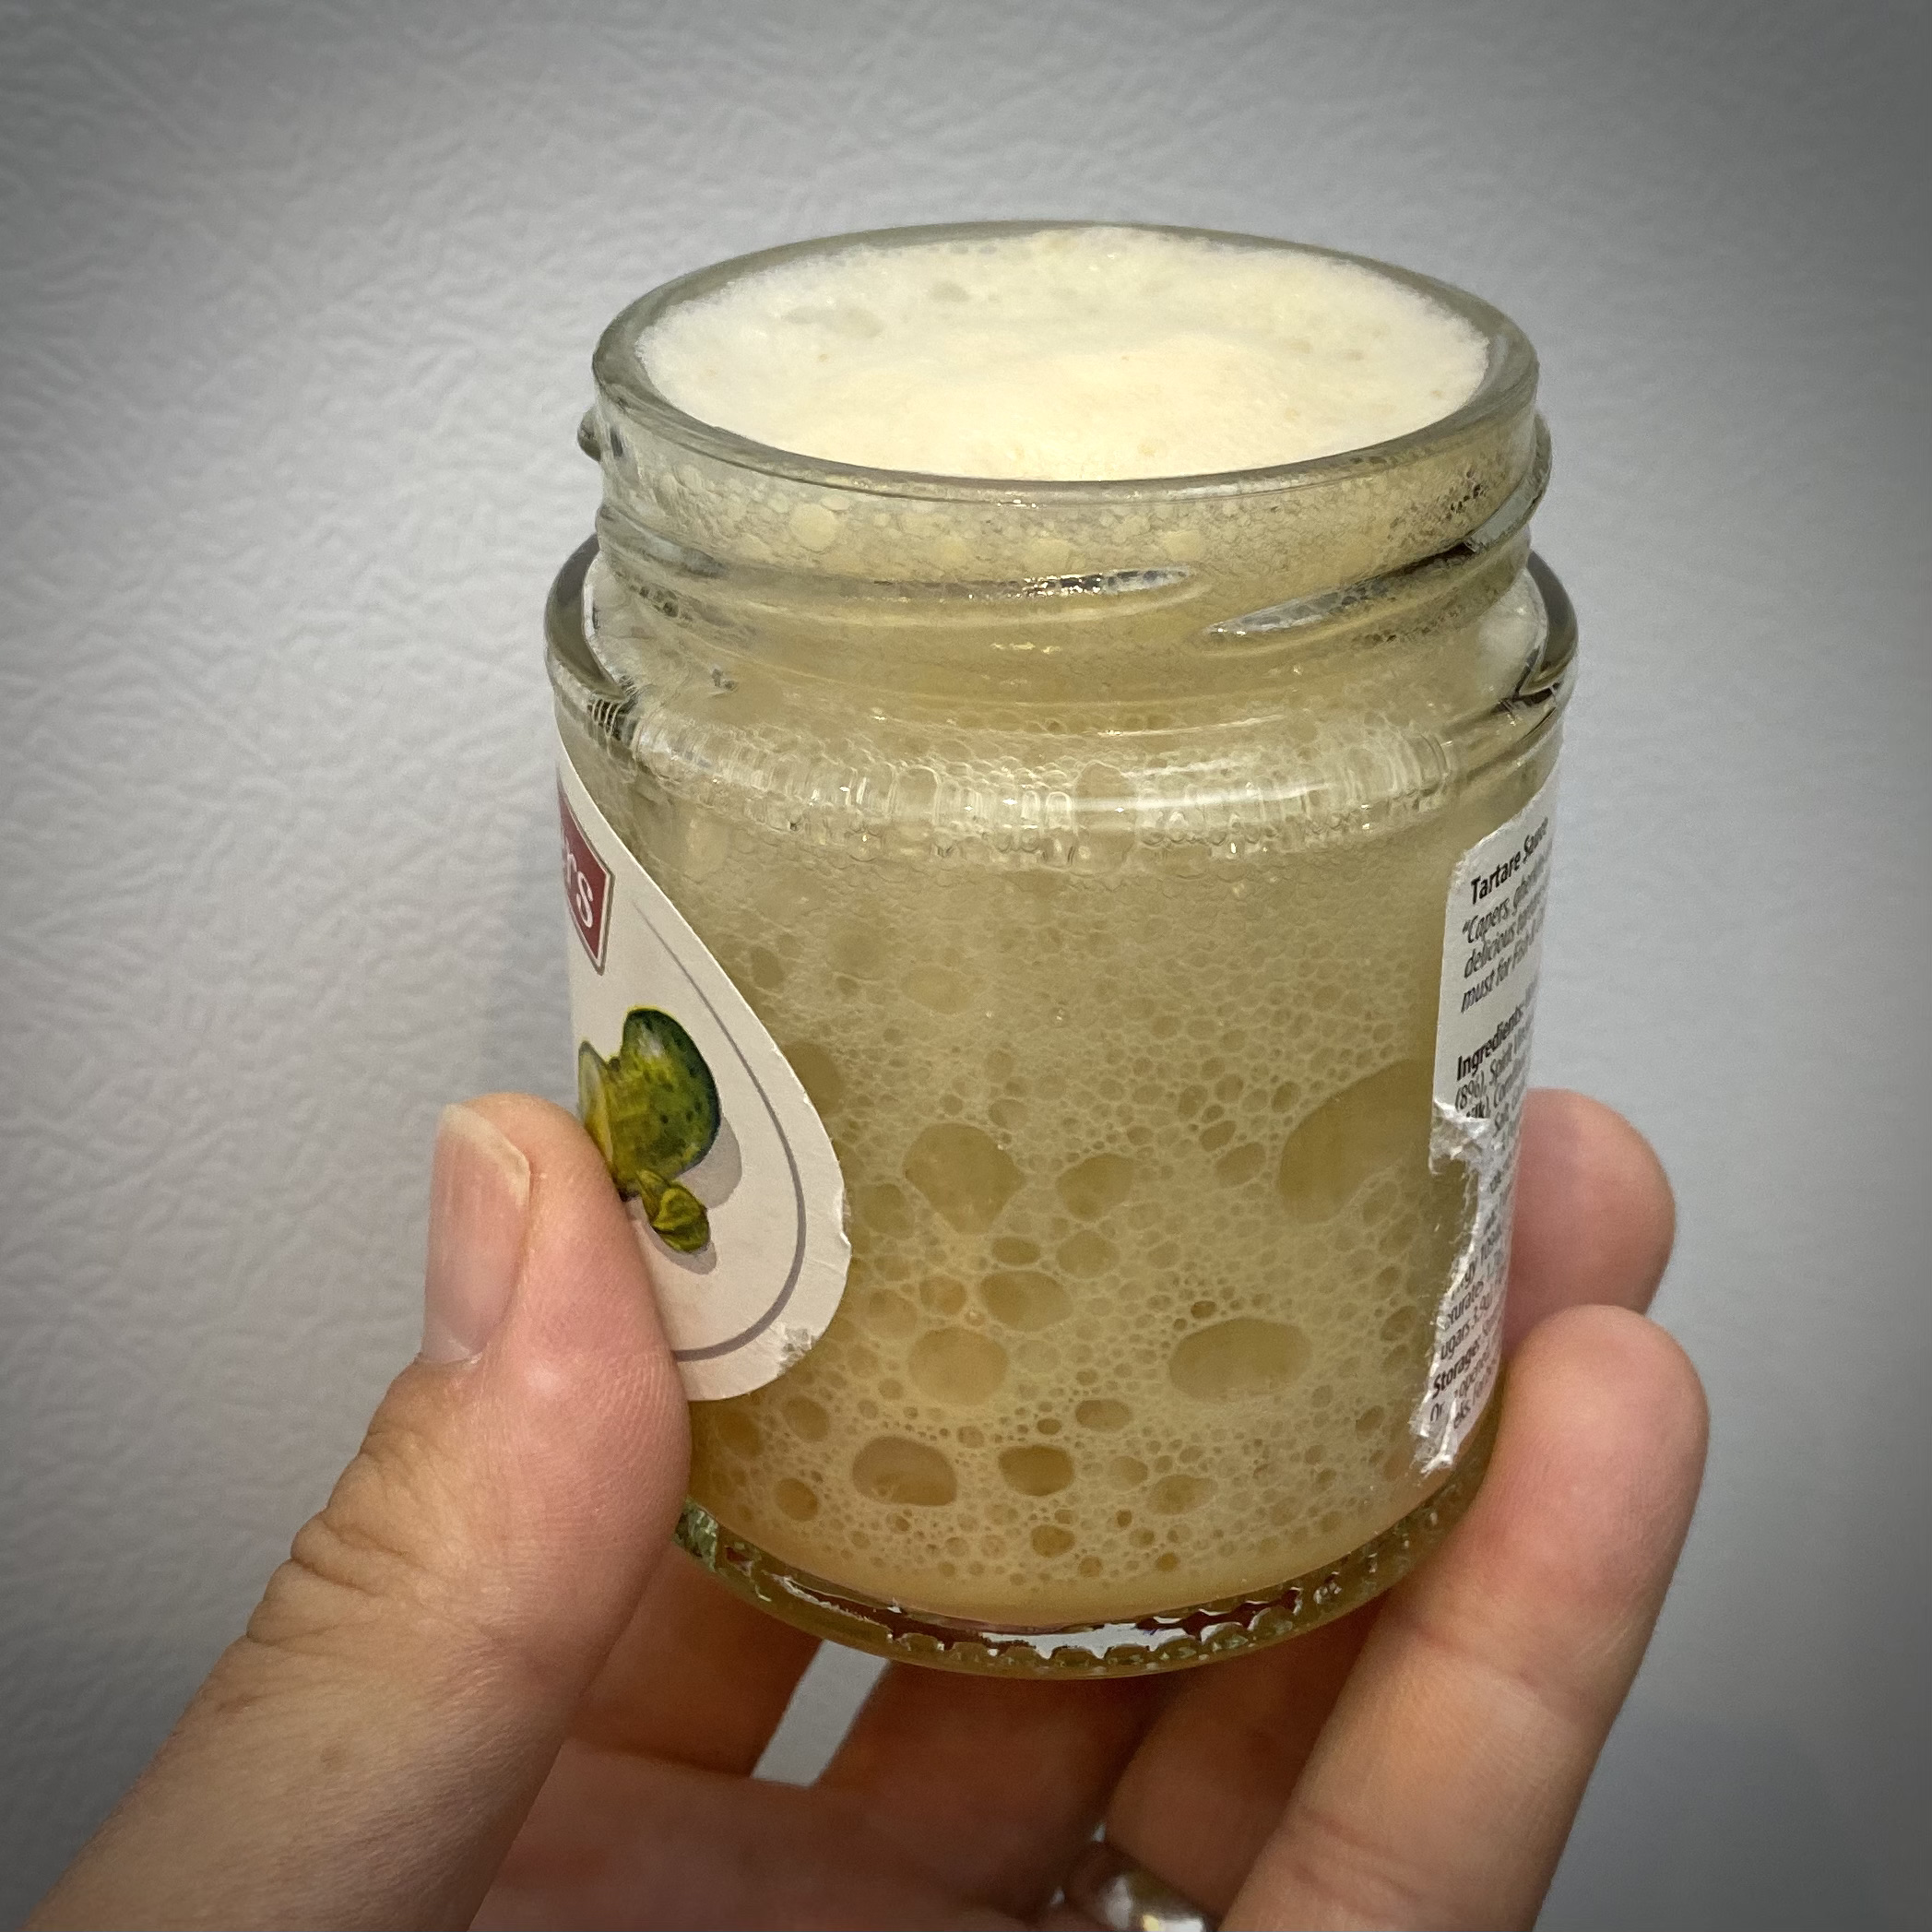
It’s just under 24 hours since fermentation started properly (approx. 36 hours after pitching) and we’re halfway towards FG, which means the yeast is at its healthiest point and ripe for harvesting. I used a glass jar and small ladle, both sanitised using boiling water. Pressure was reduced gradually over the space of about 15 minutes, and although the top of the Krausen had receded slightly from its high-tide mark on the bottom of the lid, when the pressure started dropping it reared up again and a small amount was ejected into the waiting blow-off bottle. This may not have been needed if it wasn’t for the top-cropping, but having it doesn’t hurt. Removing the Fermzilla’s top cap was predictably messy and I ended up washing it and the blow-off tube before sanitising and refitting afterwards.
#wisdom: don’t bother fitting the floating dip-tube to the lid if planning to harvest yeast, as it’s just in the way and one more thing that needs cleaning. Instead fit it when replacing the lid after top-cropping.
#wisdom: using a bigger mason jar for the yeast is recommended, since it’s really just foam at this point and compacts down to nothing when it’s chilled.


After many, many weeks of assembling kit, reading books and forums, ordering more kit, etc, I finally made it through my first ever all-grain brew day, starting yesterday after lunch and finishing up after nine o’clock. I kept a running log so that I could later dissect what worked and what didn’t, but first a bit about the beer.

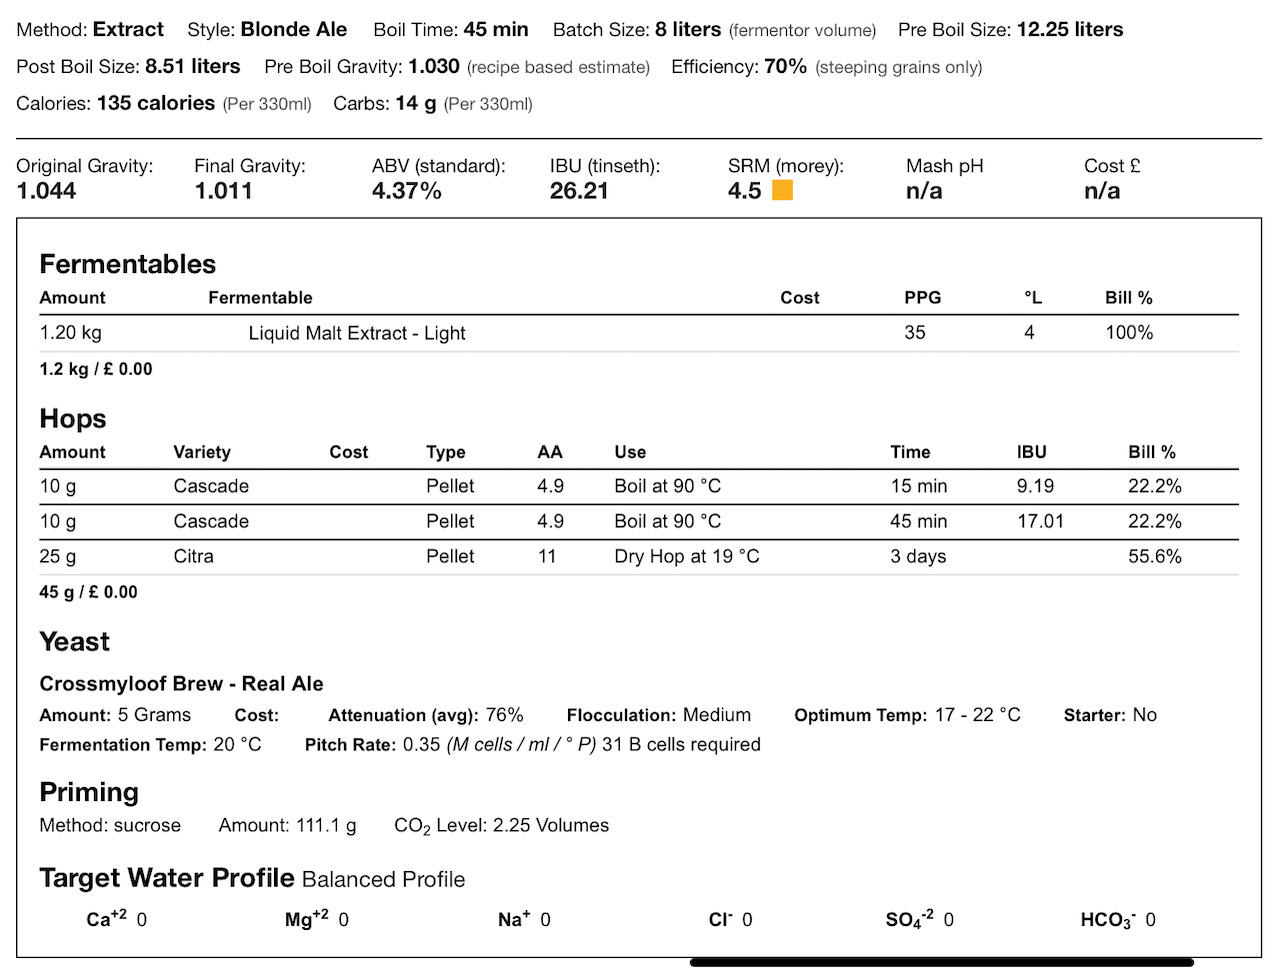
I chose this one because I’ve always had a soft spot for a golden ale, and recent experience with Bure Gold reminded me just how incredible this style can be when it’s fresh on tap. The recipe I adapted is actually a clone of Kona’s ale which somebody else had designed, I just changed it very slightly to round off some numbers (e.g. 5g of Citra instead of 4.6g) once I scaled it up to 25 litres for the Fermzilla. Click here for the PDF recipe.
By the time I started yesterday I’d already rehearsed the whole day several times so there weren’t many surprises, which was great. I noted down observations and took photos throughout the nine hour (!) ordeal and instead of writing those up into an epic account I’ll just paste them below for reference, drawing out some salient points that I need to work on.
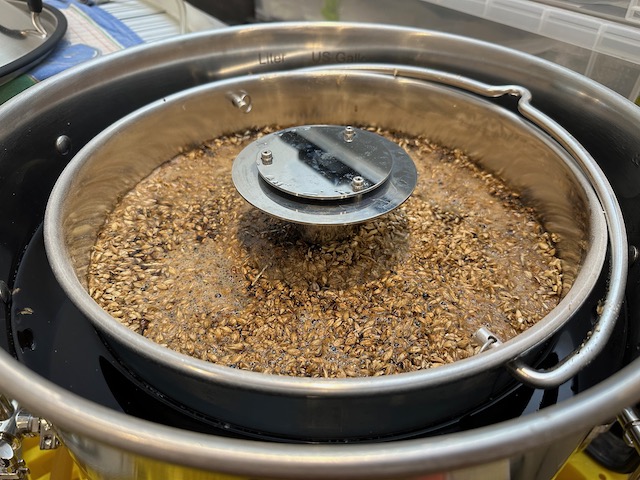
Following a lot of research I was prepared for trouble in one or tow areas, but it actually went smoother than expected. One of those was the sparging, specifically the control of a continuous flow of sparge water to maintain an inch or so above the grain bed.
The B40Pro’s sparge hat dribbles water down the centre column at low flow and doesn’t really fan out until the flow is increased, by which point you’re putting too much water onto the grain bed and risk compressing it, thereby reducing the permeability and making things worse. The situation is further complicated by the way in which the sparge hat goes from dribble to fan – let’s refer to the transition as ‘fan threshold’ or FT for simplicity.
Increasing pump speed from 0 to 100% with the pump switched on will show you the FT quite suddenly, and by the time the flow of wort leaves the centre column and spreads out it does so with enthusiasm, splashing hot liquid onto the edge of the malt pipe and necessitating immediate throttling back to contain the flow. It’s a messy procedure not well suited to indoor brewing.
On the other hand, you can set the pump speed to a midway value with the pump still switched off, then switch it on abruptly instead of increasing it gradually. Using this method you’ll find the FT at a lower pump speed than if you were to increase it slowly, but you do run the risk of switching the pump on at too high a speed and now you’re soaked in hot wort. This FT sweet spot seems to be affected by the height of the malt pipe (hydrostatic head) and probably by wort composition and temperature as well, so you really do have to get a feel for it and play around.
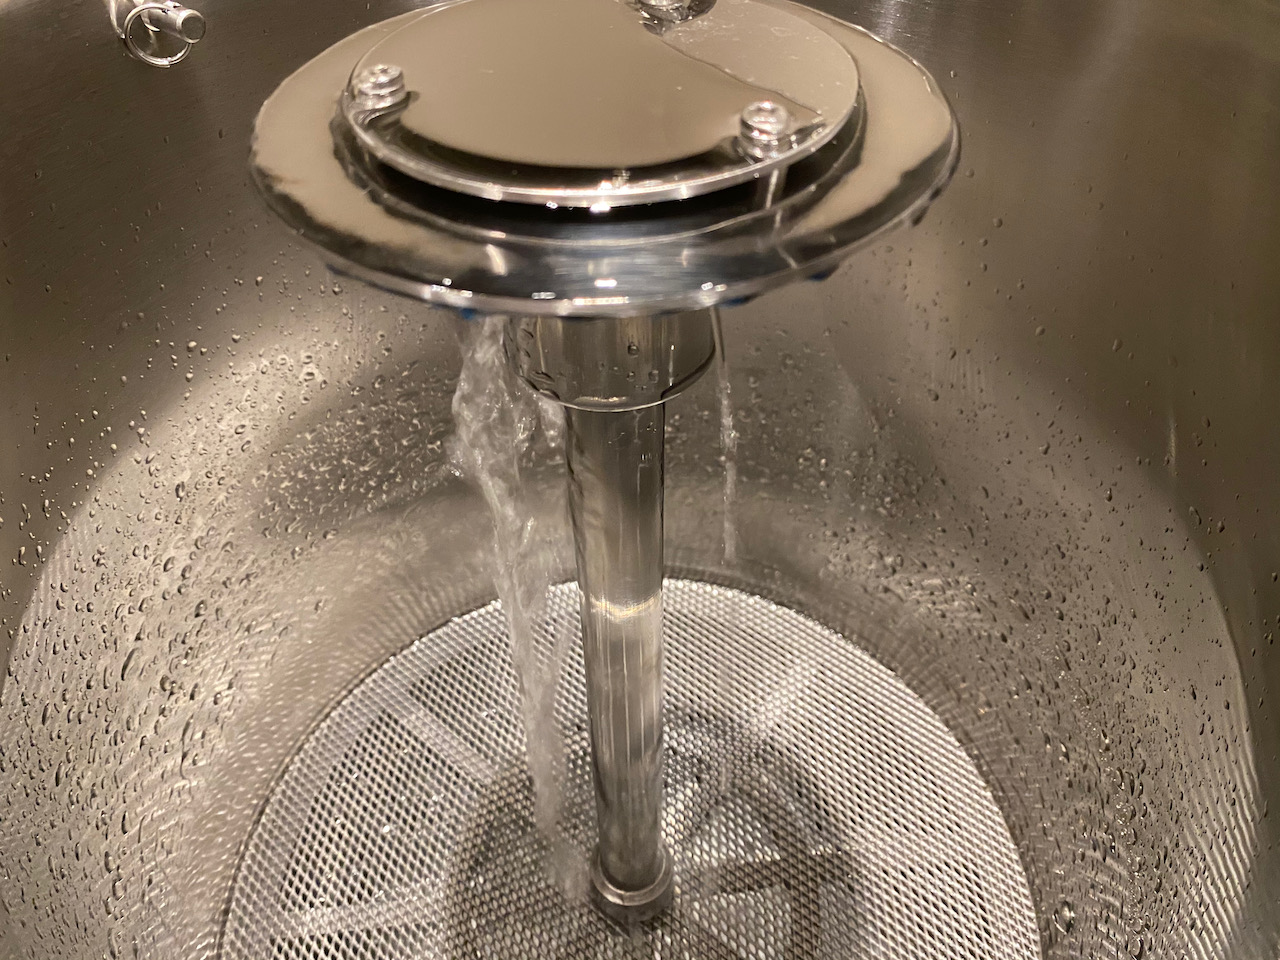


In the end I wasn’t able to find a continuous flow rate that maintained one inch of sparge water above the grain bed while also distributing that water sufficiently, and resorted to switching the pump on as soon as the first grains became exposed, and off again when the inch was reached. I did this at a rate just past FT (third image above) so that when the water was running it was well distributed. The approach worked really well and I can’t see any issues since the grain bed was neither allowed to dry out or excessively compacted, so until somebody points out an oversight I’m going to chalk this one up as a success.
After the sparge it was time to boil, and I was nervous because I’d seen plenty of references to boil-over, where the kettle suddenly and without warning goes mental and you end up with a sticky mess. My nervousness wasn’t helped by the fact that I had to do this in manual mode, because automatic mode tops out at 90 ℃ and has no way of telling when the wort boils anyway.
In the end I needn’t have worried. It took quite a while to get up to a rolling boil despite the heater on 100%, then I was able to maintain the boil by reducing power to 85% and keeping an eye on it, which is easier said than done when you’re using a steam hat + condenser and can’t see the wort without removing the rubber bung, which in turn affects the boil temperature. I’ve heard of people starting on their cleaning duties while the boil is in process, but I just didn’t have the confidence to leave it alone. Maybe I’ll get there with the kind of experience that follows several uneventful brews, but for now I’ll stick to the old adage that a watched pot never boils.
Last but not least I have to say that the Brewfather app and website are probably the biggest contributors to yesterday’s positive outcome. Finding and adapting a recipe was a cinch using the web UI on the laptop, I did my picking from inventory using the iPad app, and used the app on my iPhone to keep track of various stages via the recipe-driven timers. Everything synchronised flawlessly across devices and kept me on track despite having no experience and a good amount of nervousness. The only thing that was missing was a reminder to switch on the counterflow chiller 15 minutes before end of boil so that it has a chance to sanitise, but that’s my failing and not Brewfather’s.
Invariably there were some mistakes, but they weren’t as severe or numerous as I’d feared. I’m already working out how to address these and next time around should have eliminated all of them, but let’s call them out – warts ‘n all.
I don’t have electricity in the brewery, so it’s a case of running the fridge, kettle (B40Pro), and sparge water heater (20 litre Cygnet) off extension leads. It’s a hideous cowboy setup made all the worse by my electrical qualifications, but it’s a calculated risk and a means to an end. I’m using one 13A reel (unwound, naturally) for the water heater, and that has a thermal cut-out which it doesn’t trip, but when I use that lead with the B40Pro it does trip. So the trippy reel is saved exclusively for the Cygnet.
The B40Pro is on the same 13A extension which serves the fridge, and of course I should have unplugged that fridge before entering the boil stage. The heating elements are capped at 50% power during mashing so as not to scorch any grains that make it through the malt pipe’s false bottom, but when they’re running at full chat to reach boiling temperature the B40Pro does draw damn close to 13A, resulting in some heat build-up in cables and sockets. (I discovered it would trip the other reel’s thermal cut-out during a test run)
Everything was going swimmingly until the fridge decided to run its compressor while the B40Pro was boiling, and that blew the fuse in the extension cord serving those two devices. Stupid, predictable, and now I was paying for it by looking for another 13A lead of sufficient length with my boil timer ticking and the kettle not boiling.
#wisdom: if you have to use extension leads, unplug absolutely everything else. The fridge can take care of itself for a couple of hours, the brew kettle can’t. (you knew this already, you complete and utter pilchard)
All I knew was that for 20 minutes after dough-in you should rest the grains, and neither stir them nor circulate water through them. Brewtools are very specific about this in their instructions, and during a few of the video reviews of this kit I’ve seen on YouTube the brewers who haven’t rested their mash have expressed difficulty later on with matter getting through the mesh bottom or with sparging.
What Brewtools aren’t specific about is whether that 20 minutes is in addition to your mash time, or part thereof. Being paranoid of possible side-effects of an extended mash (tannins, those dreaded tannins!) I guessed those 20 minutes should form part of the mash, and just sat there staring at the grain bed while 65 ℃ water circulated outside the malt pipe. There were two problems here, and I think a combination of both of them led to lower-than-expected pre-boil gravity.
#wisdom: next time, heat strike water to 68 ℃ and see if the mash reaches your actual target of 65 ℃. Dumb-ass.
In hindsight I’m now convinced this is connected to my mashing, but I got a value of 1.020 for pre-boil gravity when I was expecting 1.044. That was a pretty low moment and I wondered if I should abandon it there and then rather than throw more time and ingredients at something that was going to turn out substantially weaker than expected. I knew that my hydrometer was calibrated at 20 ℃ and I was measuring at 65 ℃ so there was bound to be a difference, but I assumed it would be a minor difference. A quick plea for help on the forum revealed that there is a calculator for working out temperature offset in SG readings, and that the difference can be quite substantial: my 1.020 was actually 1.036 (Brewer’s Friend) or 1.038 (Brewfather … yeah, the one in your app, idiot)
All was not lost, and I reckon I could still get a light session beer out of this brew, even if it wouldn’t be the same as the legendary Big Wave. In the end I finished with a post-boil gravity of 1.050 versus an expected 1.047, so as long as the extra few points aren’t due to some yet to be discovered cock-up I may well have gotten away with it.
#wisdom: always, always adjust gravity readings for temperature, ideally by leaving the sample to cool naturally or by using a calculator. There’s not much point when you’re one or two degrees outside the hydrometer’s calibration temperature, but it soon becomes worth doing.
Need to get a measuring jug and work out equipment offsets. I ‘measured’ my strike and sparge water using a 5 litre bottle and a 1 litre bottle when I should really have used a proper jug. I also need to account for plumbing voids like the counterflow chiller since that swallows strike / sparge water as well as fermentables, unlike boil-off losses which leave fermentables behind and affect gravity. (oddly enough, there’s another calculator for that too)
#wisdom: be specific in your measurements, try to account for all voids and losses. Leaving this one as #unsolved since I need more info.
There’s still so much that I don’t know, that when I hear things like ‘you shouldn’t sparge too quickly because it compresses the grain bed’ I start to worry about other things which may not even be problems at all. Like going from sparge to boil.
Yesterday I gave the malt pipe a few minutes to drain before lifting it clear, but that was just because I didn’t want to dribble sticky wort between the B40Pro and the awaiting bucket. When I was clearing up at the end of the day I noticed there was about a litre of wort in the bottom of that bucket, some of which should by now have been in my fermenter.
As it stands my post-boil volume was 2.17 litres short, some of which might have been due to the counterflow chiller, and some might have been in that bucket. Should I have waited longer for the malt pipe to drain? Should I have squeezed it slightly? Both options occurred to me at the time, both were discounted because fear of the unknown (tannins? astringency?) was greater than fear of the known: being a couple of pints short.
If I start picking apart the ifs and buts in order to derive specific #wisdom points covering ‘general timing’ I’ll never finish this post, so let’s write this off as something that will get better by itself with experience.
Here’s the raw log I kept on the day, with photos too in chronological (rather than useful) order added in. The iPad is a frustrating device when it comes to writing notes, but at least it has a splash-proof keyboard.
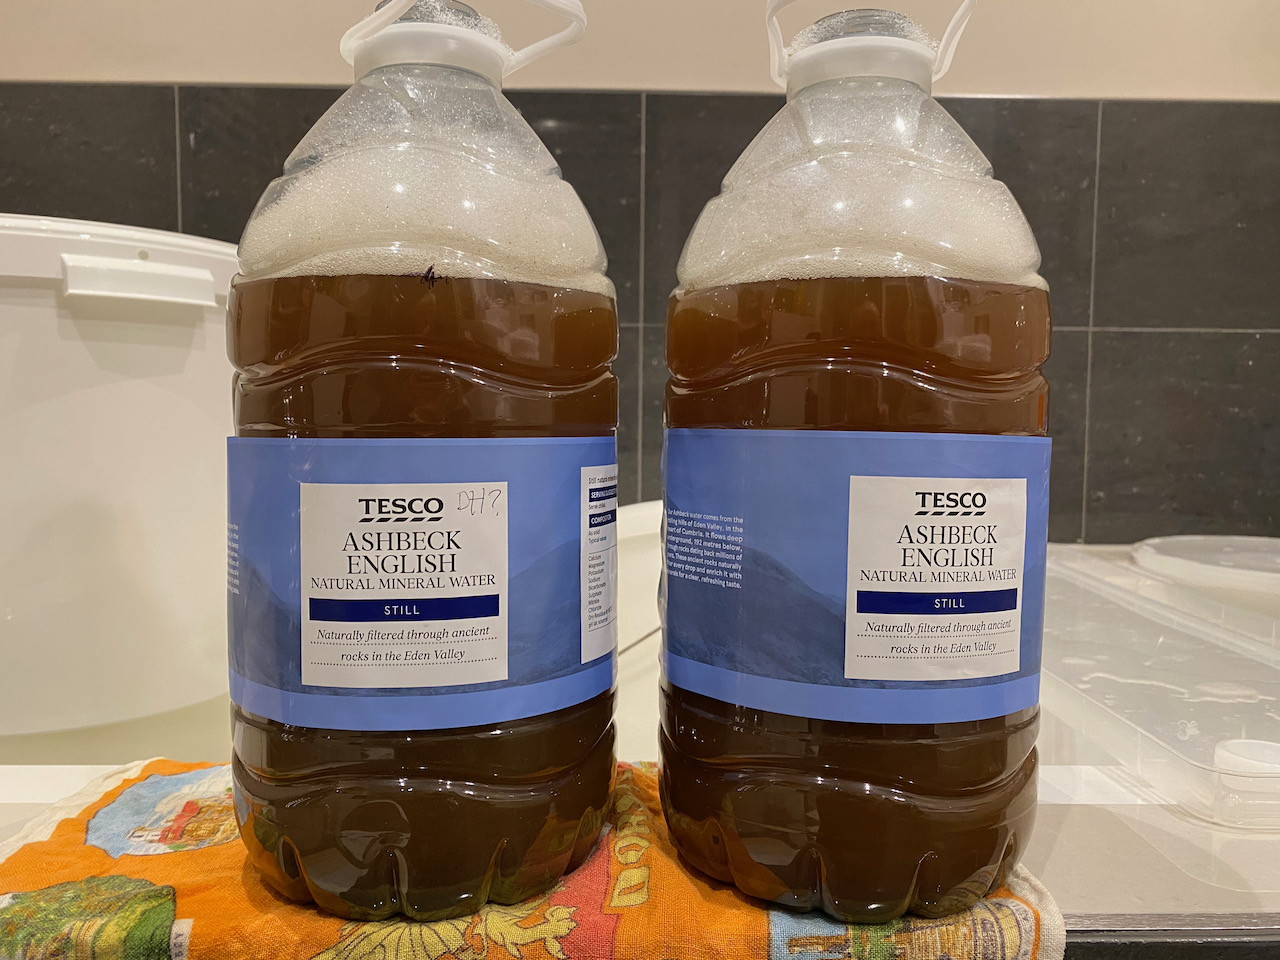
12:50 – Fill sparge water heater with 15 litres cold tap water (3x Ashbeck bottles), set dial to 3, plugged into Masterplug cable reel but expect thermal cut-out to trip at some point. Water temperature 11.5.
13:15 – Sanitised Fermzilla and finally got around to applying the graduated level scale
13:25 – Scaled the batch recipe for 25 litres (Fermzilla headspace looks to be enough) and adjusted the fermentables and hops a little to round the scaled values and bring IBU / EBC sliders to mid-points.
13:30 – Water heater clicked off gracefully, temperature 66.0. Need 65 for mash so I’m going to give the kettle and coils a quick rinse before bringing in the strike water and topping up.
13:55 – Moved 15 litres from water heater to kettle, replenished kettle with 7.5 litres, resumed heating.
14:15 – Grabbed the malt from stores and noticed that mash water in kettle was 24.75 litres. Maybe Ashbeck bottles aren’t the best measuring vessels! Reduced to 22.57 using scale inside the kettle, malt pipe in place. Refilled the water heater with 11.75 litres for sparging, again with Ashbeck bottles, but not brimmed. Need to get myself a decent measuring jug! Started heating sparge water.

14:17 – Started heating strike water in ‘mash’ heating mode, target 65.0, starting at 55.0. There’s no grain in there yet so I could set it to full auto (instead of ‘mash’ where the elements are capped at 50%) but I’m not in a hurry as I want to go get the hops and Protafloc tablet.
14:52 – Ingredients measured and bagged, commencing dough-in. First 20 minutes are there to settle, no stirring, timer starts when they’re all in.
15:06 – Dough-in complete, starting 60 minute mash timer. I’m putting the lid on until I’m allowed to stir / circulate over the mash in 20 minutes time.
15:20 – 5 minutes left until I can stir and switch on the centre pipe to circulate over the mash. Checked the manual again just to be sure, and yes, only circulating outside for first 20 minutes to prevent sugars scorching on the elements. Weird, because there’s a bit of the mash that’s not even wet yet. 3 minutes.
15:24 – Starting to circulate over grain bed and stirring. The mash isn’t as dense as I feared, those dry grains on top at the start soon went under with a gentle stir. Dividing the flow between circulating outside the malt pipe and over the grain bed is a fine balance, didn’t take long before I started sucking air via the thankfully correctly adjusted dip tube. Weight of water on the grain then compacts it further at the bottom, so it needs stirring lower down – something I was hoping to minimise in order not to push too much solid matter out through the screen. Oh well, at least there are no dough balls. Dare say I’ll find the perfect balance with practice.
16:00 – 5 minutes left to go, and I have the pump at 77%, valve halfway between recirculating outside malt pipe and up centre. Nice parasol of wort going on, malt pipe level about 4 inches higher than outside. I know stirring will lower that, but I don’t want to agitate too much and drive solids through the mesh. Also don’t want a stuck sparge. Decisions, decisions …
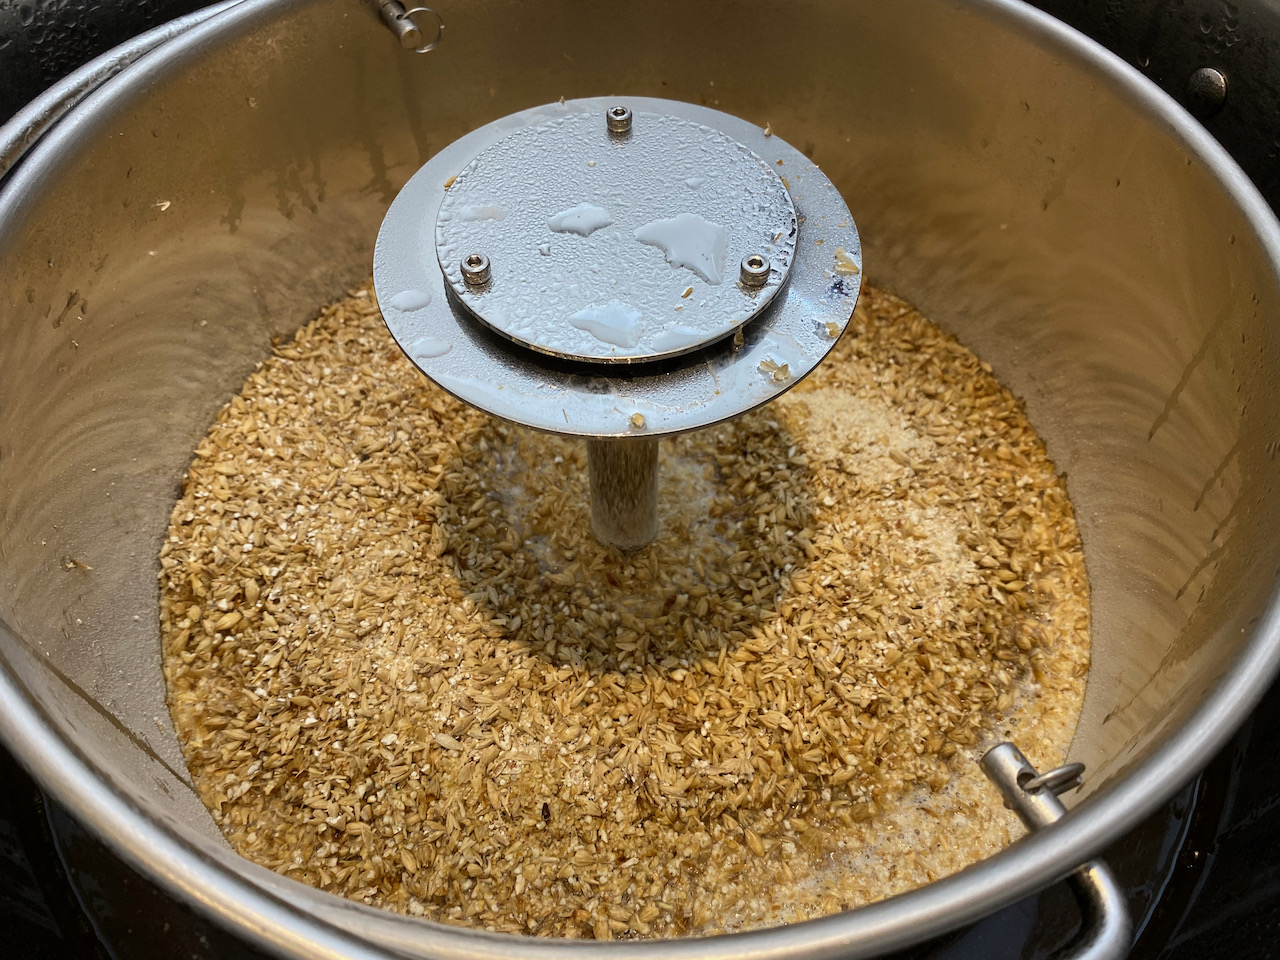
16:07 – Mash complete, heater and pump off while I raise the malt pipe. Inside / outside levels adjust quickly enough.
16:13 – Try brief vorlauf but the pump seems to stick, cycling it on and off clears it, then it sticks again. Switching to sparge, water temp 76.5.
16:16 – Maintaining an inch of water on grain bed is not easy. Pulsing pump at 45% seems to do it.
16:19 – Sparge complete. Leaving grain pipe for a minute to drain – was heavy lifting it up after mashing.
16:27 – Boil volume is only 28 litres (should be 31.5 according to Brewfather) and gravity a measly 1.020 when it should be 1.044. Bollocks. Should I have mashed for longer? Sparged with less? Oh well, let’s boil and see what happens. Might be more of a low ABV session ale after all.
16:30 – Fitting condenser and steam hat, starting approach to whatever boil temperature is, presently at 60.
17:08 – That took a while to get there! Extension lead / socket are getting very warm now – I’m on the regular 13A white one since the reel would have thrown its thermal trip by now. 60 minute timer started (still wondering if I should increase that to bring FG up) and 60 minute hop additions done.
Had some advice from the guys on the forum who confirmed that yes, temperature makes a huge difference to SG readings. I plugged my values into a calculator I was offered and it seems I’m actually at 1.036, not 1.020. Happy days!! Still low, but not a disaster.
17:32 – Rolling boil is thankfully uneventful. Keeping a constant eye open for boil-over or a melting socket. Steam hat and condenser doing their ting. I’m on my 4th bucket of warm water now, saving it for cleaning later. Managing heater manually between 85 and 100%, trying to keep the boil going on lowest value possible.

17:51 – I’m two minutes away from next boil additions and the extension lead just crapped out. Switching over to the reel, wondering how long I have before the thermal switch trips. To be fair it was the first lead (also powering the fridge) which seems to have gone, since the fridge is dead. Maybe 90% heating and fridge was too much? Sounds very plausible – I should have thought of that and switched the fridge off for the boil.
17:55 – Added one third of a Protafloc tablet. Adjusted value was 0.272 from recommended one quarter.
18:05 – 5 minute boil additions are in, smells fantastic. Hang on in there little power reel!!
18:09 – Heaters off, start counter flow chilling. Temp 100C.
18:10 – Shit, forgot about sanitising the counter flow chiller for the last 15 minutes!! Let’s give it 5 and hope for the best, was Star-san’ed after all. Heaters back on, hope the power stays on too… Temp 94.5 through chiller.
18:15 – Enough, heaters off again, time to chill or we lose the hops.
18:17 – Counterflow chiller amazing, return temperature already down to 42, tank at 75.
18:21 – Return temp down to 30, tank at 47. Hard to know how to best set the return dip tube and pump speed; faster pump will probably be better for whirlpool but slower pump gets return wort cooler faster. I’m trying to eyeball the kettle contents and get a feel for the balance, but it’s iffy.
18:26 – Return is now at 20, tank at 31. I’m stopping the pumps and plumbing in the Fermzilla. Will transfer slow-ish with a bit of splashing since I don’t yet have my oxygen setup. Kettle level is 24 litres, but then I didn’t factor in the chiller.
18:37 – Transfer to FV going well, but guess who forgot to adjust the dip-tube? Using mash paddle to push it down while holding / splashing transfer hose above Fermzilla, let’s hope there are no sanitation issues

18:51 – Yeast pitched at 21.5 degrees, FV volume 21.5 litres. OG 1.050 is OK by me against expected 1.047. Sanitised Tilt deployed, time to clean up.
19:45 – Stopped cleaning in order to have dinner
20:10 – Cleanup resumed
21:20 – Everything’s clean. Jesus. What a day.

After eight days in the chiller it’s time to put this one away, and I decided to fill one of my 5 litre kegs with the rest going into bottles, hopefully letting me form a comparison not only between this brew and my first extract blonde, but also between keg and bottle versions of the same batch.
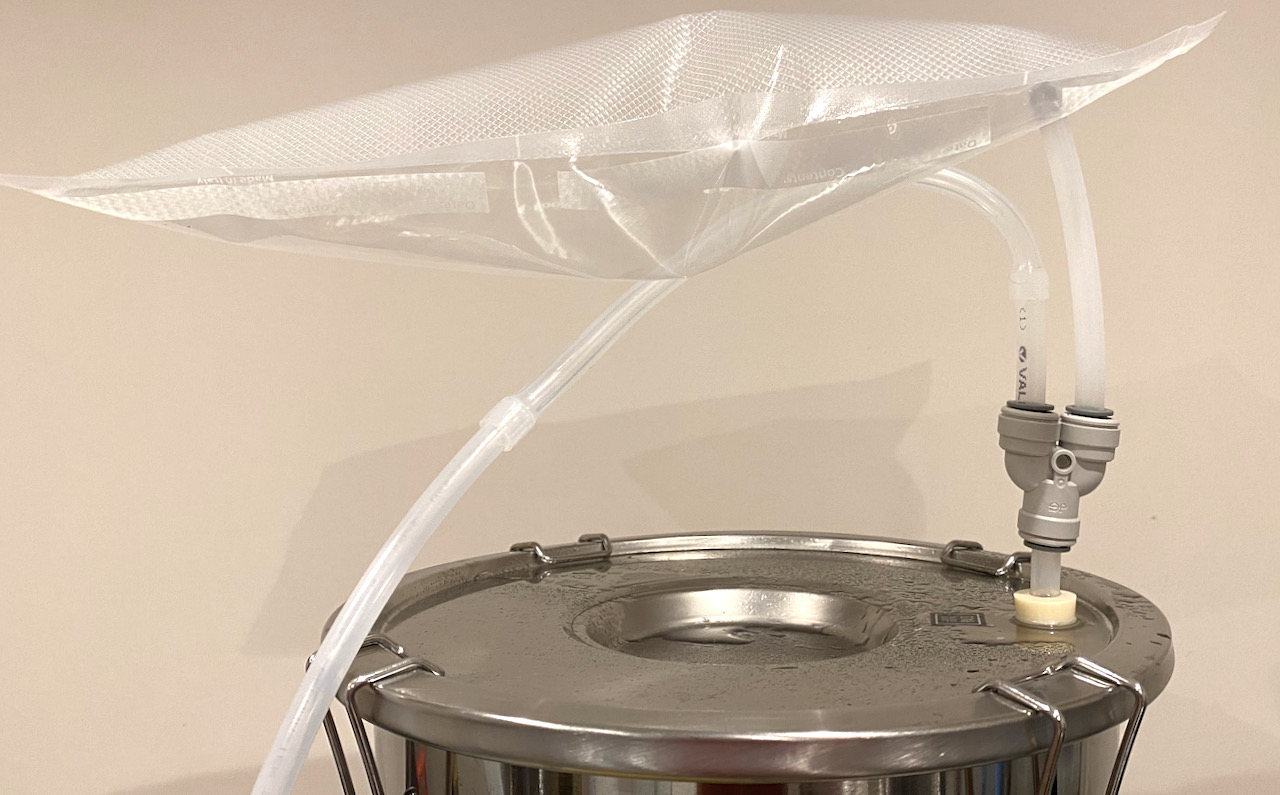
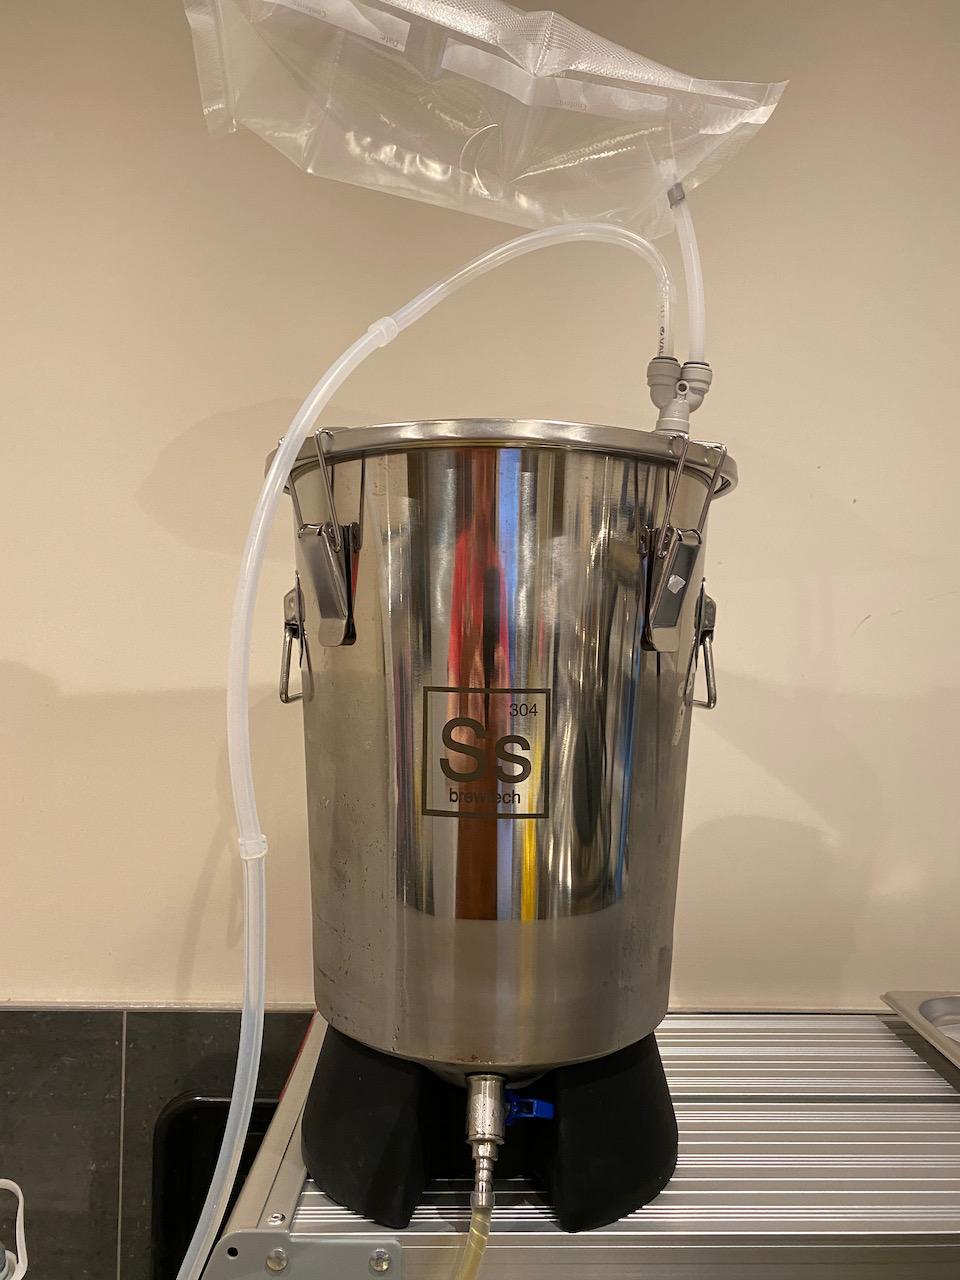
Keg or bottle regardless, I was keen to prevent as much oxygen from getting at the beer as I possibly could. Bag-Thing was already rigged up to the mini bucket while it cold-crashed in the fridge (used between ¼ and ⅓ of a filled bag over the week, for the record) so it was just a matter of topping up the carbon dioxide bag as I drained the beer. This was easily achieved by fitting a John Guest splitter between the bag and the bucket and splicing it to the CO2 regulator so that it could be manually topped up as needed.
Before I started drawing off beer into the keg I wanted to make sure that my dip tube wasn’t about to suck up dead hops and other trub, which took some leap of faith since I had no way of telling how much was in there and nor any means to filter the output. In the end I decided that cold-crashing should have settled everything as much as it was ever going to be settled, so I rotated the dip tube to its highest setting by turning the spigot clockwise – a neat feature to have.
But I still didn’t know if the tube would be clear of the sediment, so the only way to find out was to fill a cheeky tumbler. Immediately I started getting bits of hops but the stream soon cleared up, must have just picked up some random particles while adjusting the tube. The beer wasn’t anywhere near as clear as Bure Gold – the first one I ever cold-crashed – but then again that was too was cloudier during kegging than nearer the end. This did however taste wonderful, not as bitter as the first extract attempt and with slightly more hop punch. Time for one last check of the bag setup and let’s get it done.
Once I was confident that no oxygen would enter via the top, putting this into a sanitised & purged keg was as simple as connecting a piece of silicone hose from the elevated bucket’s spigot to a barbed beer disconnect and popping the pressure relief valve now and then. That last step grew old very quickly so I fitted a gas disconnect as well and just kept topping up the CO2 at the bag end while the keg vented it to atmosphere. I realise now that with the bag being such an effective buffer I could easily have used the extraneous gas from the keg to top up the bag and made for a truly closed loop – definitely something to try next time.

I used the “cold finger” method again and left the keg with about 2 inches of head space before pressurising it to 30 PSI and putting it in the chiller. I’ll reduce this gradually after 3 or 4 days to 10 PSI serving pressure, hopefully that should then be ready to sample.
I really wanted to use my Blichmann Beer Gun to continue the oxygen-free theme but there was one small problem: I needed the JG 2-way splitter in order to provide the gun with gas, but that piece was in use by Bag-Thing. (sorted for next time: an adapter is on the way)
To overcome the equipment shortage I temporarily borrowed the CO2 supply and crudely purged some clear flip-top bottles by flushing them with carbon dioxide after I’d dropped in two carbonation drops in each, targeting 750 ml. Yes, overdoing it a bit there, but those drops were all I had left and I couldn’t be arsed to mess about weighing out loose dextrose for the sake of a couple of bottles. Once they were gassed and carbed it was easy to rest the flip-top stopper on the mouth of the bottle until each could be filled via the same silicone tube I used while kegging, just without the disconnect attached.
All this went fairly well until I started drawing bubbles halfway into the first bottle – guess that dip tube must be quite long after all. Seeing bubbles during filling is never good, but I kept telling myself that it should be OK since the bottles were filled with CO2, and it’s better to splash some gas about than set the tube too low and draw in unwanted rubbish. This method of constant adjustment saw me filling four 500 ml clear flip-tops while lowering the dip tube gradually before I hit the hops on the fifth bottle.

While cleaning the vessel after bottling I noted that the trub-line was roughly equal to the conical part. Obviously this will vary wildly depending on what’s added to the brew during fermentation, but it’s good to have this guide and reassuring to know that there’s quite a bit of adjustment on the dip tube – the guys at SS Brewtech have clearly done their homework.
In closing, one thing’s just occurred to me: by cold-crashing before bottling I may have removed the yeast that I need to turn my carbonation drops into carbonation. If these turn out to be flat then I need to learn from this, and draw off that part of the batch which is to be bottled before cold-crashing. As always, fingers crossed …
#wisdom: cold-crashing the mini bucket for a week uses between ¼ and ⅓ of a filled Bag-Thing, no need to worry about having to refill it partway.
#wisdom: if filling a purged keg from the brew bucket, use the gas that’s being driven out of the keg to refill the bag on top of the bucket.
Thanks to a mix-up at bottling time yesterday, the 31 mixed bottles only have 50% of the priming sugar that they should, and today I corrected that by cracking some of the bottles open again and adding the last of my carbonation drops. The 31 bottles of Mangrove Jack’s Strawberry & Peach Cider now look like this:
Looking back over the process of re-opening these I don’t think there’s very much to worry about. Each bottle was treated to a good dose of sanitiser before I popped the cap, and as soon as I did so I dropped in a carbonation drop and added a fresh, sanitised crown cap – or flipped shut the still wet flip-top. I did the flip-tops first and noticed that adding in the carbonation drop resulted in a fair bit of fizz, but because the flip-top was within reach I was able to cap it before anything boiled over. The first couple of crown caps I treated subsequently did eject some foam, but then I nailed the procedure and the rest were OK. No spinners or obviously leaky caps.
All 31 bottles were moved to the server room which is bouncing between 21 and 25 ℃ depending on the amount of sunshine that day. In around a week’s time I’ll put these out to the garage for conditioning.

#wisdom: ending with a positive, and I hear that cider isn’t too bothered about oxygen since it’s the hop oils in beer which cause oxidisation when exposed, so unless it’s a dry-hopped cider there’s nothing to worry about. Oh well, was fun playing with the beer gun all the same.
The 19 litre Cornelius keg is getting lighter by the day, so I decided to re-keg to my 5 litre Mangrove Jacks mini and ready the Corny for its next adventure, which will hopefully be my first all-grain brew.
The re-kegging procedure was a copy of the closed transfer that I used to package this from the FV originally
This time I didn’t have a second recipient keg connected in series to protect against overflow getting into my spunding valve, mainly because I didn’t use the spunding valve at all and instead pulled at the PRV on my smaller keg to reduce pressure and start the flow. Taking it fairly easy at the start to prevent foaming, it wasn’t difficult to gauge the progress in both kegs via the condensation level on the outside. As the smaller MJ keg began to fill up I placed two fingers on the top, hoping to feel the temperature difference and therefore know when to stop the transfer before beer gets into the PRV. That worked well too, and because I can’t leave these things alone I gently kept going until the slightest change of tone told me I was about to release foam. Next time I’ll stop sooner – just figured that on this occasion I can always clean the PRV and will probably have drunk the remaining 5 litres before any backwards contamination becomes a factor, if that’s even a consideration.
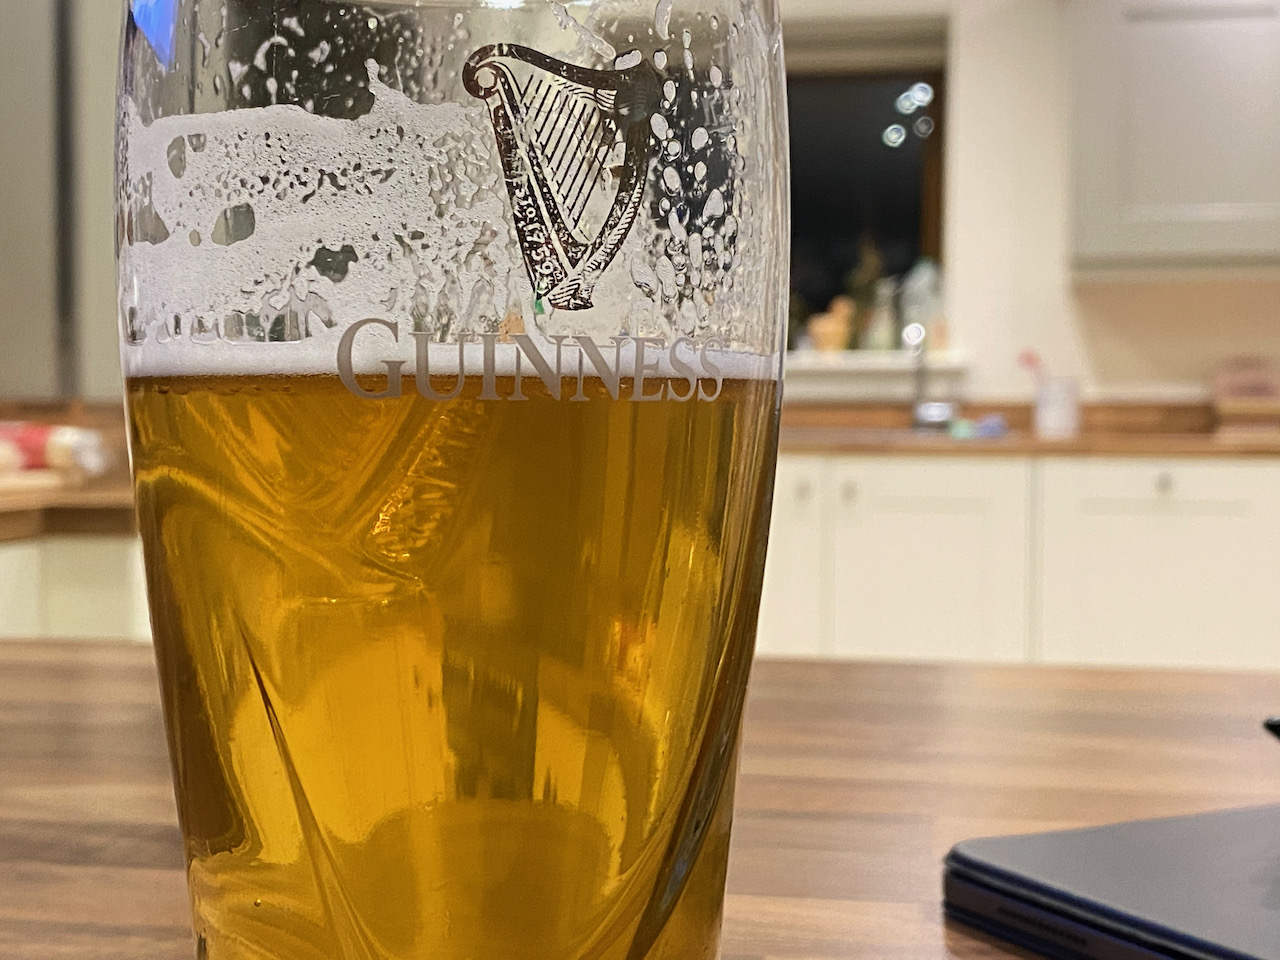
There was about a pint left in the Corny after I’d filled my mini-keg, so I used the beer gun to decant that into a plastic bottle for consumption this evening. Another successful procedure completed, more lessons learnt. Also, I’m really glad how well this brew turned out and will be buying it again. Here’s a picture taken yesterday showing off that amazing clarity:

#wisdom: PRV on recipient keg is fine for relieving pressure and starting transfer, no need for spunding valve unless you need to be hands-free. If the recipient keg is room temperature and has a sloping metal top then two fingers placed at the base of the top make a sufficient filling guide, provided the liquid is cold.
Temperature in the fermentation fridge had dropped drastically a couple of days ago, reaching -8.6 ℃ and causing the extremities of the fermenter contents to start forming ice. In hindsight This may be due to there only being a single, solid item in there, which takes a while to cool down and causes the air temperature in the fridge to get much colder than usual while keeping the average interior temperature warmer than usual. Then again, the thermostat is mounted inside the fridge and should be sensing the air, not the fermenter contents, so I don’t know what’s going on.
Either way, from now on I’m going to use the fridge on a low setting so that the difference between a newly added fermenter and the air inside the fridge is minimal. It’s all thawed out again now and no leaks have sprung, but I’ll have to inspect the threads and seals carefully when cleaning the vessel. On the bright side my brew appears to be clearing gradually, which is nice.
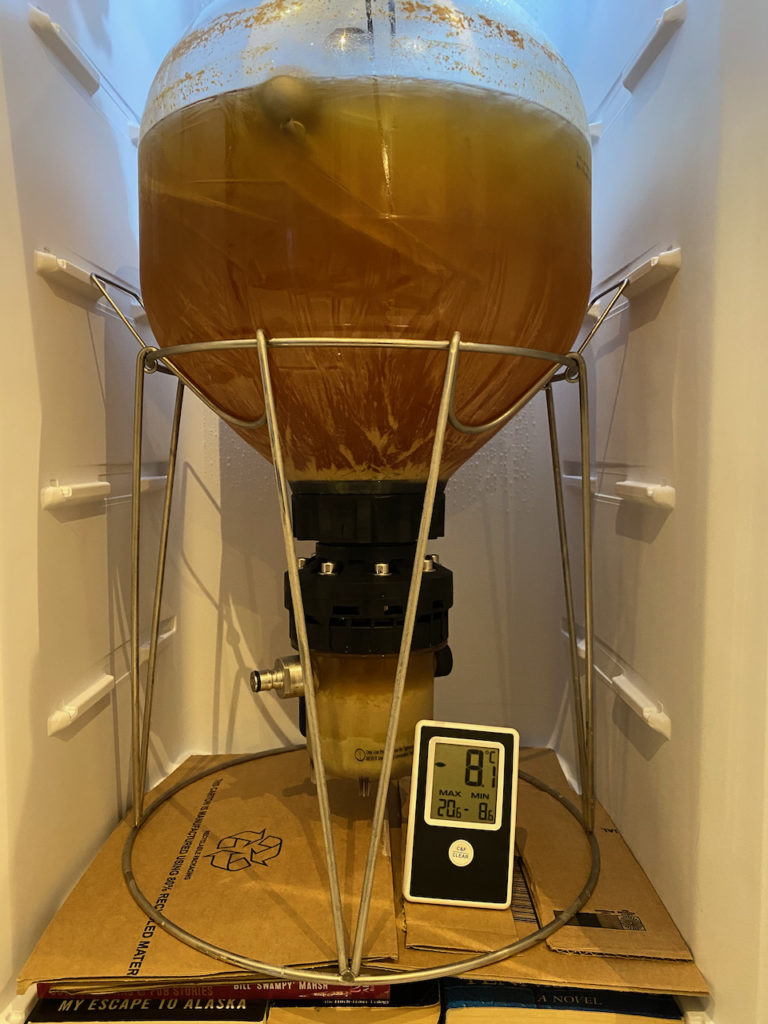
#wisdom: decrease the temperature slowly when cold-crashing to avoid freezing the brew. When using the Inkbird it may be worth placing the sensor inside a separate bottle of water to act as a thermal buffer.
Not bad, not great. There’s less of a synthetic taste about this than the two concoctions I brewed up purely from Tesco fruit juice (Summer Turbo and Farting Thrush) but that ‘fake’ palate is still there underneath our own cider, and not entirely welcome.
Right now I feel as though next time I’ll use half the amount of external flavouring as I used here, and I’ll try to make that external flavour something natural, wether it’s fresh cherries / berries or at least fresh-frozen. This stuff is drinkable, but not great.
A bottle of the sister brew, Blueberry Orgy, has been given to a friend along with a bottle of the Mangrove Jack’s Blueberry Cider on which it was based. Will be interesting to see what kind of comparison he makes.
#wisdom: don’t use too much flavouring, especially from artificial sources. 2 litres of juice mixed with 2.5 litres of cider was overkill, and one litre would have been enough.
Having spent the larger part of the day pleased with myself at how well this brew’s progressing, I just read a chapter on Extract Brewing in the Big Book of Homebrewing (Christmas gift) and now I have cause for concern, because I transferred the steeped hops to the fermentation vessels when I probably should have filtered them out.
Which of course makes sense. Why would you bring that redundant gunk along for fermentation when you’ve already extracted all the oils that you want? Can’t believe I didn’t question that point in the instructions I blindly followed. I’m tempted to syphon both brews to new vessels (it’s not as though I’m short of 5 litre Ashbecks) but I’m probably going to do more harm now through oxygenation than I’ll do good by removing excess trub. Oh well, a lesson for next time perhaps.
On the positive side, the book agrees with my decision to add a portion of the LME near the end of the boil, which is nice. To be honest I have no idea why I did that, other than to make it easier to mix with the diluting water.
Been a long afternoon, but I’ve finally taken a step further towards true brewing with my first extract attempt, fingers crossed this works out.
Having a plan is all very well, here’s what really happened. These notes were made on-the-fly and I’ve not had a chance to tidy them up, maybe I never will. Bit tired right now.


This has had just over 8 weeks of conditioning now, and I’m guessing it’s about as good as it’s going to get. Which is very good indeed; deep red colour, perfect clarity, ideal head retention, good carbonation. Taste is great, though there is a tiny amount of twang left, and that’s hard to quantify. Would you say this is Beer of Britain, an accolade it achieved in 2015? Probably not. But that’s my failing, not Tiny Rebel’s. On the other hand, if I were on holiday abroad and this is the only ale on the menu, I’d have 3 or 4 successive pints with no hesitation at all. Perfectly enjoyable.
Looking back over my notes I see that there’s a couple of hydrometer readings with excessive surface tension, which may have led to slightly off numbers and slightly iffy timing. I also suspect that closer attention to fermentation temperature won’t hurt.

This has been conditioning for 5 weeks now so I thought I’d try another one in order to see if the last of the twang has disappeared. I’ve drunk a total of 6 bottles so far and they do keep getting better, but there’s a running theme of slight under-carbonation common to both those bottles marked with 2F and those marked with 1C – 2 Fox’s drops and 1 Coopers respectively. By no means flat, it’s probably within tolerance for this type of ale, but I’d place it at the lower end of acceptable. Maybe I’m drinking it slightly cool at 9.9 ℃.
Colour is very nice right now, and clarity on par with anything I’d expect to get in a pub. There’s a lot of autumnal flavour on the palate with an acceptable amount of malt and lingering traces of honey. I don’t remember if this is what Wherry tasted like on draught as it’s been a very long time, but I’m very happy with this as a session-opener.