Presenting a real milestone: my first ever all-grain attempt! Everything’s new here so I chose what looked like a fairly easy brew comprising of 2 malts, 2 hops, a single infusion mash and regular fly sparging. The recipe is a clone of Kona’s Big Wave Ale which was slightly fiddled and scaled using Brewfather, brewed using Brewtools B40Pro and fermented in the Fermzilla.
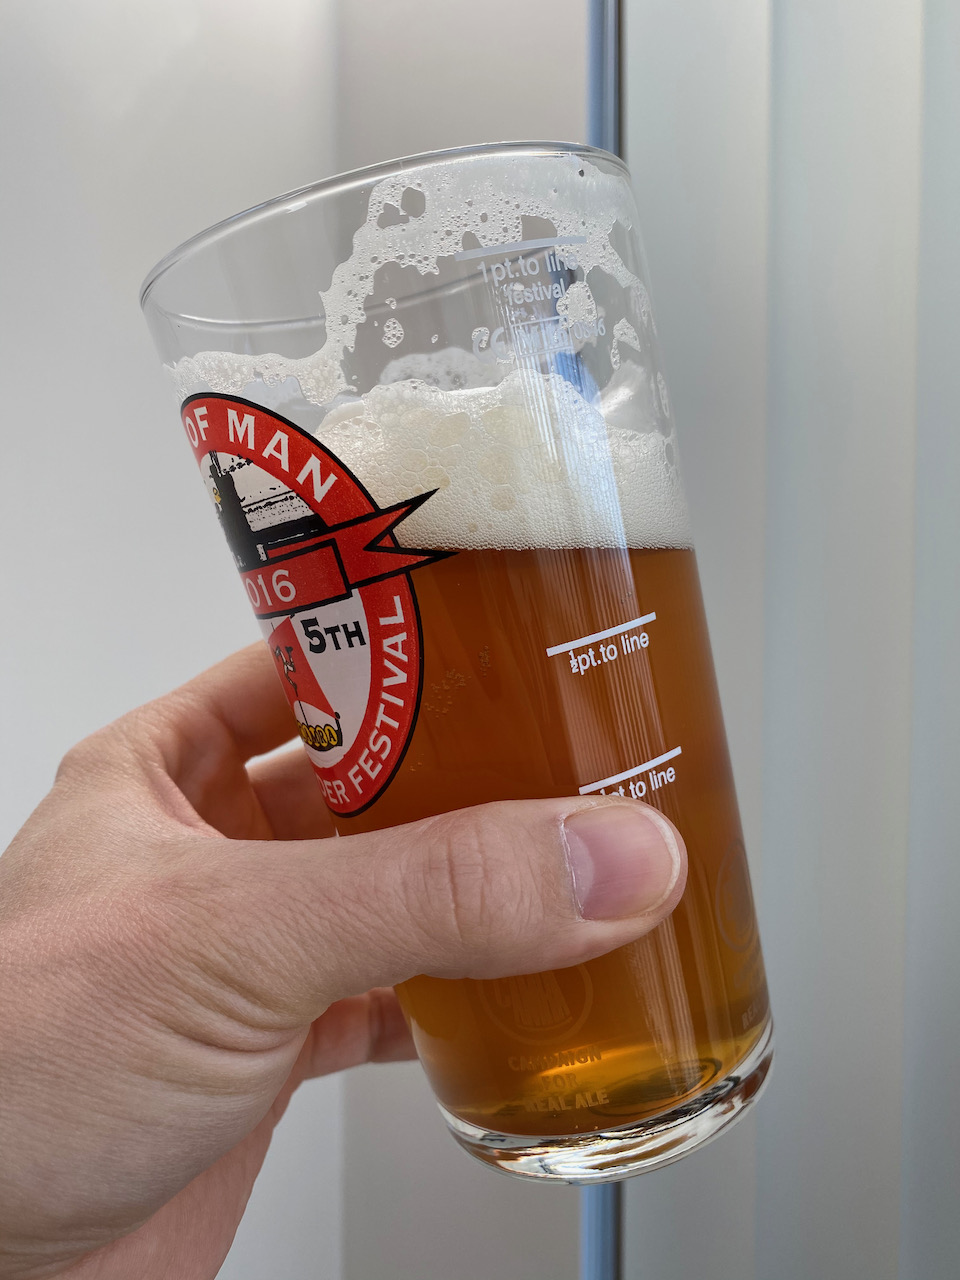
Finished off the last bottle of Golden Wave with Hazel and Blair last night. It tasted great until the end, no sign of twang at all and the same delicious level of happiness as we had from the keg. Mouthfeel may not have been 100% on par with draught version, but until I get a like-for-like comparison it’s hard to say, and given that we kegged this two months ago it’s also pretty unlikely that a chance to compare bottles with draught will ever present itself.
It’s been three days since the last sample, thought I’d dip my beak in again to see how this one’s getting on.
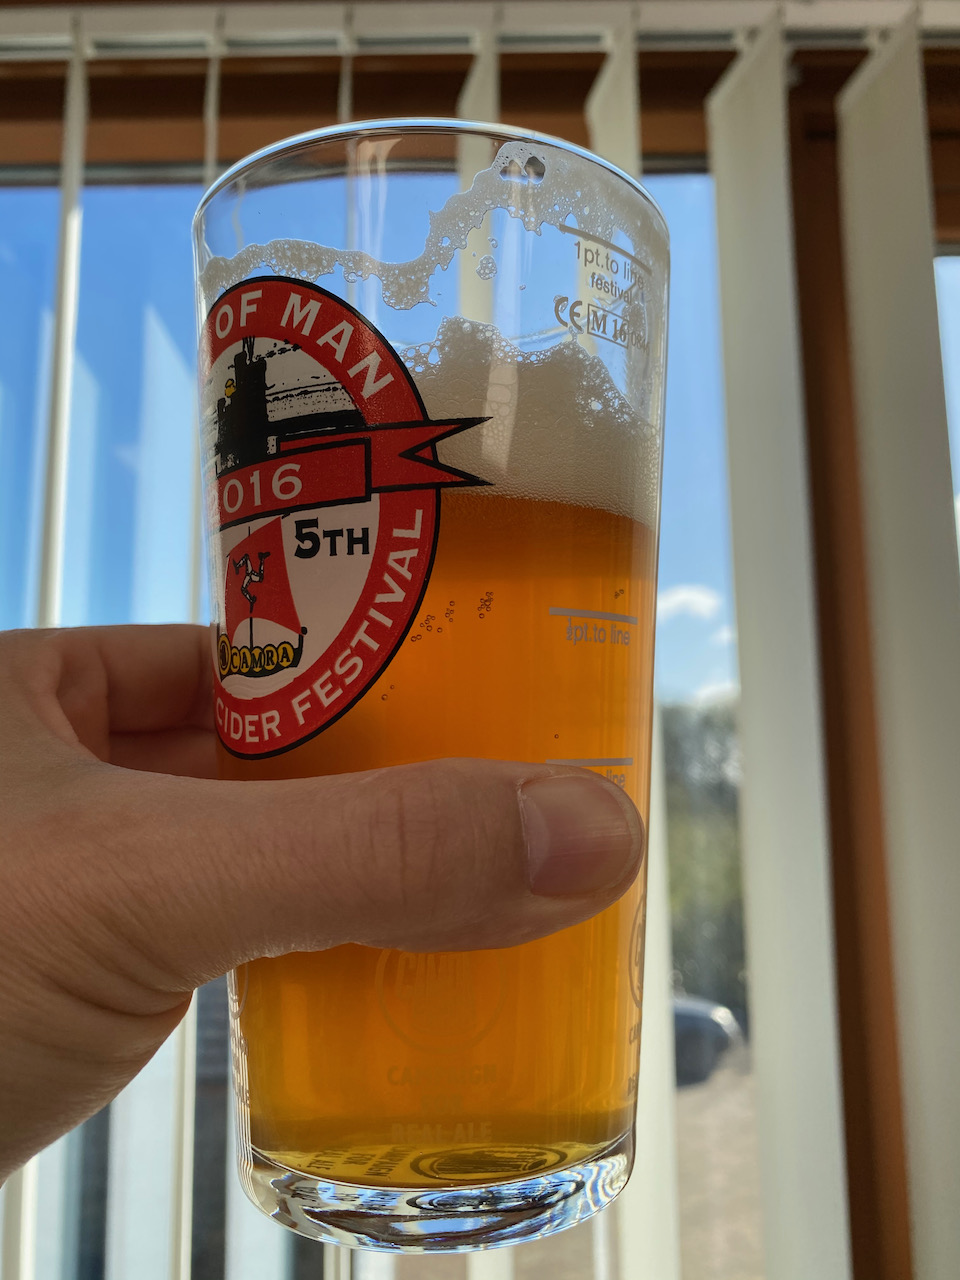
Cloudiness is still there, as is the lovely hoppy nose, and there’s a well-rounded bitterness where at the start was a touch of … I don’t know, “grassiness” … ? It’s slightly more drinkable than it was 3 days ago, and it wasn’t exactly bad then. A touch more clarity would be nice, though I wonder if in waiting for that to happen I’ll lose some of the hop aroma.
Parting thought: still too much foam. It’s been sitting at 10 PSI these past three days and I’m reducing it to 8 PSI until it calms down a bit. 30 was way too much at the start, not doing that again.
Decided that after today’s successful brew day I deserved an early go at this one. Way too much foam even once dispenser is chilled, maybe I shouldn’t have held it at 30 PSI for 2 days before dropping the pressure to 10.
Foam party (and some slight cloudiness) aside, the taste is very good and has a lovely hoppy nose. The body feels as though it may improve a little with another week or two, but it’s going to take some willpower to leave this alone that long.
After spending a day in the cold I’ve decided that not much more is going to drop out of this beer, so it’s time to hit the keg and free up the fermenter for my next concoction. There being just under 22 litres in the Fermzilla I opted for a fully closed transfer to a 19 litre Cornelius keg and the rest into bottles, and it almost went without a hitch.
Starting a fully closed transfer was as simple as connecting the liquid out posts of the two pressure-balanced vessels with my newly rigged transfer line (2 bits of silicone hose and a large Bouncer filter) and then briefly popping the PRV on the lowered keg in order to start the syphoning process. As soon as beer is in motion the two gas posts were connected with a straight pipe between two disconnects – simple. Naturally the keg was purged of air beforehand by filling it with sanitiser and then pushing that out with bottled CO2, doing the same with the filtered beer line and also flushing the gas line in the process.
I initially gave both the Fermzilla and the keg just 5 PSI because I didn’t want to risk blowing the silicone hose off my filter’s barbs, but increased it to 12 PSI when I noticed that the piece of hose downstream from the filter was ¼ full of tiny bubbles which I first took to be an air leak despite the enthusiastically tightened plastic union. Seems that it wasn’t an air leak but carbonation escaping my beer as it rushed through the filter, and increasing pressure back to serving PSI fixed that.
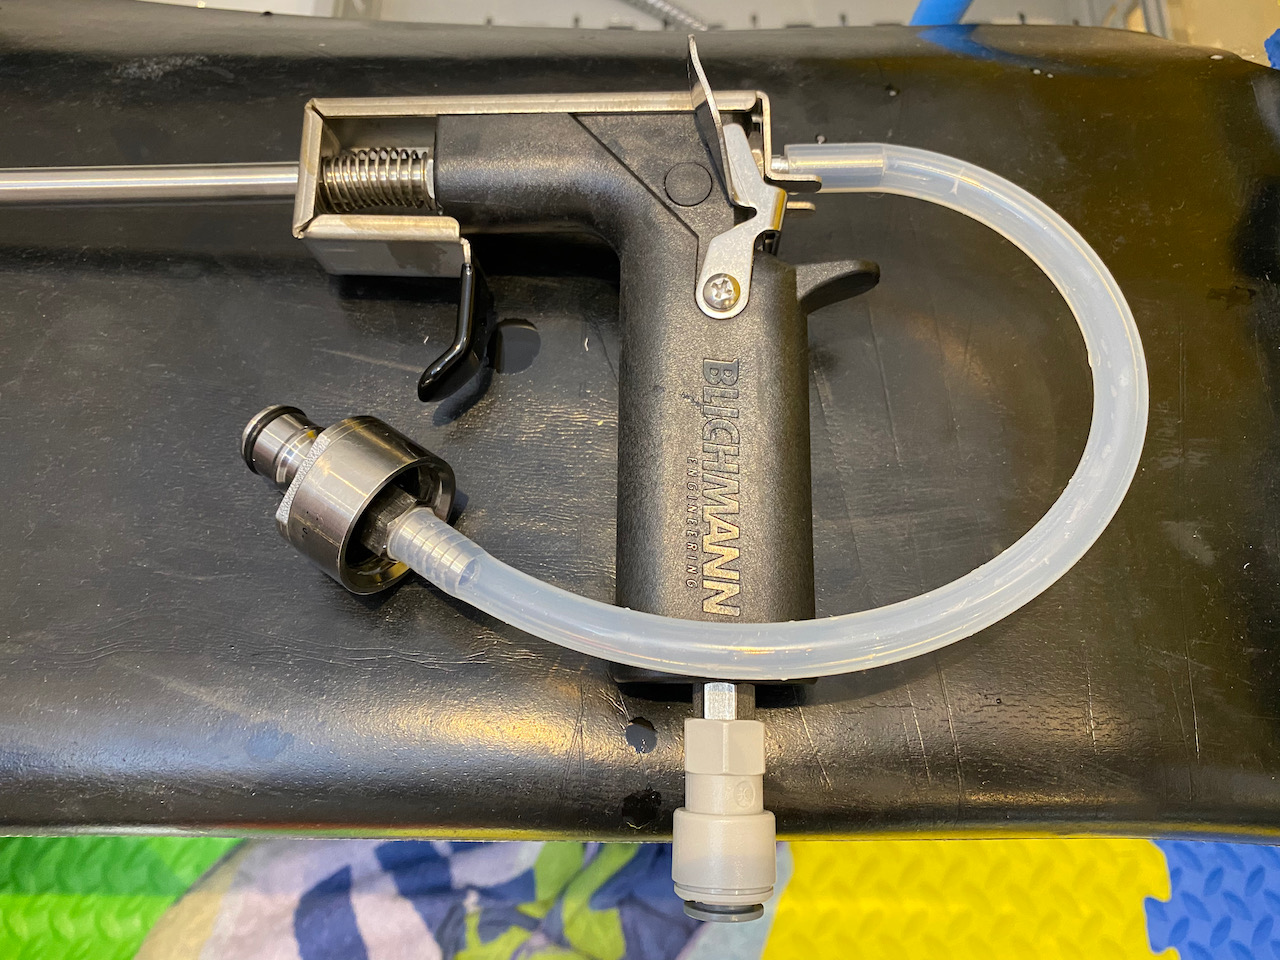
Using the Blichmann Beer Gun was less successful, largely because even the slightest bit of pressure caused beer to squirt out of the muzzle due to the design of the silicone bead at the end. To get any level of control I had to purge the Fermzilla of pressure entirely and rely on gravity to dispense the already carbonated beer, which wasn’t nearly as clean as it sounds and resulted in just two bottles filled, barely justifying the amount of cleaning that was necessary afterwards.
Ending on a positive note, I rigged a clumsy arrangement of silicone and carbonation cap so that I could use the beer gun with the same transfer line as I’d used for the kegs, which was relocated from the floating pick-up tube to one of the posts on the Fermzilla’s collection jar. By a happy coincidence the level of settled trub was just below this post, and I was able to draw quite a bit more beer than the floating dip tube would have given me.
I’d like to say I’ll use this method again, but chances are that if I’ve used the Fermzilla then my beer will be at least partially carbonated by the time it’s ready to bottle, and unfortunately this really isn’t the beer gun’s strong side. Nice try though.
Shot in the dark: bottling carbonated beer with Blichmann’s Beer Gun
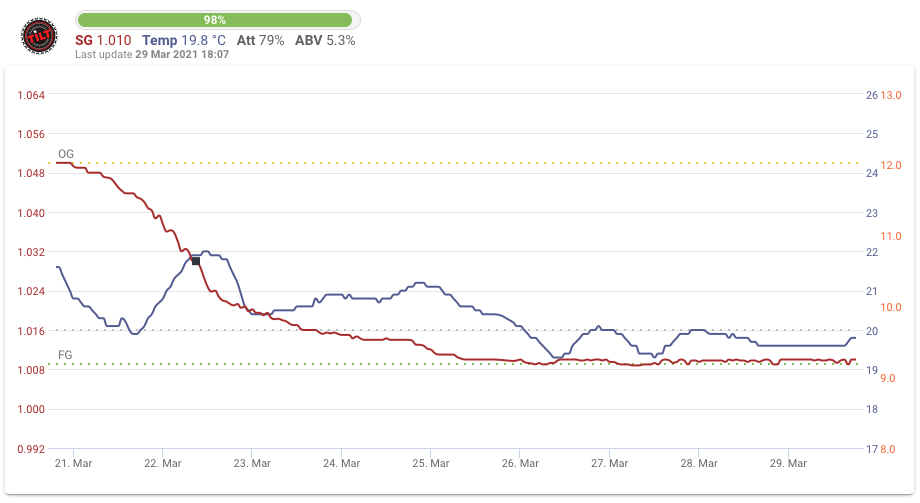
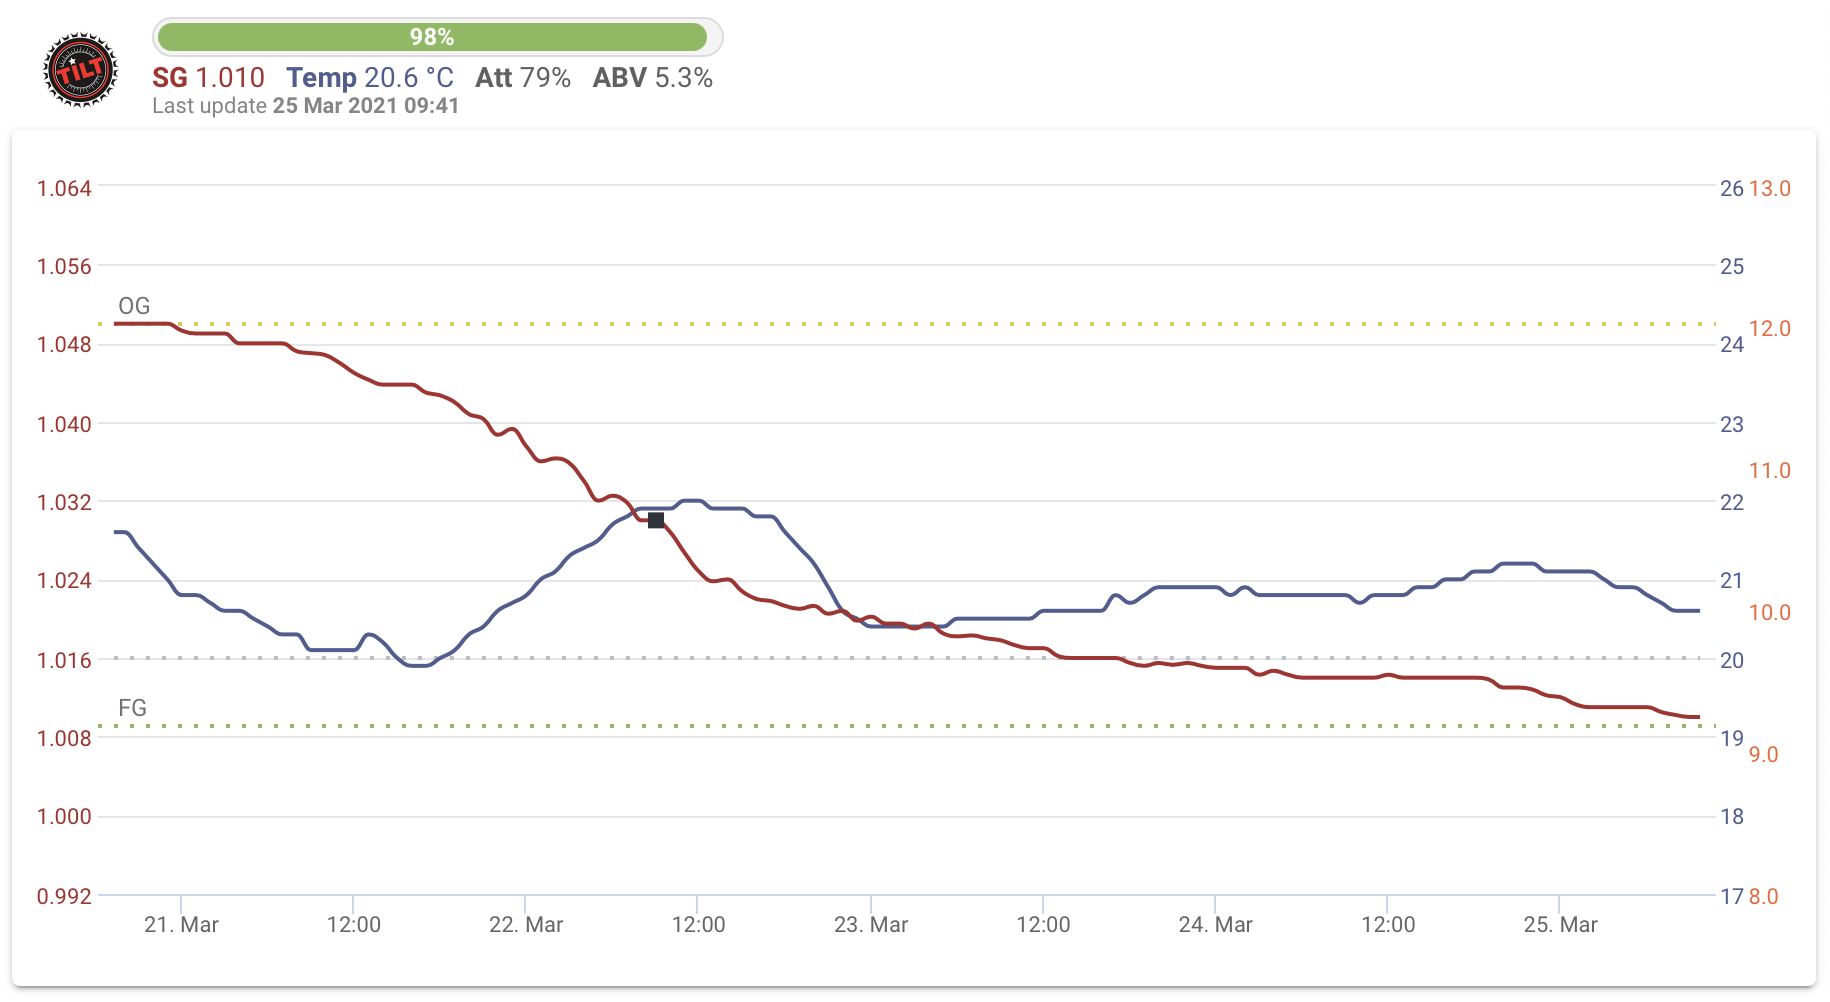
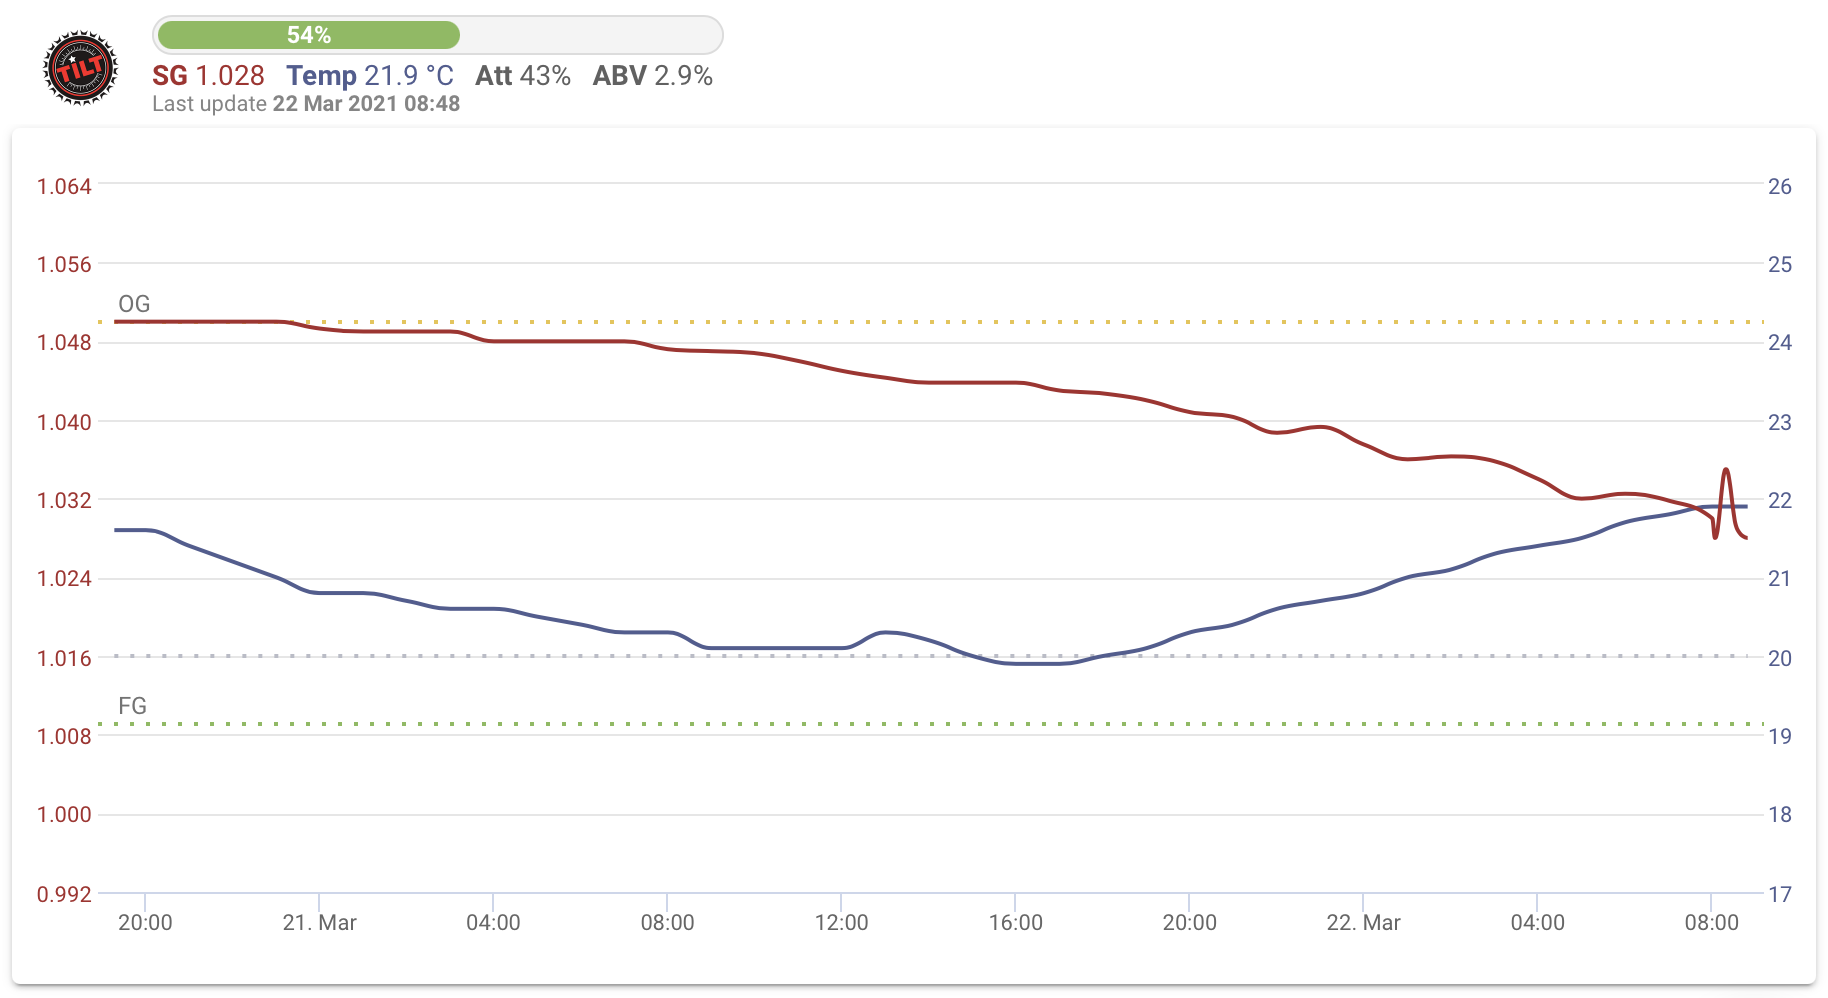
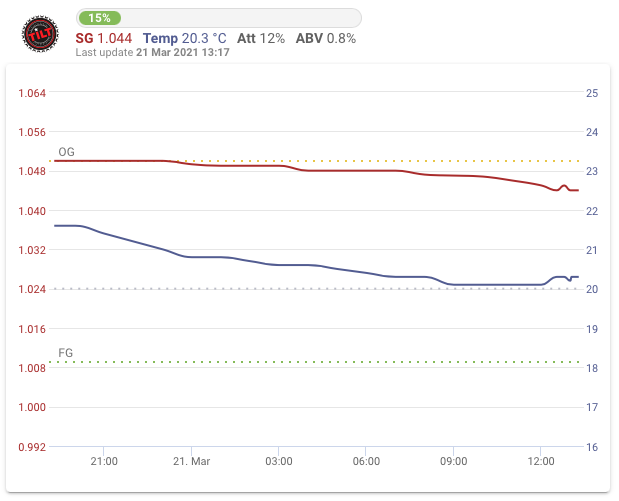
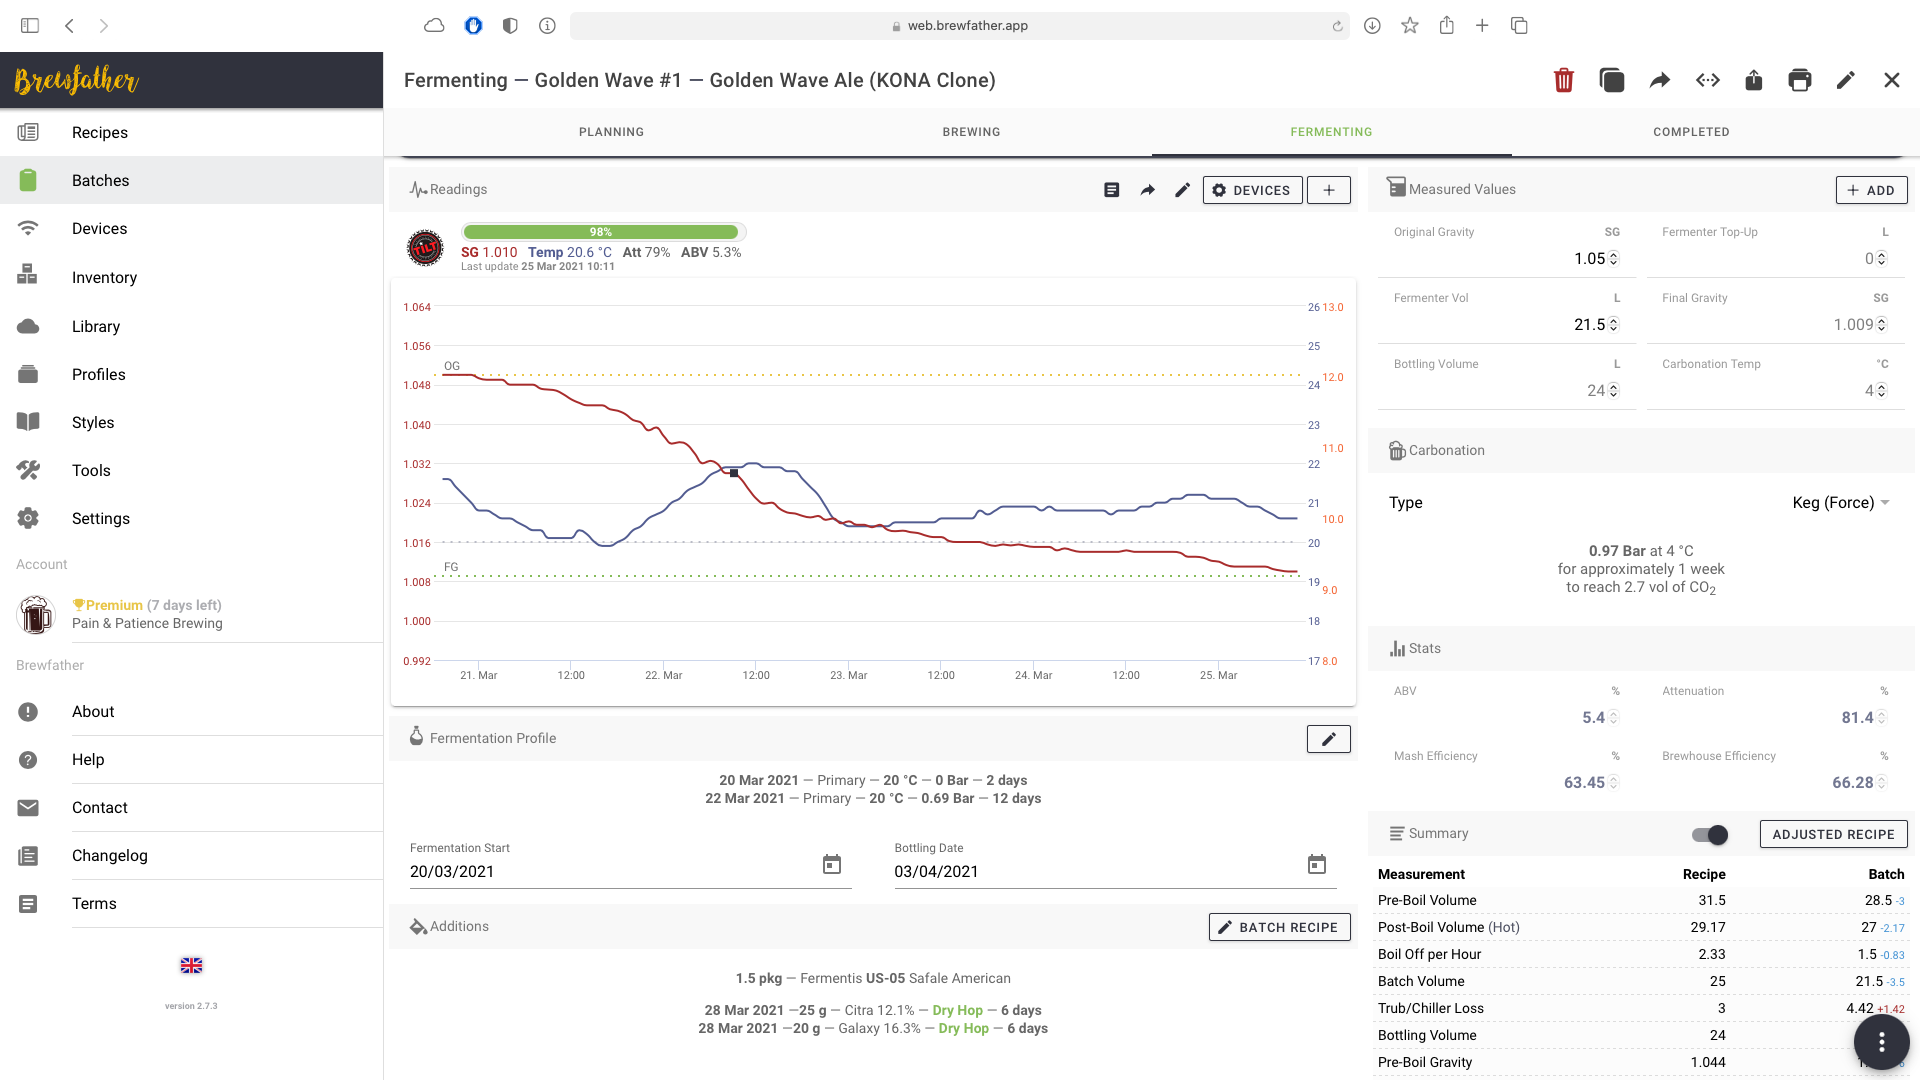
There’s been very little movement on this brew in the past couple of days with the gravity swinging between 1.010 and 1.009, representing 98% to 100% completion against target. The only sign of life in fact has been a gradual increase in pressure since the spunding valve was closed after dry hopping 2 days ago, starting at 10 PSI and getting as far as 13 PSI today. I don’t think that’s going to cause issues with the 4 or 5 bottles (if any) that we’ll get over and above a keg, and it certainly won’t be a problem for the Cornelius.
Golden Wave Ale, 9 days into primary
The only question in my mind right now is whether cold-crashing is even necessary, since I’ve seen an unprecedented level of clarity with this, my first attempt at using Protafloc tablets. I’d be mightily pleased if a non-fined beer were this clear after a week in the chiller, so is there even any point in doing this? Well, the keg this is going into will be chilled as soon as I’ve filed it, and if chilling is only going to remove a smattering of suspended hop matter then it may as well remove it before we go to the keg.
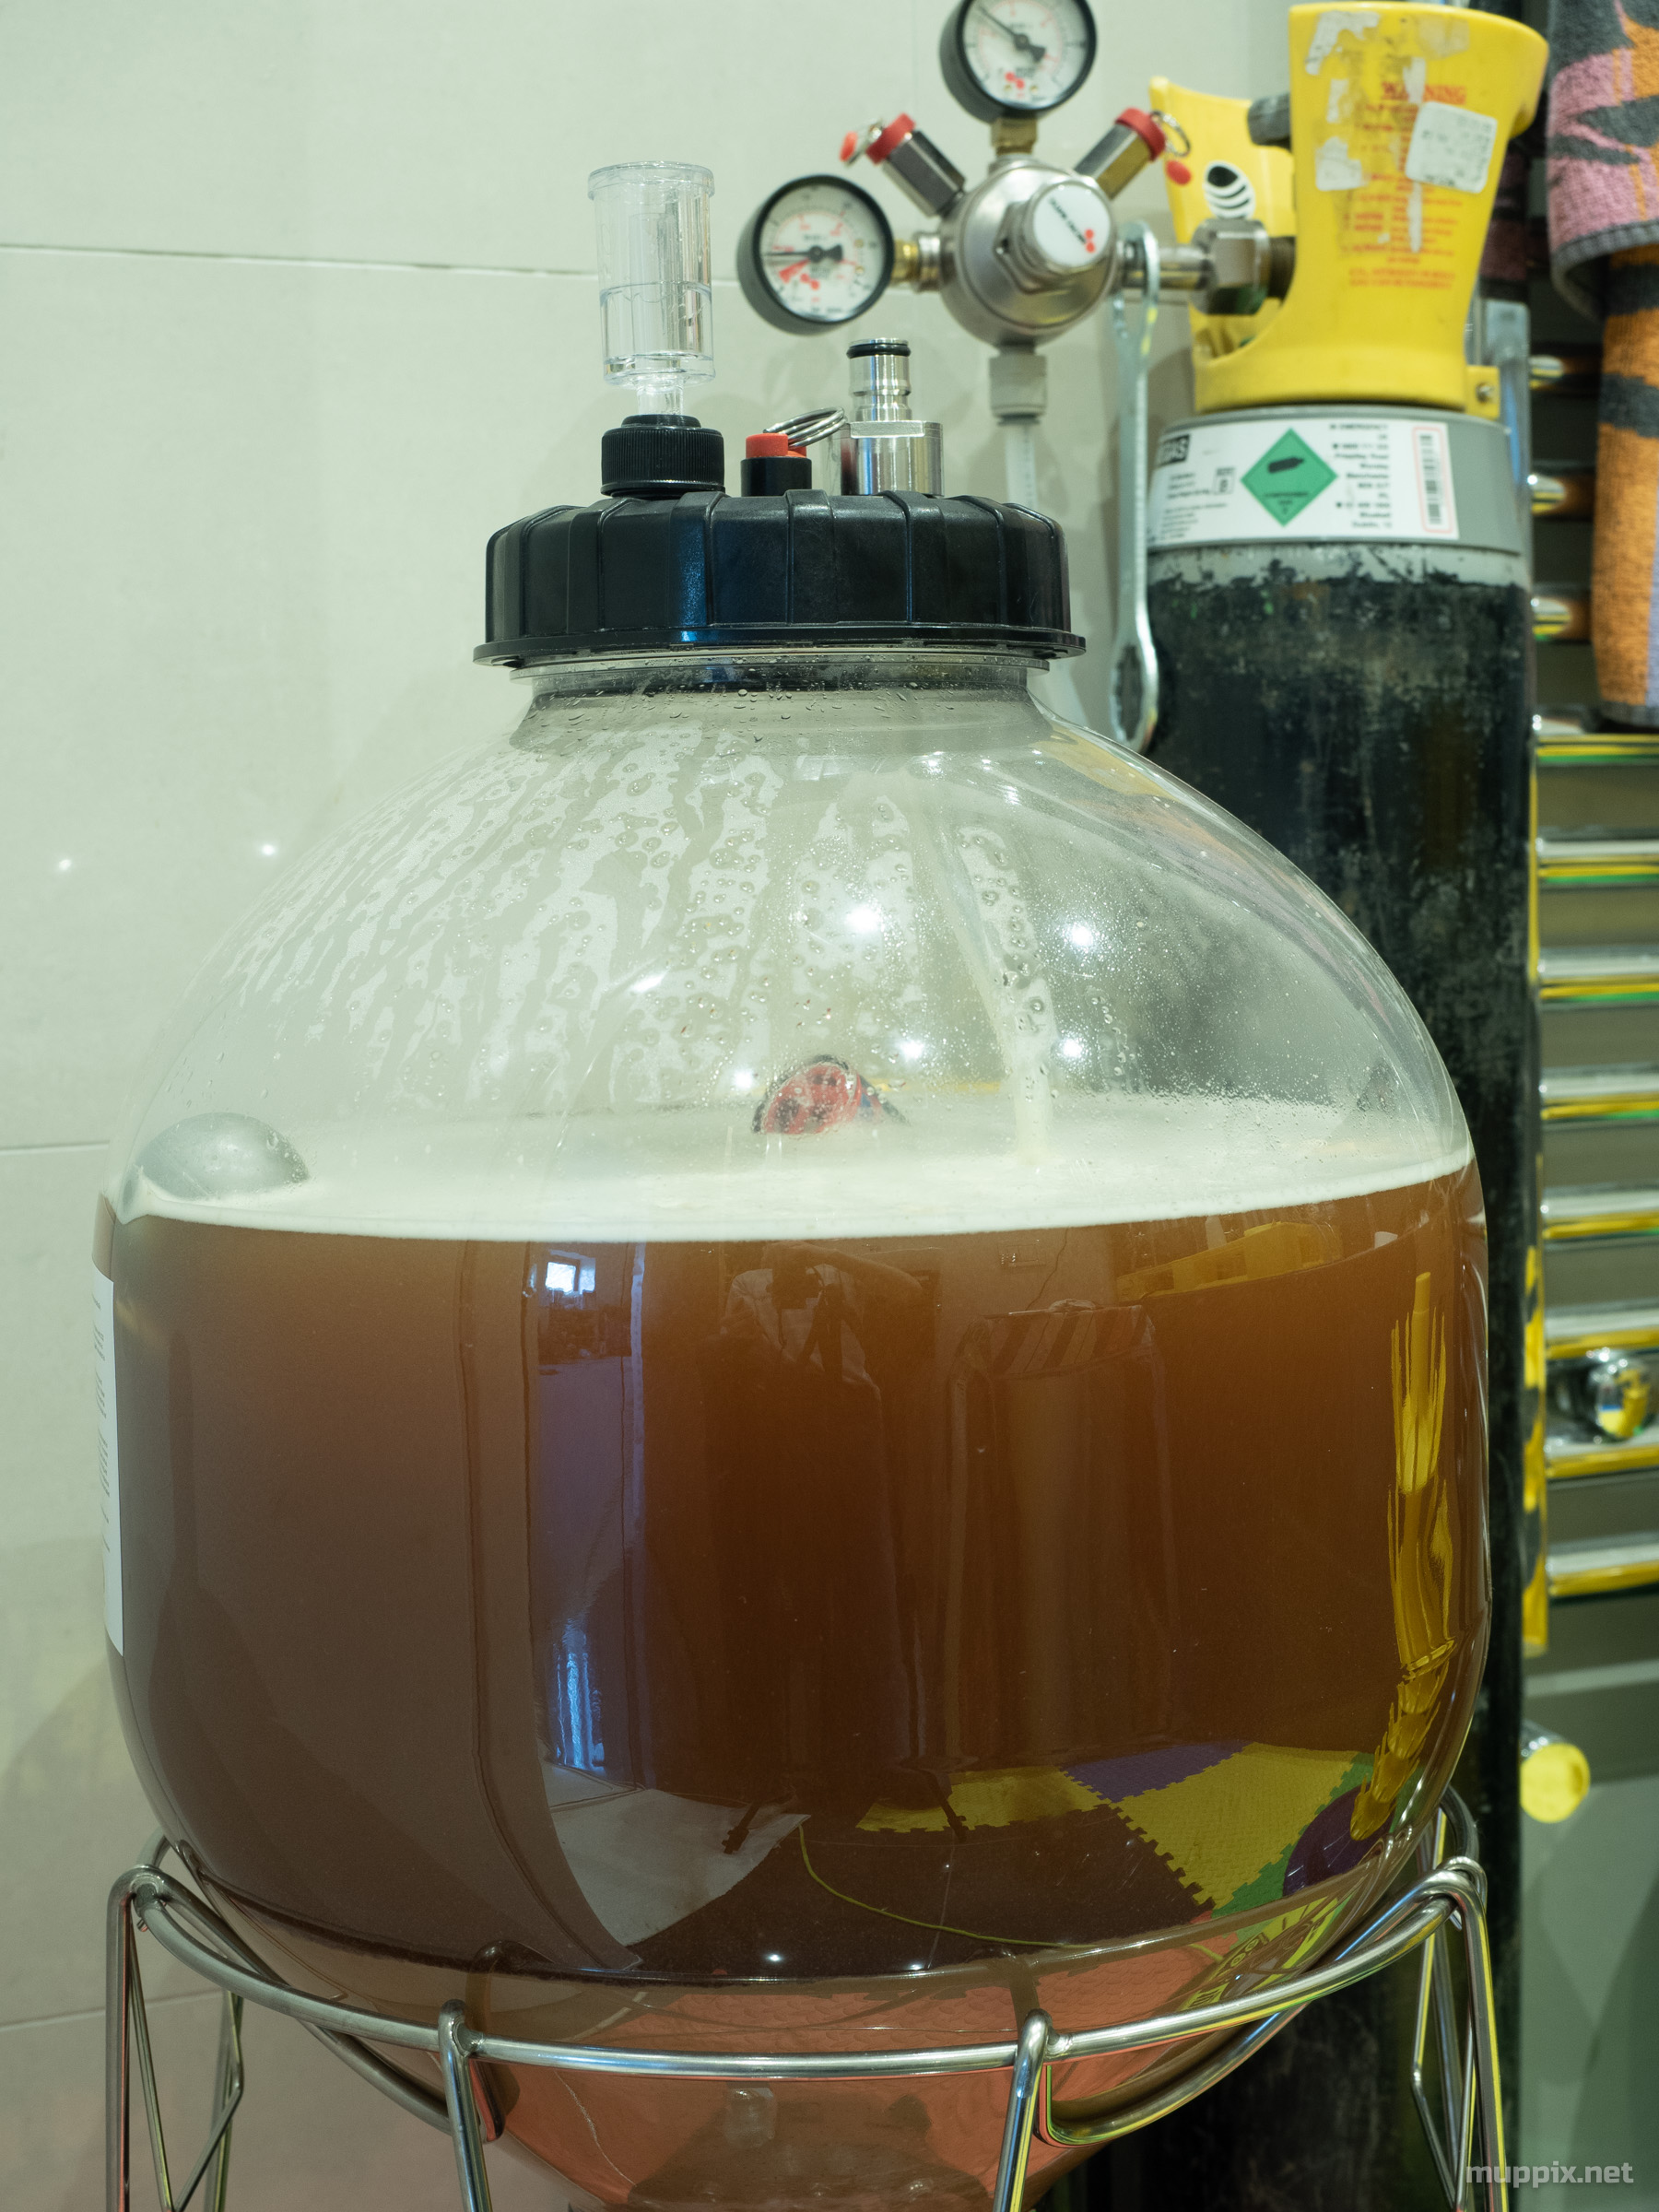
Let’s give it a couple of days and keep an eye on the temperature via Tilt, which seems to be working just fine through the walls of the refrigerator. Speaking of which, a couple of days ago I added a gas line via the drain pipe so that I could keep my kegs carbed, and I may as well add some pressure to the Fermzilla now rather than wait until we’re in the Corny. Dialling in 15 PSI and setting the temperature control to ‘mid’ in order to prevent a repeat performance of the Great Bure Permafrost of 2021.
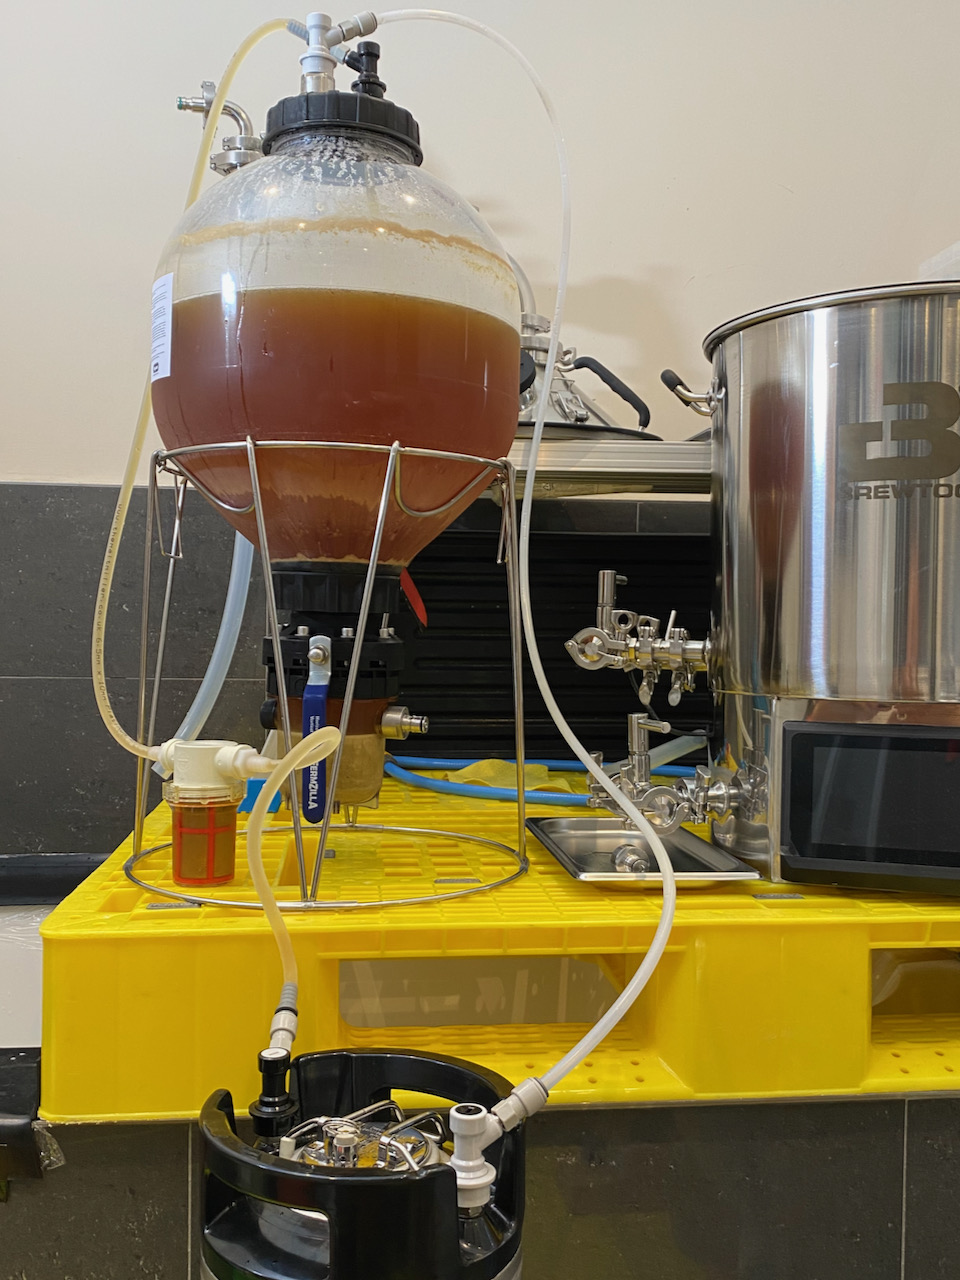
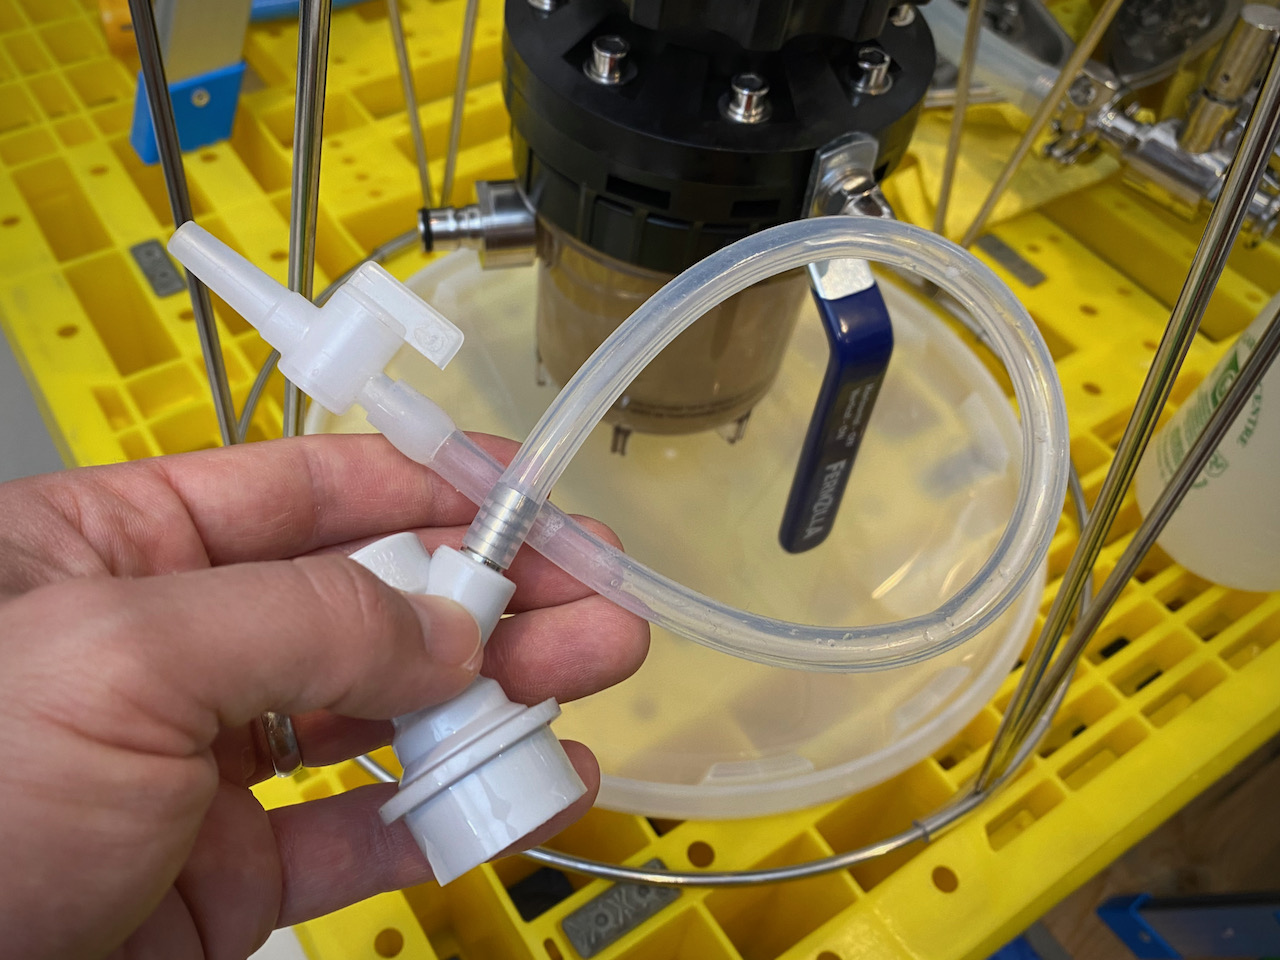
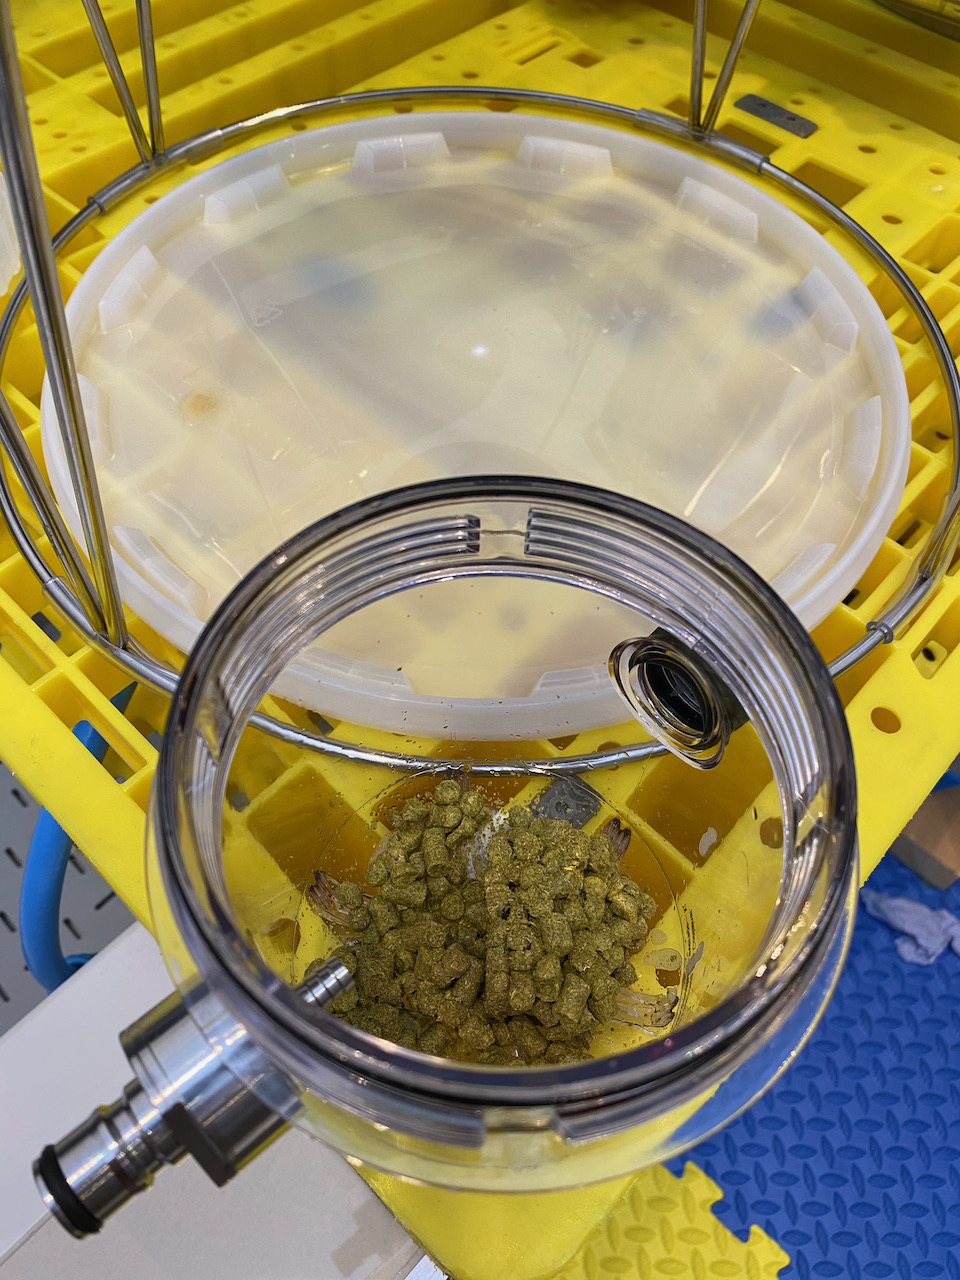
Added 25g Citra and 20g Galaxy via the Fermzilla’s collection jar, reducing the pressure and partially draining before disconnection, equalising against the vessel before releasing the hops. One or two challenges were overcome along the way, overall a successful operation.
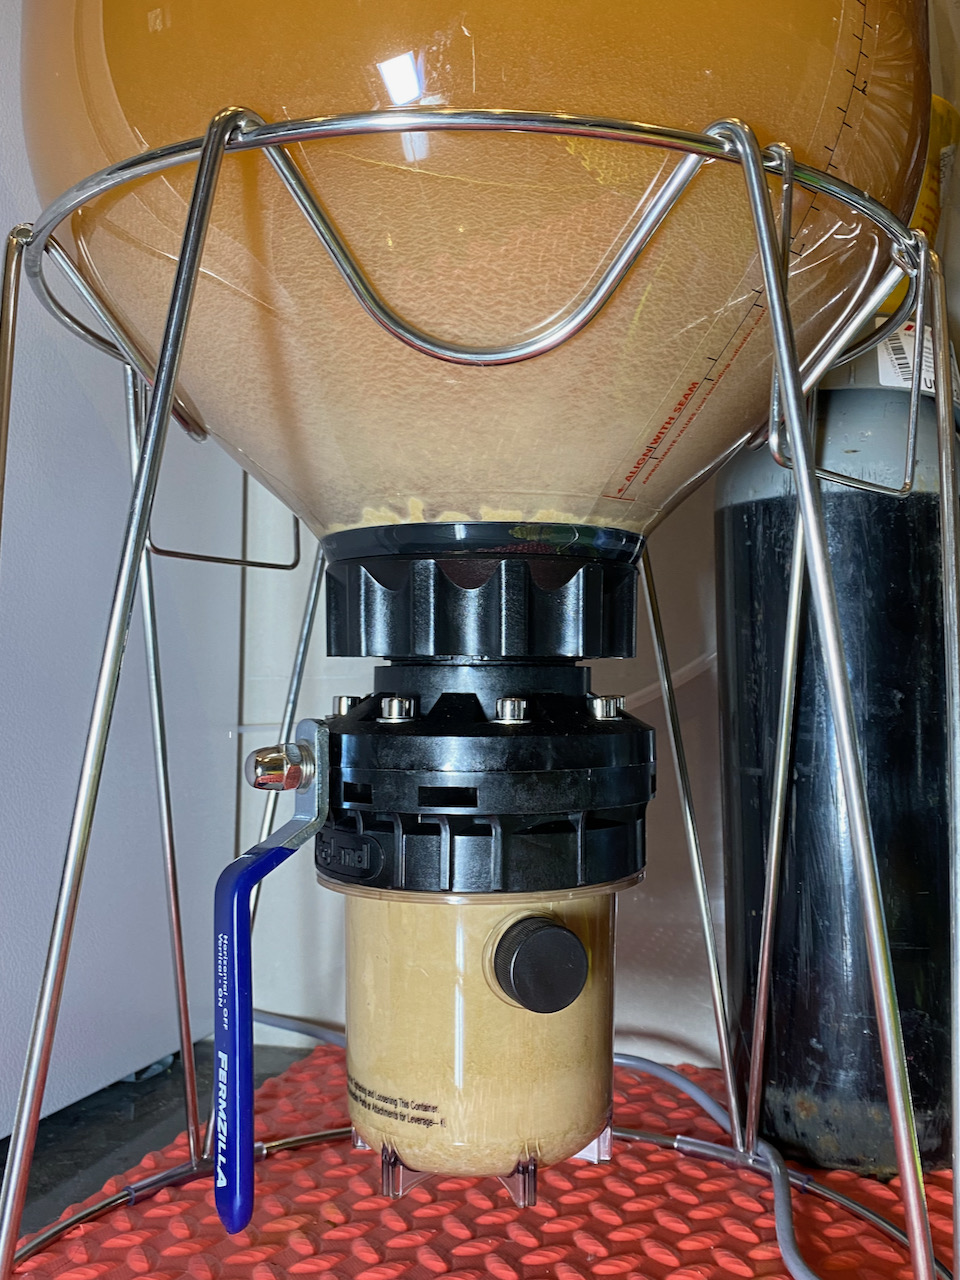
Removing the Collection Jar
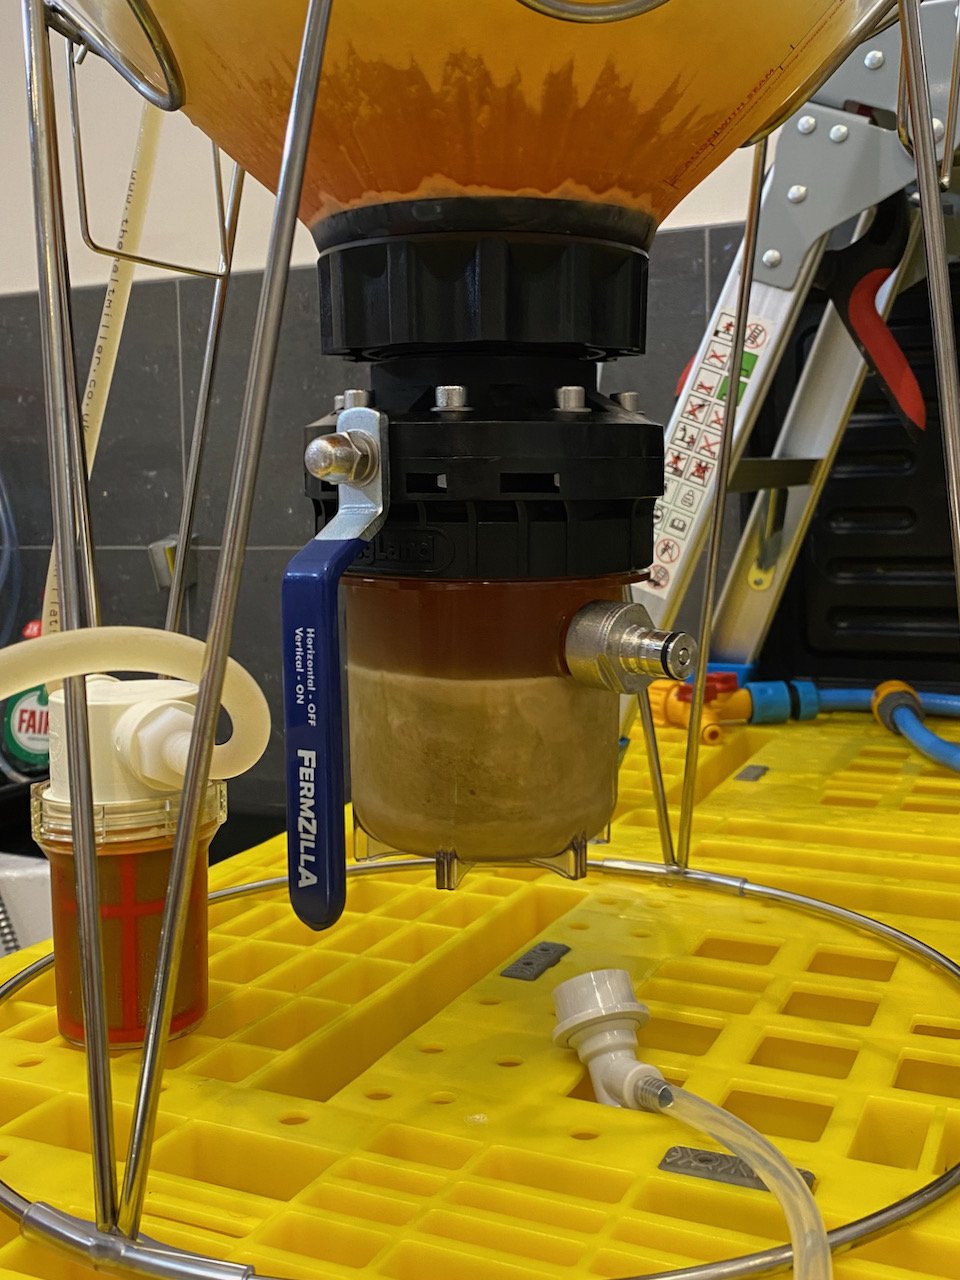
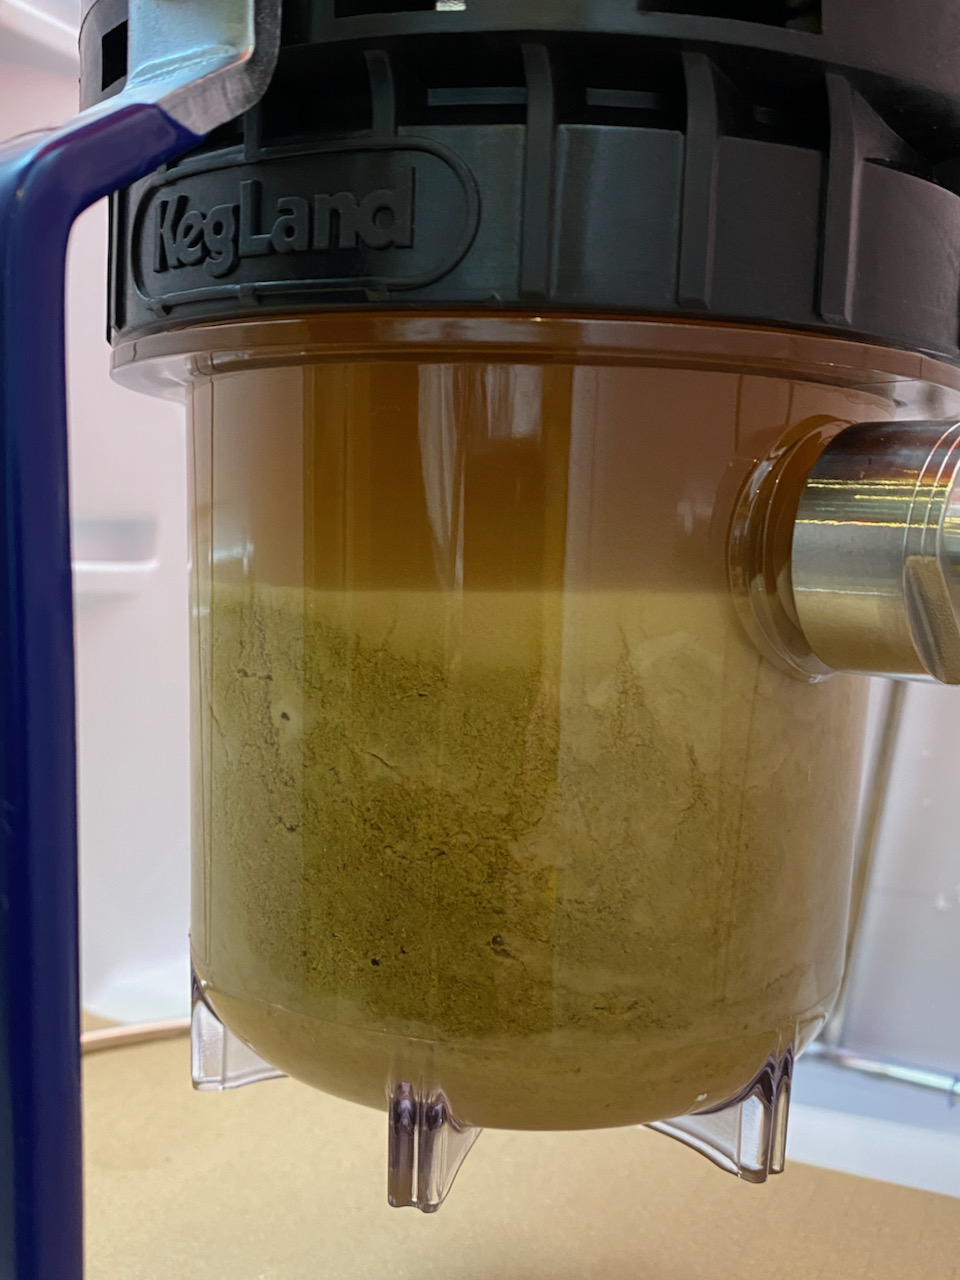
The last time I did this I ended up with quite a mess despite completely de-pressurising the Fermzila before removing the jar. I think it was because I de-pressurised after closing the butterfly valve, which left the collection jar under pressure and a small amount of trub below the butterfly valve yet above the lip of the jar. This was released violently as soon as the jar came off.
Depressurising completely also causes trub to swirl around from the bottom and somehow seems disrespectful to the beer after it’s been sitting there patiently at 10 PSI thanks to the spunding valve, so this time I only reduced the pressure to 5 PSI, shutting the butterfly valve afterwards so that the collection jar too was at 5 PSI.
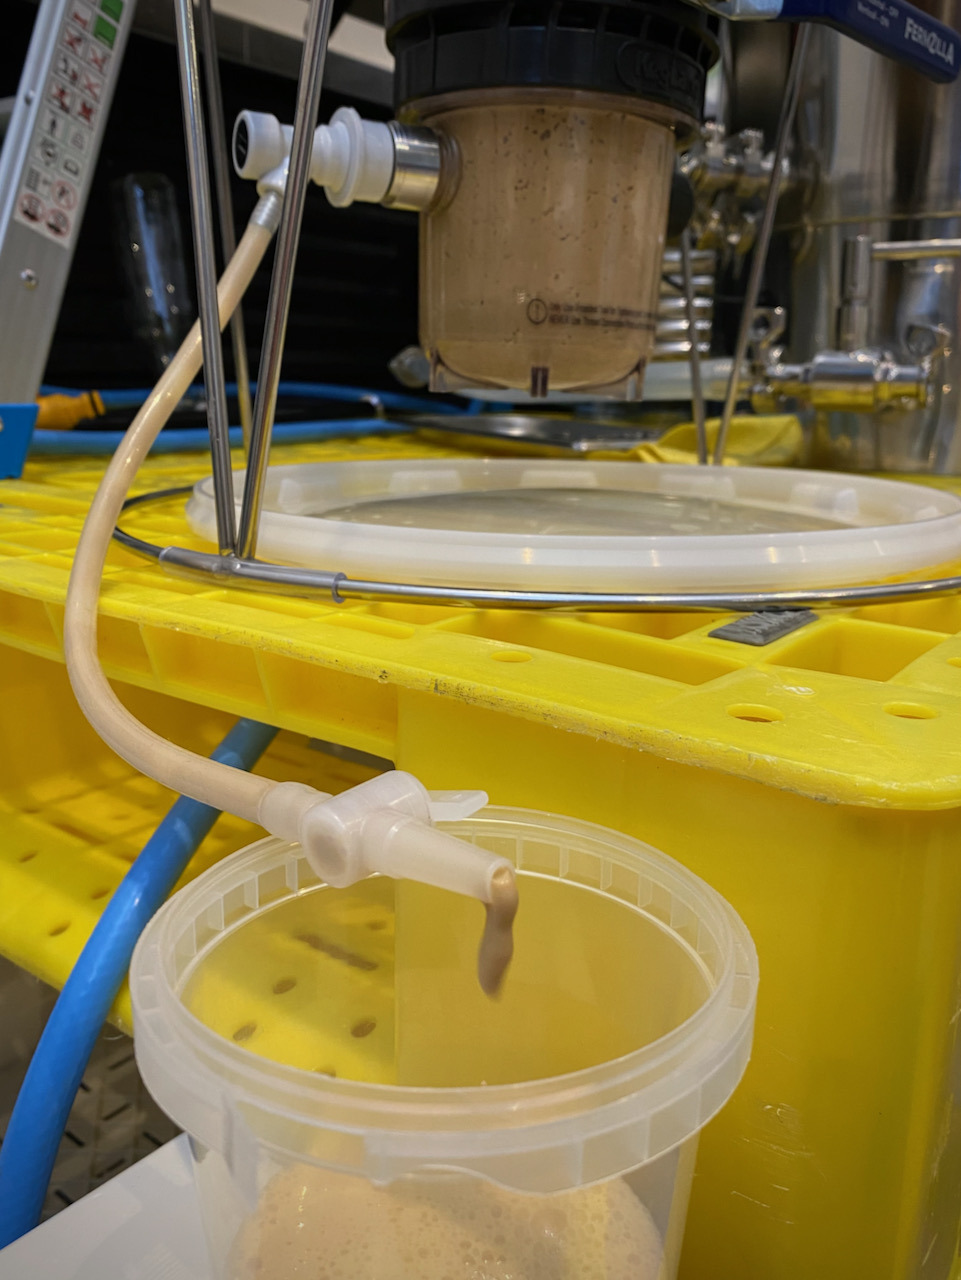
All I had to do now was see if I could get the trub level down past the rim of the jar before unscrewing it – not really necessary, but I wanted to see how cleanly I could do this. I rigged up some silicone hose to a barbed disconnect and a plastic valve that came with a bottling kit which I never used. 5 PSI shouldn’t be enough to dislodge the hose so I didn’t bother with zip-ties.
The device worked really well, pumping out some thick gunk enthusiastically at first, then more slowly as the pressure inside the jar dropped off. I regretted not fitting a second ball-lock to the opposite side of the jar since the flow was bound to stop soon without air getting in to balance things out, but it carried on dribbling happily until I stopped it after 10 minutes and what looked like 400 ml of yeasty gunk.
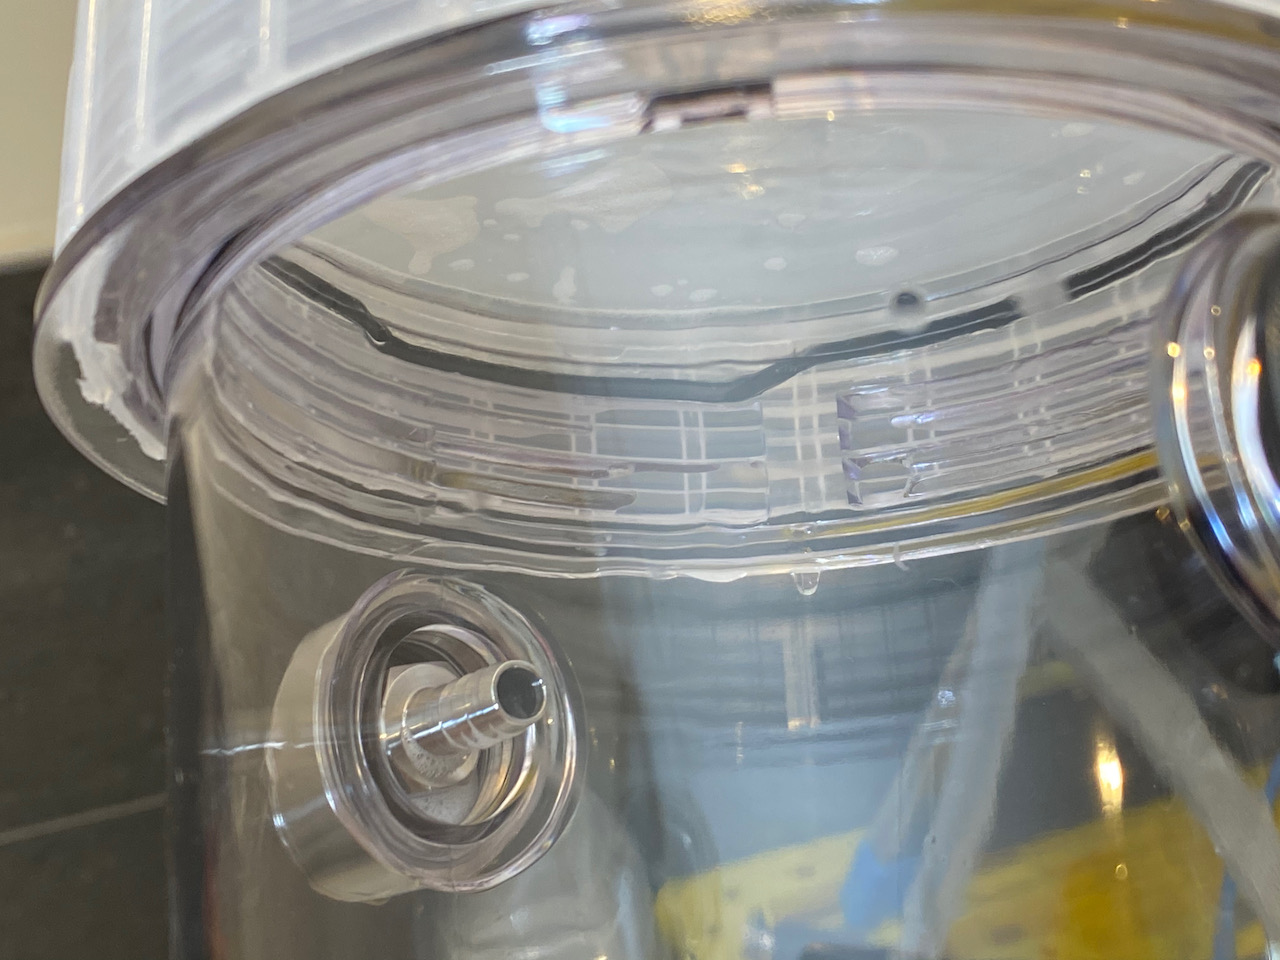
Removing the collection jar was as difficult as last time despite me greasing the O-ring with silicone lube before assembly, and would have been impossible without the supplied rubber strap wrench. Even so there’s precious few hand-holds to keep the Fermzilla in place while you wrench away, and you have to be sure to place the strap around the very base of the collection jar in order to prevent the thing from flexing dangerously. When it finally came loose I didn’t spill a single drop of crud, and was pleased to see the level in the jar about half an inch below the lip. Result!!
Refitting and Purging
Having dumped the contents of the jar it’s time to strip off the caps and give everything a steaming hot wash before refitting and sanitising. I’ve not used the collection jar lid before and decide to dig it out so that I can shake it vigorously and foam up some sanitiser, which leaks copiously and I discover that the lid has dislodged the O-ring. Great. Now I have to wonder if it’s been damaged and / or if the same thing will happen when I fit the jar to the Fermzilla. Nothing for it but to add my hops and carefully screw it on while checking with a torch. Thankfully the jar is transparent and I think it looks OK.
I hook up my CO2 to the carbonation cap and dial in 5 PSI, flicking the coke cap repeatedly to flush the jar. I’m not really satisfied with this arrangement; each purge only mixes the oxygen in the jar with CO2, diluting it a little more, but never fully eliminating it. Each purge also takes with it a chunk of hop aroma, which smells very nice but I’d rather it stayed in the beer. Difficult to know where to draw the line, so I go for half a dozen quick purges and resolve to pop the pressure relief valve a couple of times when the hops are mixed in. By then any oxygen will also have gone through the beer, but it’s better than nothing.
#idea: going forward I want to knock up a silicone tube elbow to a second carbonation cap fitted to the collection jar. The silicone elbow should go to the very top of the void, touching the middle of the butterfly valve. I’ll add CO2 via the opposite carbonation cap, slowly purging it via the tubed cap. Hopefully purging slowly will minimise the mixing of oxygen and carbon dioxide, and drawing from the top of the void should give me oxygen first and CO2 later.
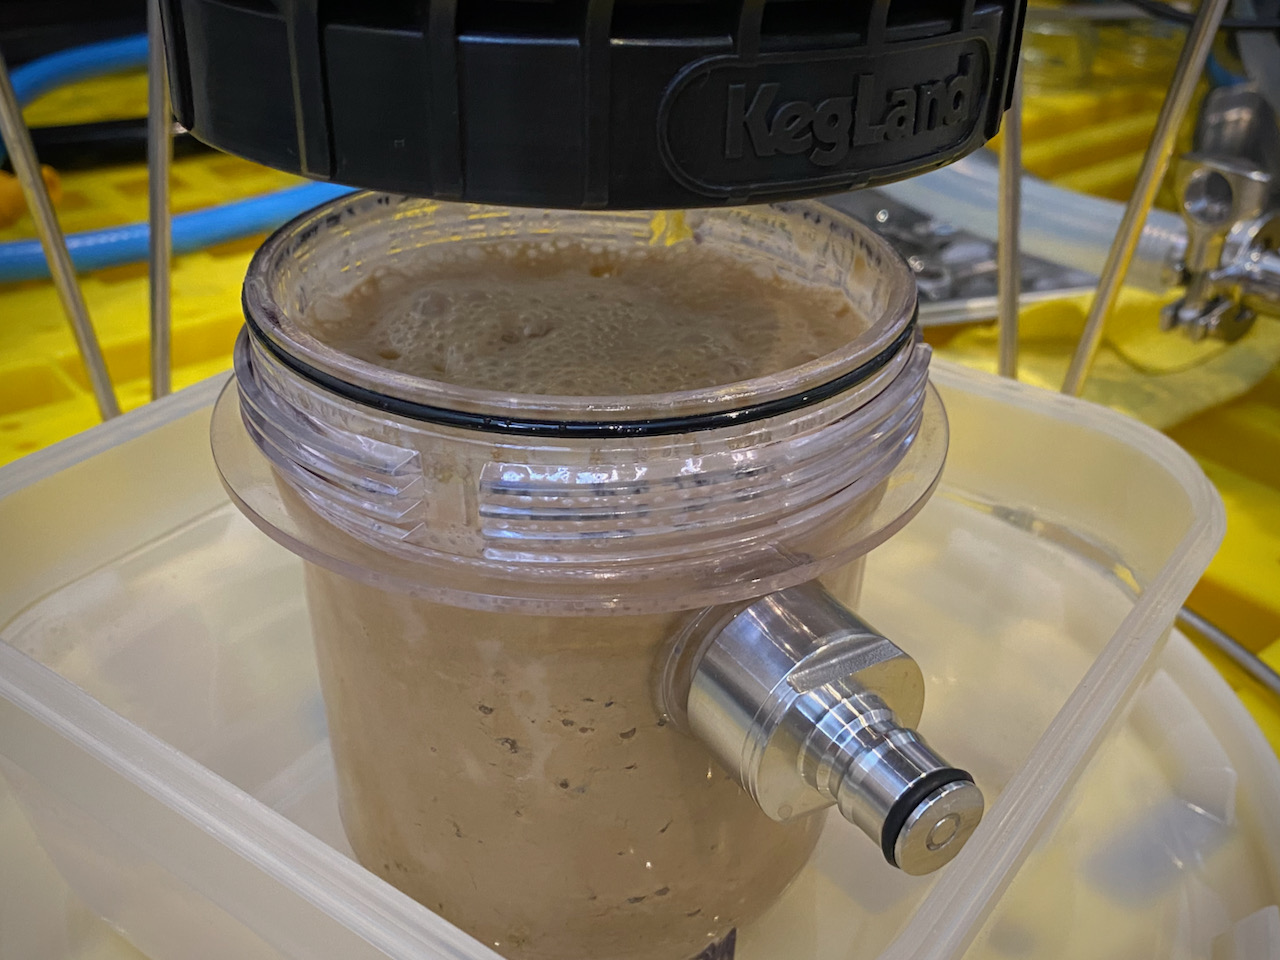
Equalising the pressure in the collection jar and the Fermzilla was a good idea. When I slowly opened the butterfly valve I didn’t get the same explosive upward surge as last time, just a gentle mixing of gas, beer, and hops. Move gas disconnect to the top, dial in 10 PSI, pop the PRV a couple of times. There’s no leaks and the hops are well and truly mixed in, as is some of the previously settled matter because the beer is more cloudy and lighter in colour, a bit like it was in the last few days before clearing. Final step is to remove the gas disconnect and fit the spunding valve, cranking it right up. Although I’m sure fermentation was done before I dry-hopped the agitation of yeast and addition of new material could result in some activity, and I want any subsequent CO2 produced to help with carbonation instead of escaping to the atmosphere, taking my precious hop aroma with it.
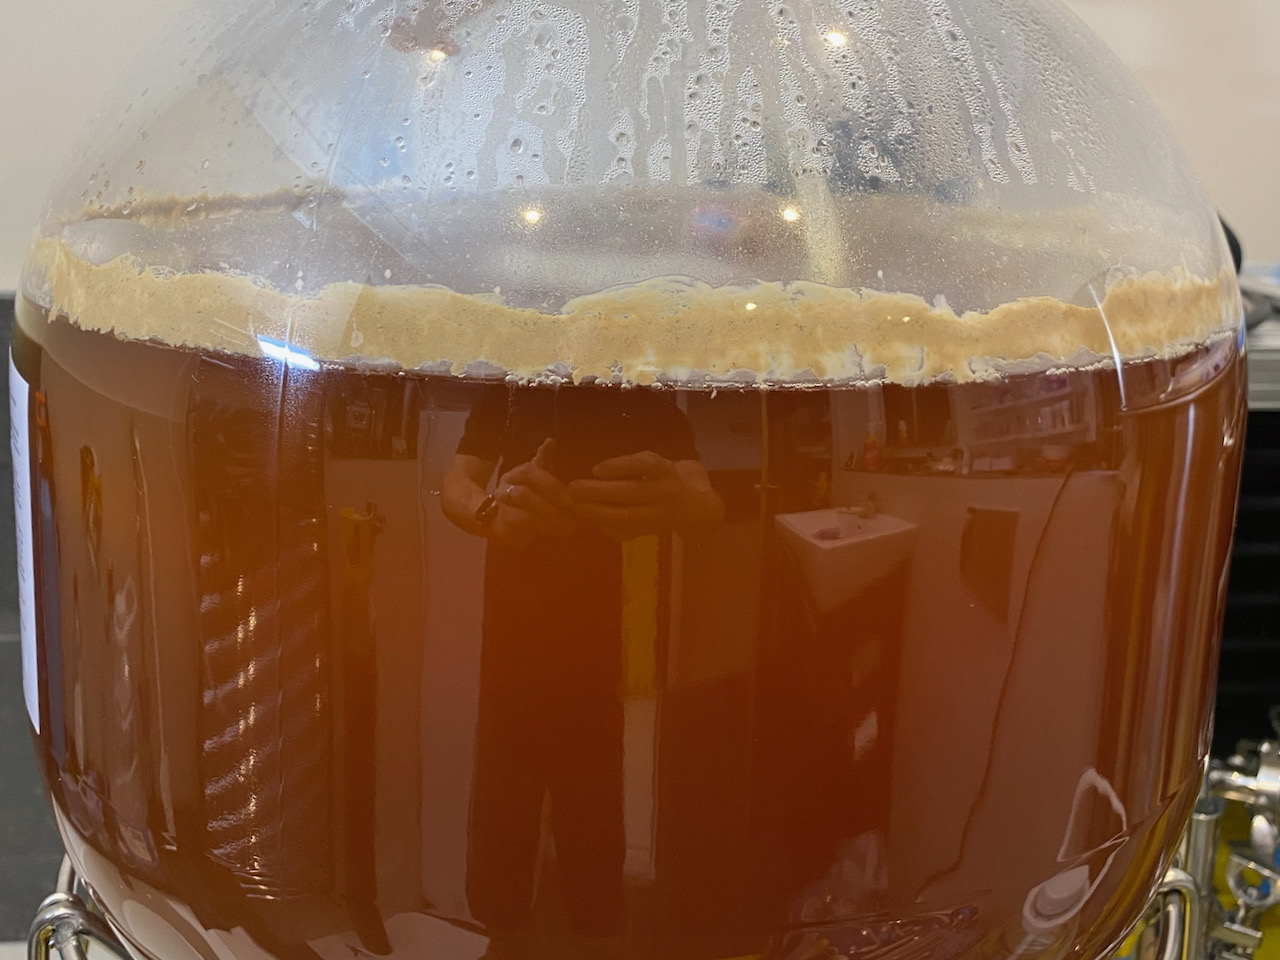
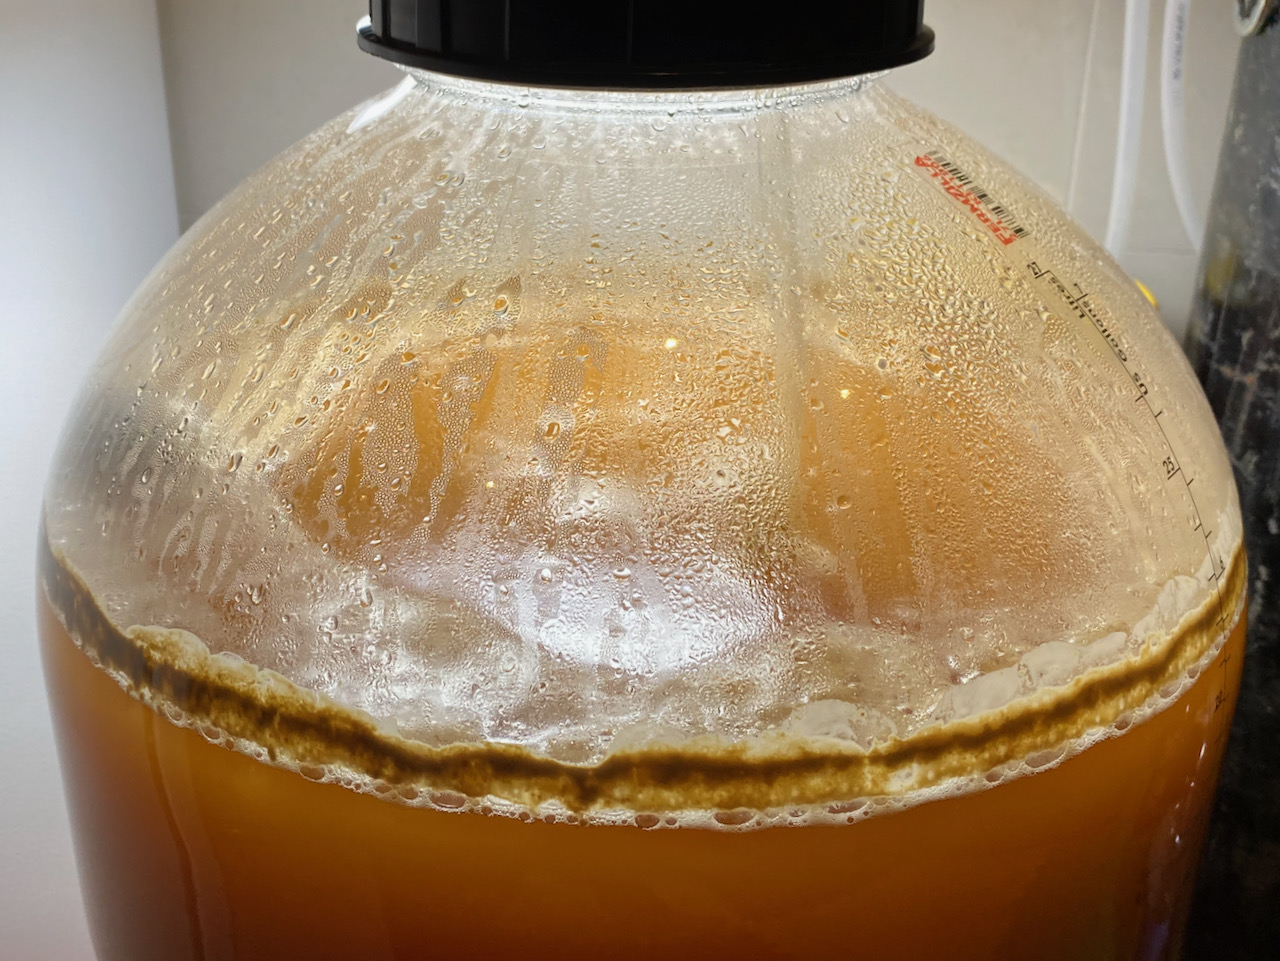
Looks as though this one’e either stopped or slowed right down. There’s no change in the gravity for 2 days but the colour has gotten a lot deeper, possibly because whatever was in suspension up until now has dropped out. Krausen is gone except for some deposits around the rim.
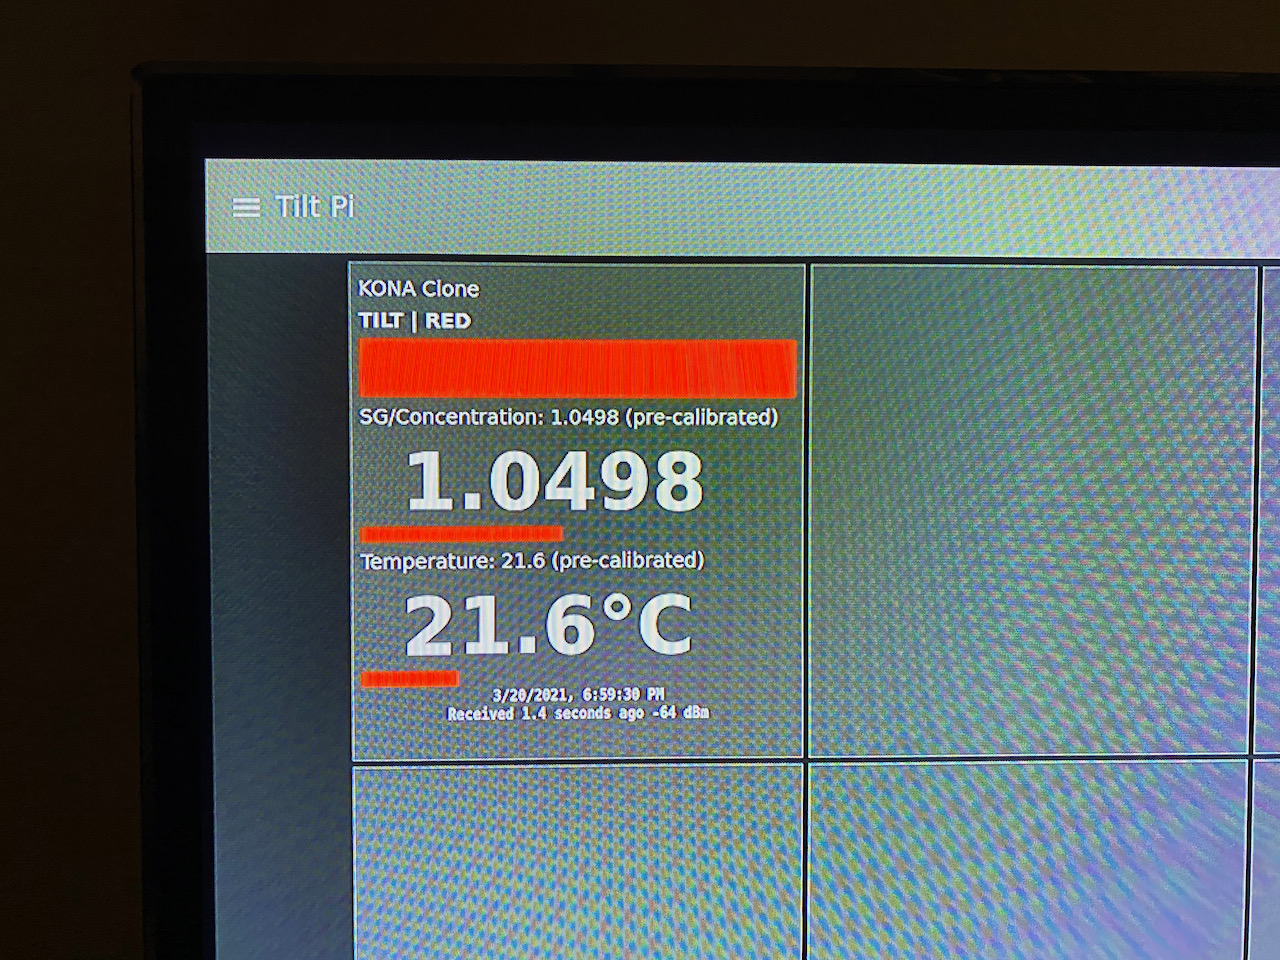
It appears as though fermentation is slowing down here. Last night there was a visible reduction in the thickness of Krausen and the Tilt gravity data had flattened out over the past couple of days to the point where I thought it would stop at 90%, but this morning it’s dropped another couple of points and is now sitting at 98% done, or 5.3% ABV.
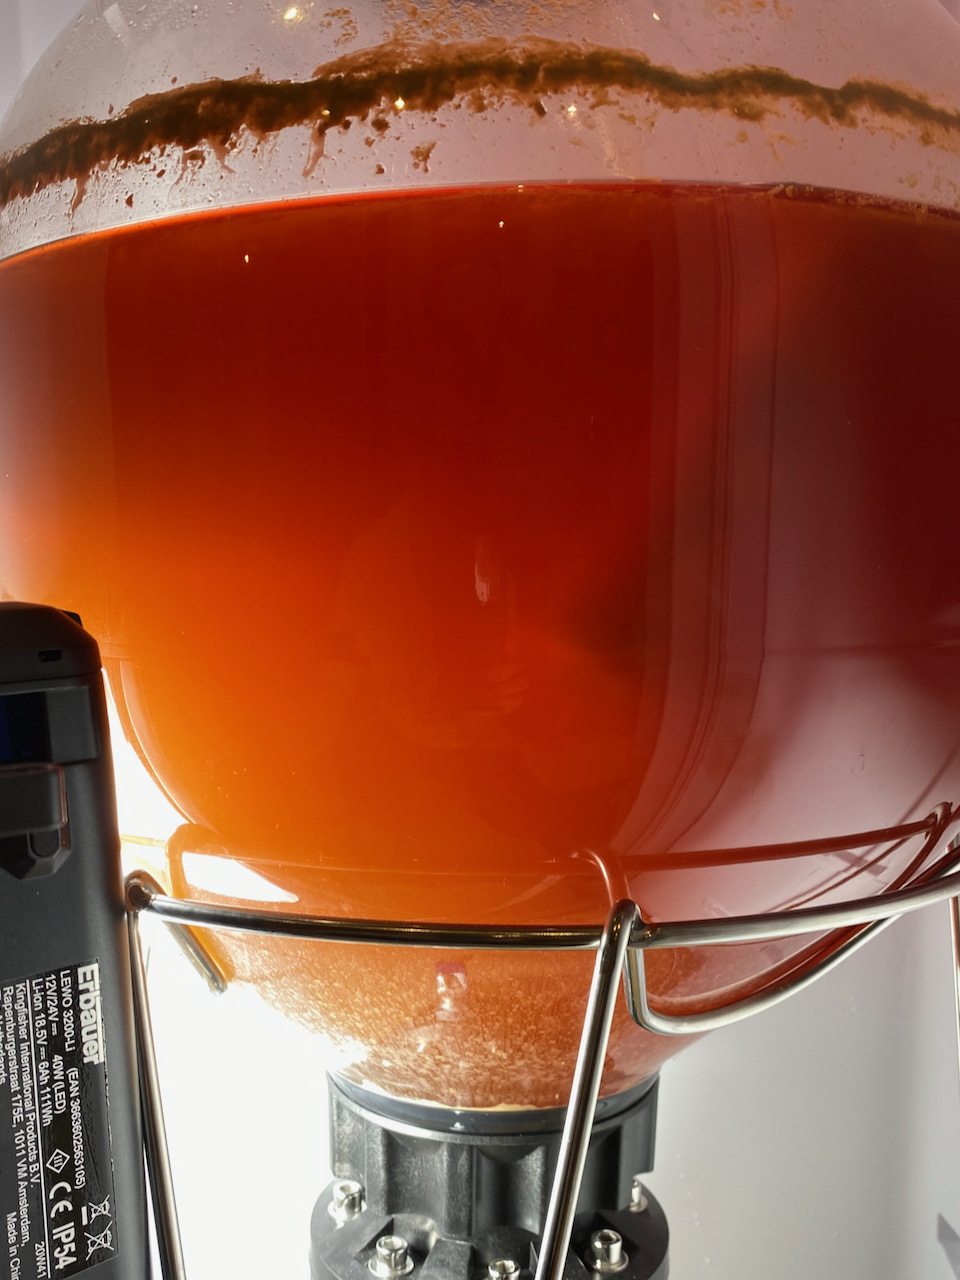
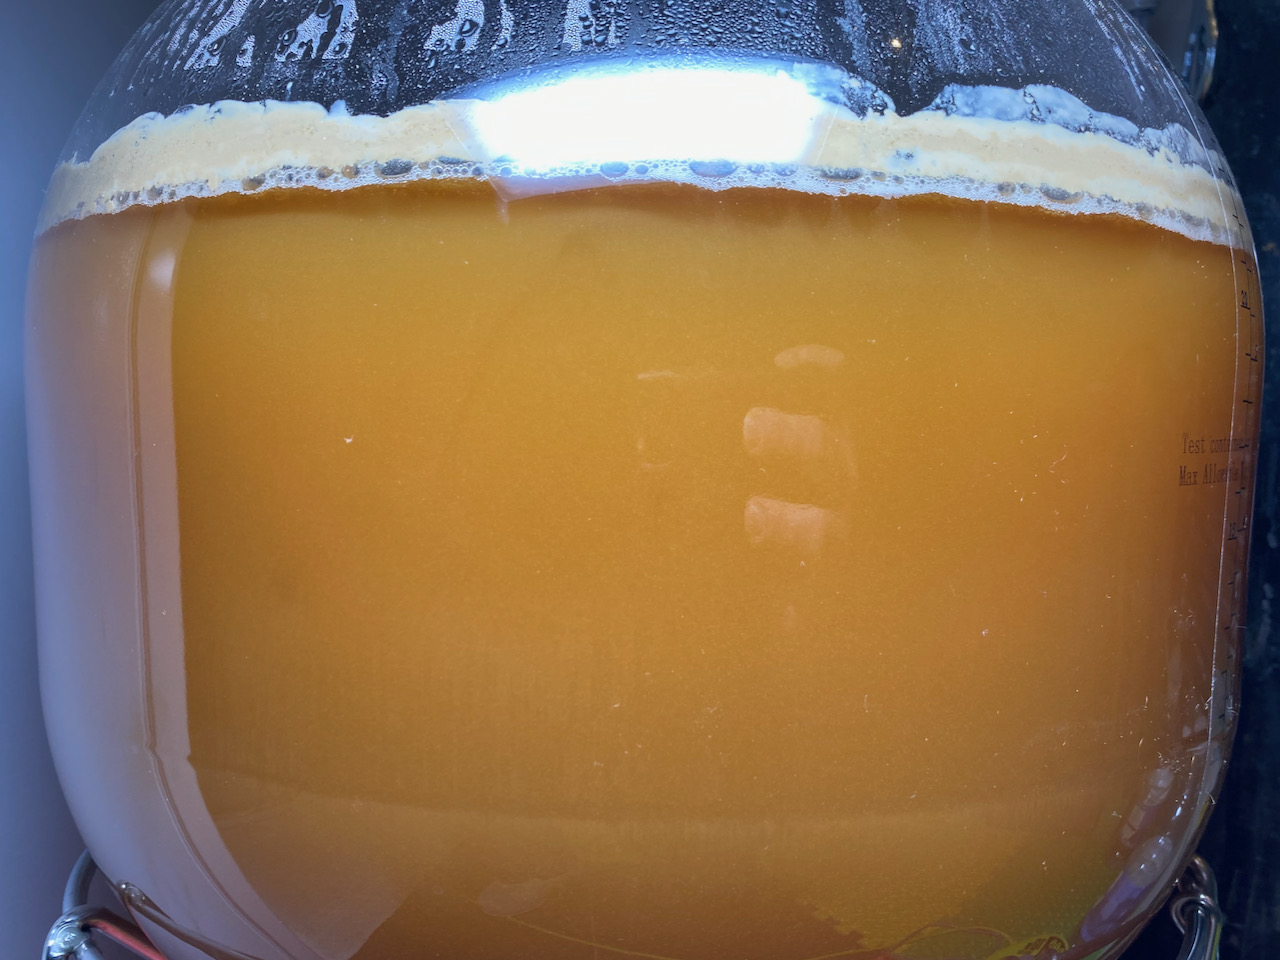
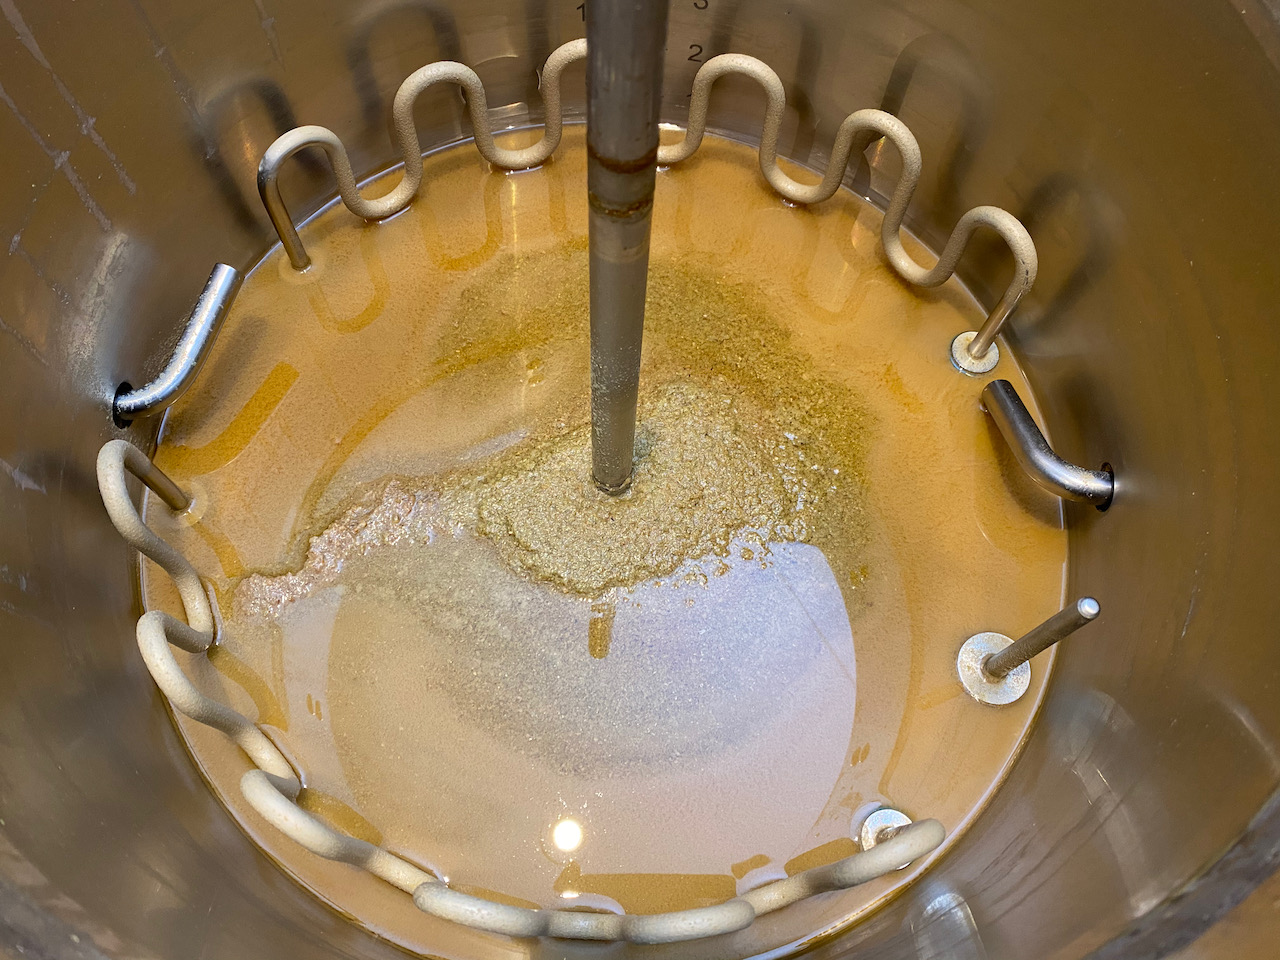
Being able to visualised this data is amazing, as is being able to see inside the Fermzilla. Krausen has now receded to a point where there’s a clearing in the middle, and there are a couple of millimetres of clear wort just beneath the surface which look similar to the clear-ish wort that was seen in the kettle after boiling. I reckon the finings are responsible in both cases.
Also amazing is the remarkable change in colour since starting this brew, which is now much lighter and has taken on a nutty hue, a bit like milky toffee. The deposits from the lower slopes of the conical have slipped into the collection jar, which is now full past the visible brim and probably past the butterfly valve. Should be useful when the time comes to remove this in order to dry-hop, but I’m going to give the yeast a chance to clean up after itself first.
Speaking of which, dry-hopping is planned for 3 days from now, and given we’re now at 98% with so much progress in the past 2 days I don’t think that’s unrealistic at all. The recipe I’m following doesn’t specify pressure fermentation, so I wonder how far we’d be along at 0 PSI?
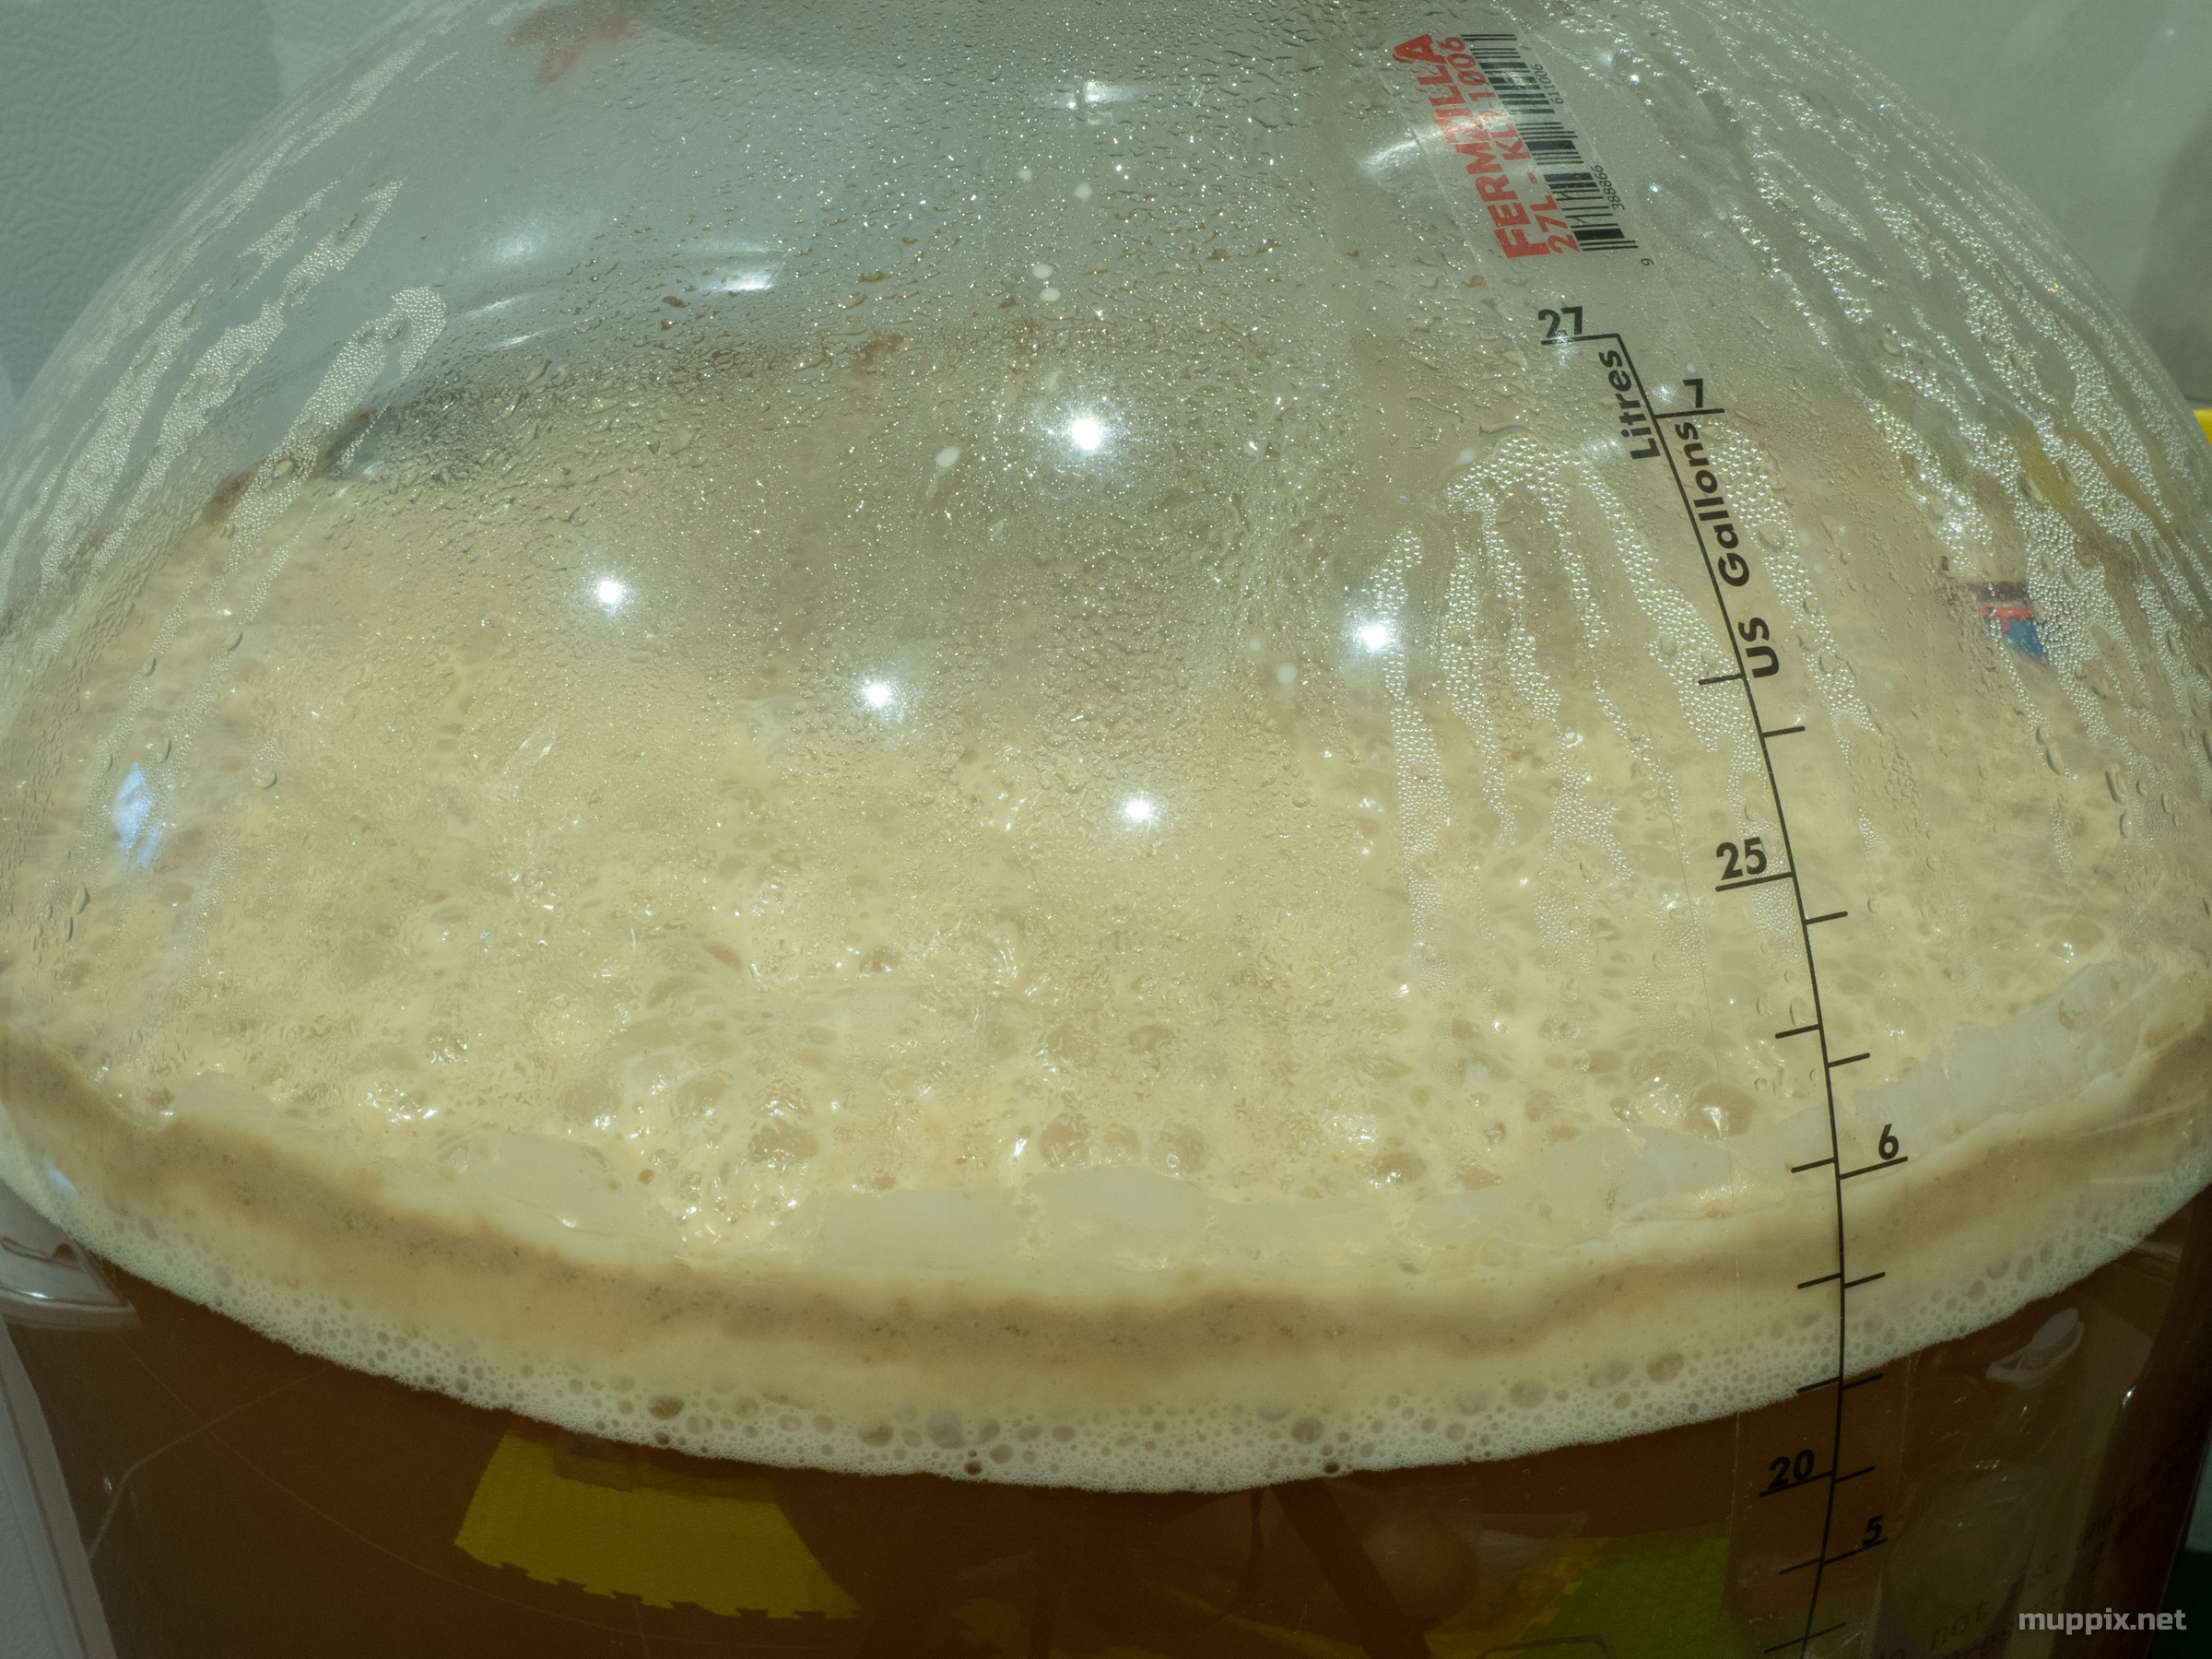
We’ve been at what looks like High Krausen now for a couple of days, starting two or three hours after adding fermentation pressure. The data from Tilt in Brewfather looks great, and I can see that fermentation is tailing off slightly now that we’re at 4.5% ABV, 83% of our target. Not bad at all for a 3 day old brew!
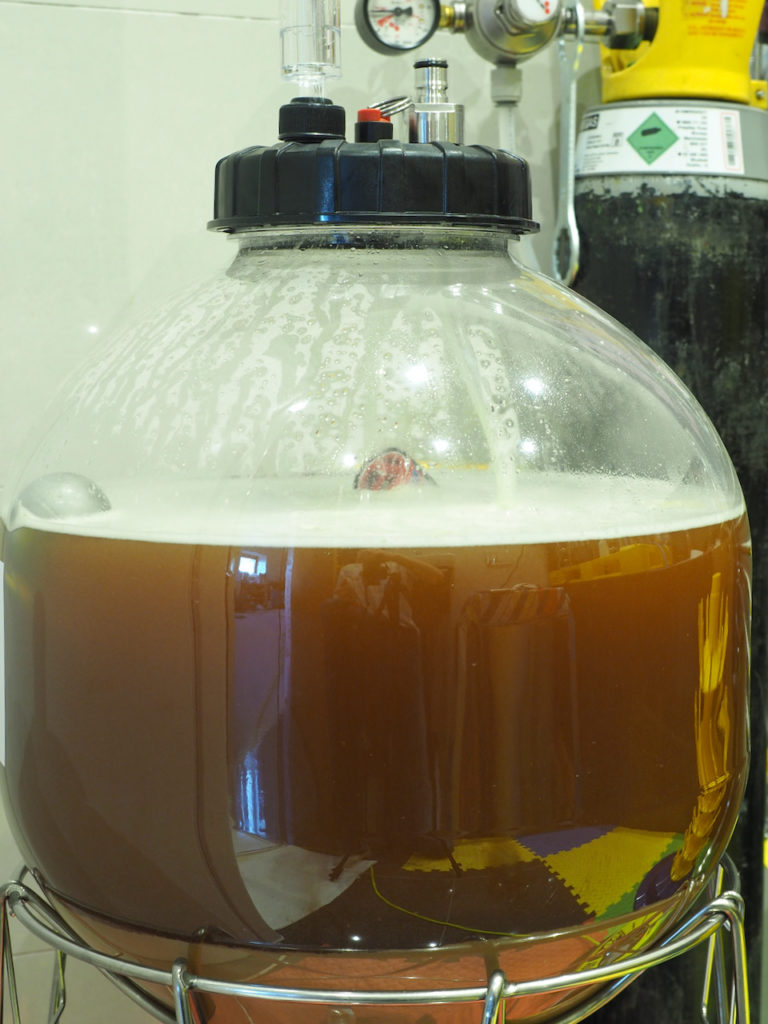
Golden Wave has been fermenting for 38 hours now. The wort appears to be very active underneath its blanket of Krausen, which is between 1 and 2 cm thick and a variety of colours, from almost white to a dark beige.
Fermentation of Golden Wave Ale 38 hours after pitching yeast
Data from the Tilt tells me that the temperature inside the Fermzilla is 2 ℃ higher than room temperature and still climbing, and since I don’t have a dedicated brew fridge yet I’m switching to pressure fermentation 10 hours earlier than planned in order to limit the production of esters and off flavours. Spunding valve added 09:10, 50 minutes later we’re already at 8 PSI. Capping it at 10 PSI.
Golden Wave Ale 38 hours after pitching yeastTilt readings for Golden Wave Ale 38 hours after pitching yeast
When the airlock didn’t start popping immediately after I transferred the wort to the fermenter yesterday I was a tiny bit worried, and put it down to me not having rehydrated the yeast before pitching it, choosing instead to follow the manufacturers instructions and just sprinkle it on top.
This morning there was already some airlock activity to be seen, and by 10:00 we had individual bubbles linking together to make foam. It’s now lunchtime and the foam could almost be called Krausen, as the top layer is getting darker and being broken apart by lighter layers beneath to form something vaguely like the crust on a tiger roll.
There’s plenty of activity inside too, with a kind of boiling turmoil swirling around small particles of solid matter. I’m also getting good separation between what looks like sugary fluff and the clear wort. When the liquid was added to the Fermzilla yesterday this fluffy stuff, which had already started to settle out in the kettle, was mixed up again in the FV but started to sink quickly, completely filling the collection jar and starting to settle on the conical sides. Well, today that seems to have changed again, and there’s only an inch or two settled in the collection jar and a small amount on the sides of the vessel. I don’t know if the yeast is circulating the rest or if it’s compressed down in volume, but it sure is interesting. I wonder how much of this is due to the Protafloc tablet added during boil?
The real star of the show is my new Tilt hydrometer, which has been sending back temperature and gravity readings since it was dropped into the FV at start of primary yesterday. It seems there’s quite a bit of variation in wort temperature even when the ambient room temperature stays stable. My first thought was ‘must get a fermentation fridge set up’ in order to stabilise things, but to be honest I doubt very much what difference that would make on such a large thermal mass which changes temperature from the inside-out. Keep the probe outside and it wouldn’t pick up on the subtle changes happening in the FV, move it inside the vessel and the either the pump or the heater would be running constantly, trying to impart a change likely too big by the time it gets there. Need to park that thought for now before it gets complicated.
On a positive note, the Tilt clearly shows that fermentation is in progress, in fact I’m already 15% towards my goal! I plan to leave it another 24 hours and then start adding some pressure to the Fermzilla, hoping to tame any subsequent Krausen, insure against temperature rises, and begin the process of carbonation. If that brings the total fermentation time down as expected I’ll also have to bring forward the 6 day hop additions, but we can cross that bridge later. For now I’m really glad to have Tilt’s trend graphs as a point of reference.
After many, many weeks of assembling kit, reading books and forums, ordering more kit, etc, I finally made it through my first ever all-grain brew day, starting yesterday after lunch and finishing up after nine o’clock. I kept a running log so that I could later dissect what worked and what didn’t, but first a bit about the beer.
Kona Big Wave Clone
I chose this one because I’ve always had a soft spot for a golden ale, and recent experience with Bure Gold reminded me just how incredible this style can be when it’s fresh on tap. The recipe I adapted is actually a clone of Kona’s ale which somebody else had designed, I just changed it very slightly to round off some numbers (e.g. 5g of Citra instead of 4.6g) once I scaled it up to 25 litres for the Fermzilla. Click here for the PDF recipe.
The Brew Day
By the time I started yesterday I’d already rehearsed the whole day several times so there weren’t many surprises, which was great. I noted down observations and took photos throughout the nine hour (!) ordeal and instead of writing those up into an epic account I’ll just paste them below for reference, drawing out some salient points that I need to work on.
The Good
Following a lot of research I was prepared for trouble in one or tow areas, but it actually went smoother than expected. One of those was the sparging, specifically the control of a continuous flow of sparge water to maintain an inch or so above the grain bed.
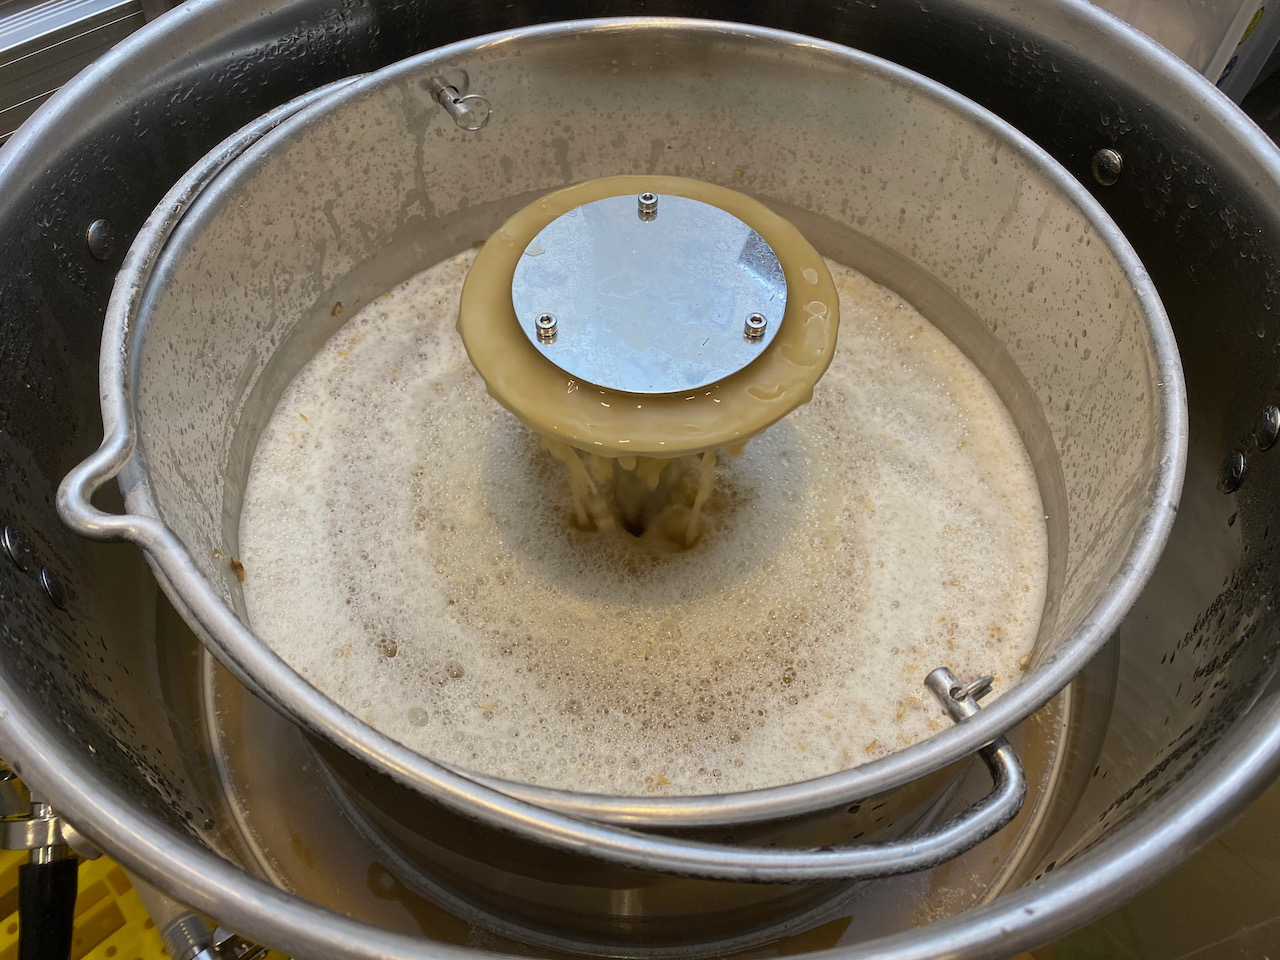
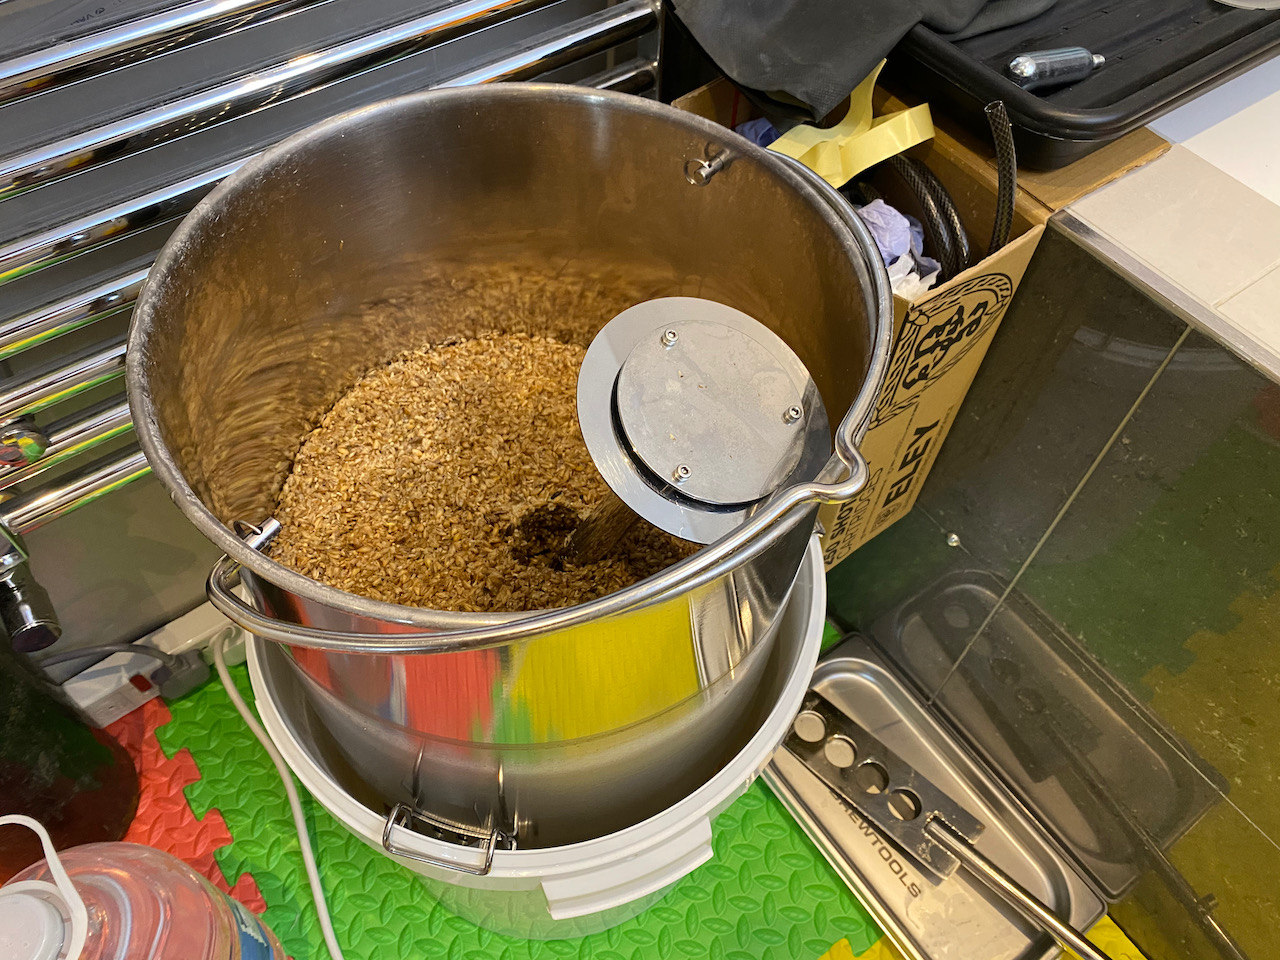
Sparging
The B40Pro’s sparge hat dribbles water down the centre column at low flow and doesn’t really fan out until the flow is increased, by which point you’re putting too much water onto the grain bed and risk compressing it, thereby reducing the permeability and making things worse. The situation is further complicated by the way in which the sparge hat goes from dribble to fan – let’s refer to the transition as ‘fan threshold’ or FT for simplicity.
Increasing pump speed from 0 to 100% with the pump switched on will show you the FT quite suddenly, and by the time the flow of wort leaves the centre column and spreads out it does so with enthusiasm, splashing hot liquid onto the edge of the malt pipe and necessitating immediate throttling back to contain the flow. It’s a messy procedure not well suited to indoor brewing.
On the other hand, you can set the pump speed to a midway value with the pump still switched off, then switch it on abruptly instead of increasing it gradually. Using this method you’ll find the FT at a lower pump speed than if you were to increase it slowly, but you do run the risk of switching the pump on at too high a speed and now you’re soaked in hot wort. This FT sweet spot seems to be affected by the height of the malt pipe (hydrostatic head) and probably by wort composition and temperature as well, so you really do have to get a feel for it and play around.
In the end I wasn’t able to find a continuous flow rate that maintained one inch of sparge water above the grain bed while also distributing that water sufficiently, and resorted to switching the pump on as soon as the first grains became exposed, and off again when the inch was reached. I did this at a rate just past FT (third image above) so that when the water was running it was well distributed. The approach worked really well and I can’t see any issues since the grain bed was neither allowed to dry out or excessively compacted, so until somebody points out an oversight I’m going to chalk this one up as a success.
Boiling
After the sparge it was time to boil, and I was nervous because I’d seen plenty of references to boil-over, where the kettle suddenly and without warning goes mental and you end up with a sticky mess. My nervousness wasn’t helped by the fact that I had to do this in manual mode, because automatic mode tops out at 90 ℃ and has no way of telling when the wort boils anyway.
In the end I needn’t have worried. It took quite a while to get up to a rolling boil despite the heater on 100%, then I was able to maintain the boil by reducing power to 85% and keeping an eye on it, which is easier said than done when you’re using a steam hat + condenser and can’t see the wort without removing the rubber bung, which in turn affects the boil temperature. I’ve heard of people starting on their cleaning duties while the boil is in process, but I just didn’t have the confidence to leave it alone. Maybe I’ll get there with the kind of experience that follows several uneventful brews, but for now I’ll stick to the old adage that a watched pot never boils.
Brewfather
Last but not least I have to say that the Brewfather app and website are probably the biggest contributors to yesterday’s positive outcome. Finding and adapting a recipe was a cinch using the web UI on the laptop, I did my picking from inventory using the iPad app, and used the app on my iPhone to keep track of various stages via the recipe-driven timers. Everything synchronised flawlessly across devices and kept me on track despite having no experience and a good amount of nervousness. The only thing that was missing was a reminder to switch on the counterflow chiller 15 minutes before end of boil so that it has a chance to sanitise, but that’s my failing and not Brewfather’s.
The Bad
Invariably there were some mistakes, but they weren’t as severe or numerous as I’d feared. I’m already working out how to address these and next time around should have eliminated all of them, but let’s call them out – warts ‘n all.
Power Supply
I don’t have electricity in the brewery, so it’s a case of running the fridge, kettle (B40Pro), and sparge water heater (20 litre Cygnet) off extension leads. It’s a hideous cowboy setup made all the worse by my electrical qualifications, but it’s a calculated risk and a means to an end. I’m using one 13A reel (unwound, naturally) for the water heater, and that has a thermal cut-out which it doesn’t trip, but when I use that lead with the B40Pro it does trip. So the trippy reel is saved exclusively for the Cygnet.
The B40Pro is on the same 13A extension which serves the fridge, and of course I should have unplugged that fridge before entering the boil stage. The heating elements are capped at 50% power during mashing so as not to scorch any grains that make it through the malt pipe’s false bottom, but when they’re running at full chat to reach boiling temperature the B40Pro does draw damn close to 13A, resulting in some heat build-up in cables and sockets. (I discovered it would trip the other reel’s thermal cut-out during a test run)
Everything was going swimmingly until the fridge decided to run its compressor while the B40Pro was boiling, and that blew the fuse in the extension cord serving those two devices. Stupid, predictable, and now I was paying for it by looking for another 13A lead of sufficient length with my boil timer ticking and the kettle not boiling.
#wisdom: if you have to use extension leads, unplug absolutely everything else. The fridge can take care of itself for a couple of hours, the brew kettle can’t. (you knew this already, you complete and utter pilchard)
Mashing
All I knew was that for 20 minutes after dough-in you should rest the grains, and neither stir them nor circulate water through them. Brewtools are very specific about this in their instructions, and during a few of the video reviews of this kit I’ve seen on YouTube the brewers who haven’t rested their mash have expressed difficulty later on with matter getting through the mesh bottom or with sparging.
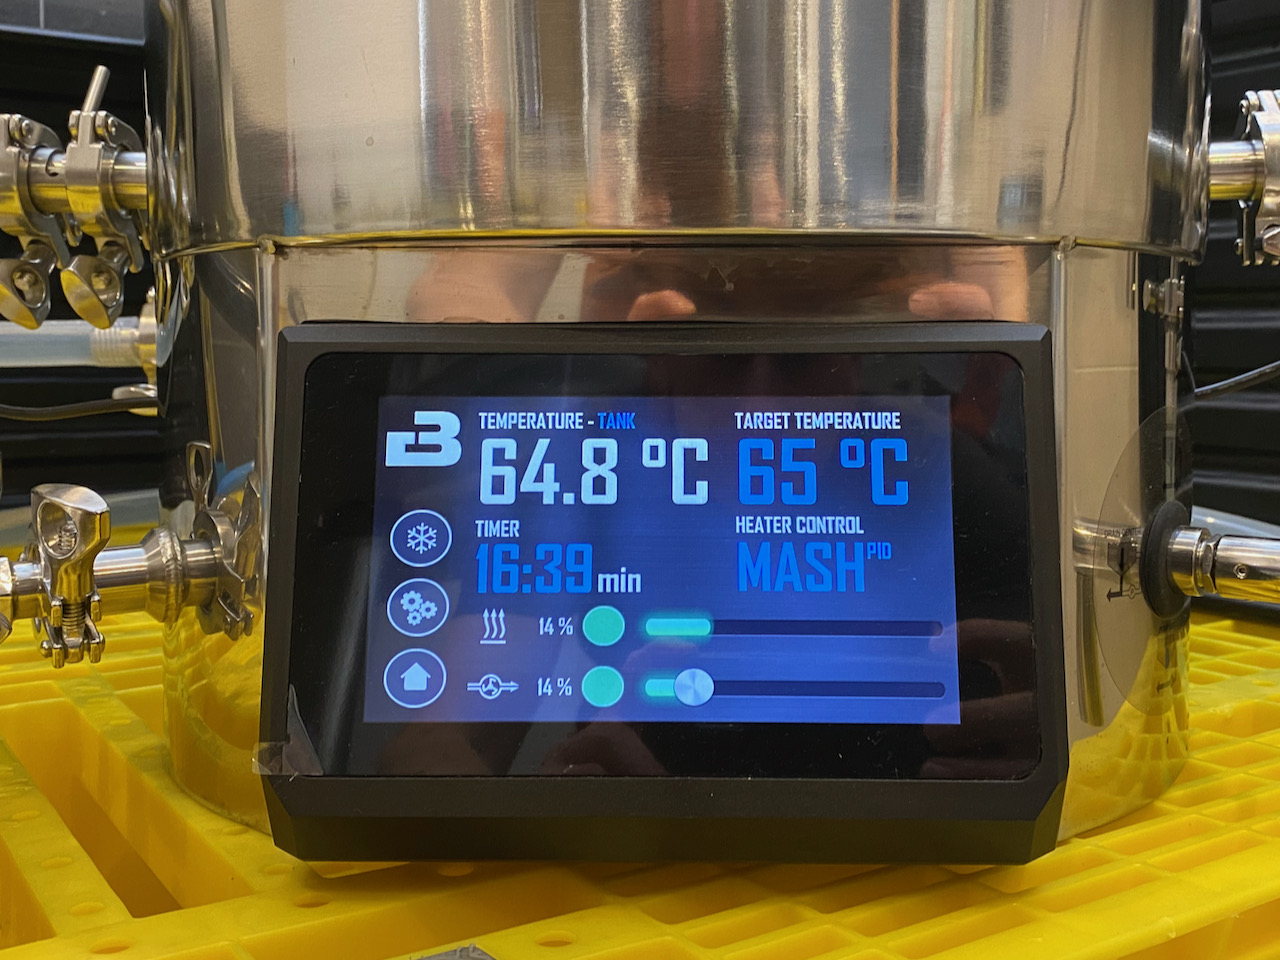
What Brewtools aren’t specific about is whether that 20 minutes is in addition to your mash time, or part thereof. Being paranoid of possible side-effects of an extended mash (tannins, those dreaded tannins!) I guessed those 20 minutes should form part of the mash, and just sat there staring at the grain bed while 65 ℃ water circulated outside the malt pipe. There were two problems here, and I think a combination of both of them led to lower-than-expected pre-boil gravity.
Some of the grain had come to rest above the water level and remained dry during the whole 20 minutes, ⅓ of my total mash time. I think I could have given the very top layer the gentlest of stirs at dough-in just to get everything covered without causing whatever I was supposed to avoid by not stirring.
My mash temperature was between 62 and 63 ℃ as measured using a digital thermometer, whereas the strike temperature was set to 65 ℃ on the B40Pro. Each time you turn this thing on it starts with default values, and for auto mode the default target temperature is always 68 ℃. That should have been a hint for me to leave well alone, since no matter how well you circulate you will always have a few degrees less inside the mash than on the outside, which is where your thermometer is. Especially if you’re not even circulating any water through the mash for the first 20 minutes.
#wisdom: next time, heat strike water to 68 ℃ and see if the mash reaches your actual target of 65 ℃. Dumb-ass.
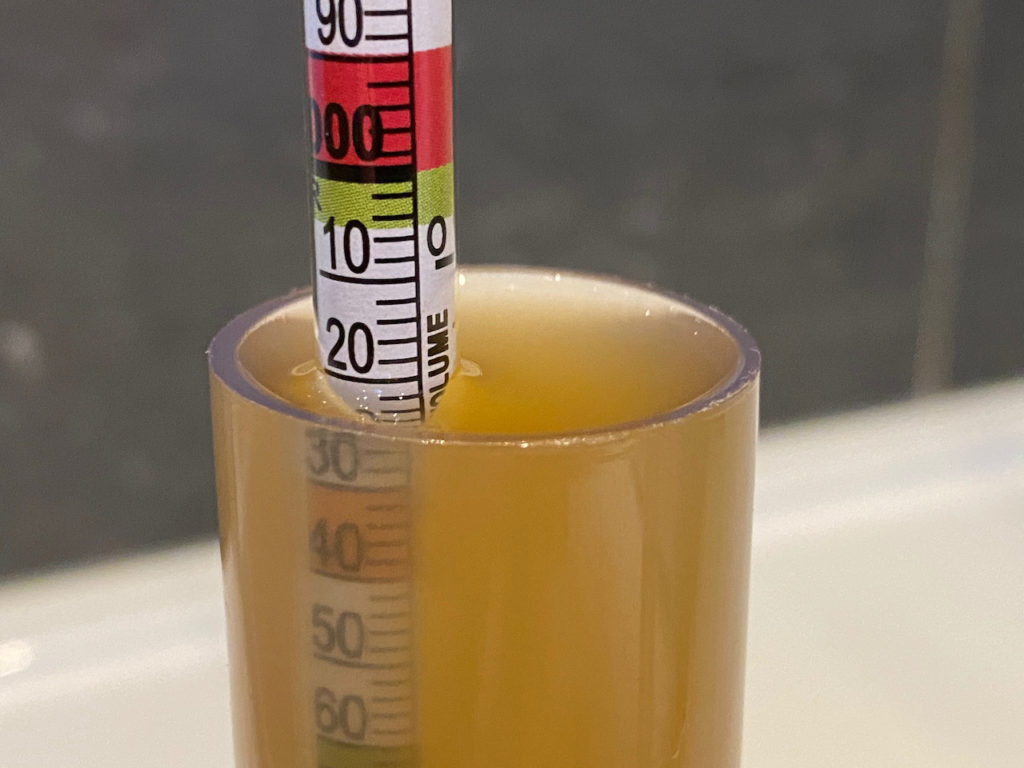
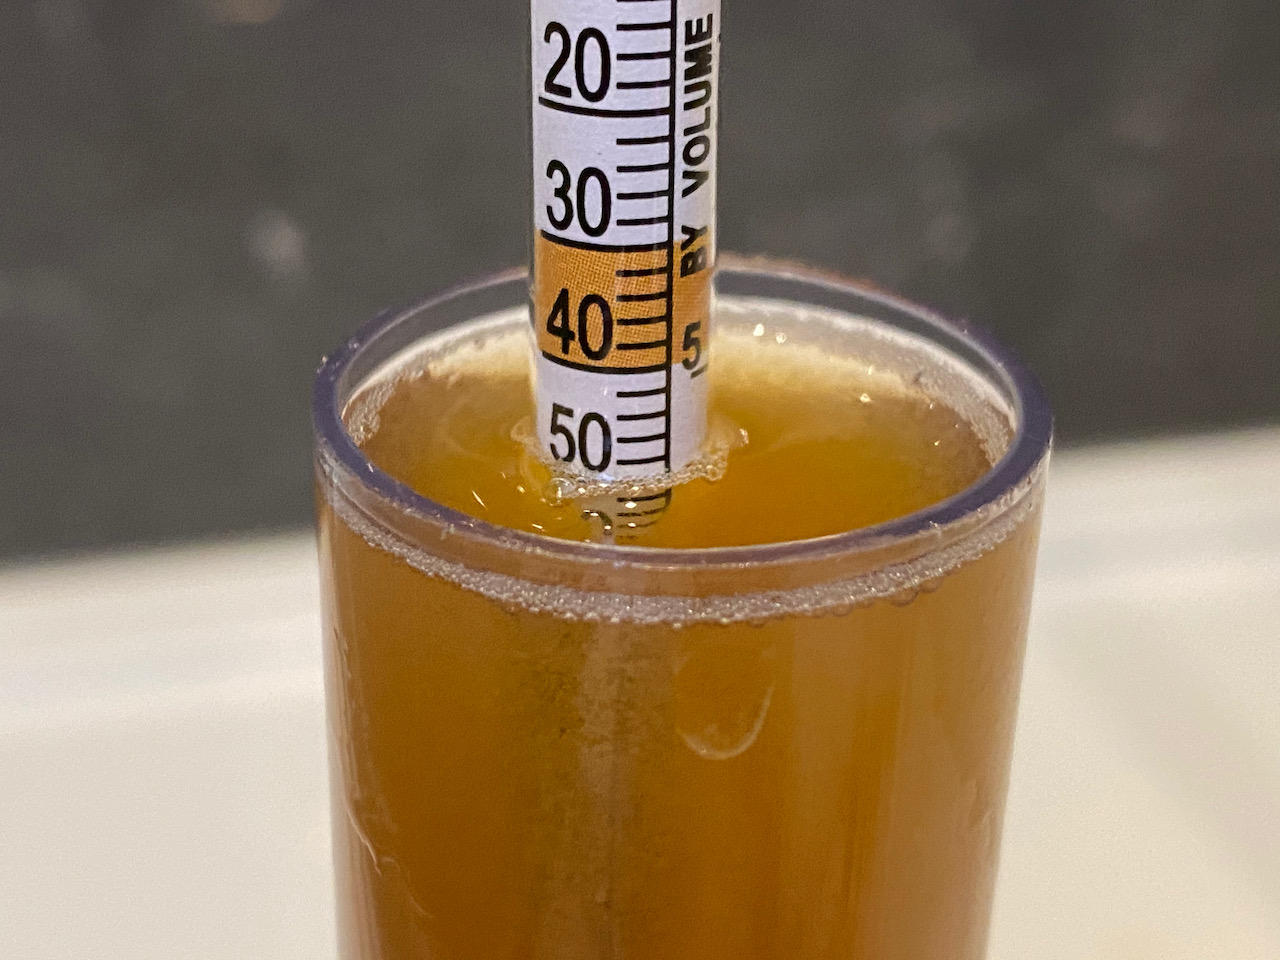
Pre-boil Gravity
In hindsight I’m now convinced this is connected to my mashing, but I got a value of 1.020 for pre-boil gravity when I was expecting 1.044. That was a pretty low moment and I wondered if I should abandon it there and then rather than throw more time and ingredients at something that was going to turn out substantially weaker than expected. I knew that my hydrometer was calibrated at 20 ℃ and I was measuring at 65 ℃ so there was bound to be a difference, but I assumed it would be a minor difference. A quick plea for help on the forum revealed that there is a calculator for working out temperature offset in SG readings, and that the difference can be quite substantial: my 1.020 was actually 1.036 (Brewer’s Friend) or 1.038 (Brewfather … yeah, the one in your app, idiot)
All was not lost, and I reckon I could still get a light session beer out of this brew, even if it wouldn’t be the same as the legendary Big Wave. In the end I finished with a post-boil gravity of 1.050 versus an expected 1.047, so as long as the extra few points aren’t due to some yet to be discovered cock-up I may well have gotten away with it.
#wisdom: always, always adjust gravity readings for temperature, ideally by leaving the sample to cool naturally or by using a calculator. There’s not much point when you’re one or two degrees outside the hydrometer’s calibration temperature, but it soon becomes worth doing.
Measuring Liquids
Need to get a measuring jug and work out equipment offsets. I ‘measured’ my strike and sparge water using a 5 litre bottle and a 1 litre bottle when I should really have used a proper jug. I also need to account for plumbing voids like the counterflow chiller since that swallows strike / sparge water as well as fermentables, unlike boil-off losses which leave fermentables behind and affect gravity. (oddly enough, there’s another calculator for that too)
#wisdom: be specific in your measurements, try to account for all voids and losses. Leaving this one as #unsolved since I need more info.
General Timing
There’s still so much that I don’t know, that when I hear things like ‘you shouldn’t sparge too quickly because it compresses the grain bed’ I start to worry about other things which may not even be problems at all. Like going from sparge to boil.
Yesterday I gave the malt pipe a few minutes to drain before lifting it clear, but that was just because I didn’t want to dribble sticky wort between the B40Pro and the awaiting bucket. When I was clearing up at the end of the day I noticed there was about a litre of wort in the bottom of that bucket, some of which should by now have been in my fermenter.
As it stands my post-boil volume was 2.17 litres short, some of which might have been due to the counterflow chiller, and some might have been in that bucket. Should I have waited longer for the malt pipe to drain? Should I have squeezed it slightly? Both options occurred to me at the time, both were discounted because fear of the unknown (tannins? astringency?) was greater than fear of the known: being a couple of pints short.
If I start picking apart the ifs and buts in order to derive specific #wisdom points covering ‘general timing’ I’ll never finish this post, so let’s write this off as something that will get better by itself with experience.
The Detail
Here’s the raw log I kept on the day, with photos too in chronological (rather than useful) order added in. The iPad is a frustrating device when it comes to writing notes, but at least it has a splash-proof keyboard.
Preparation
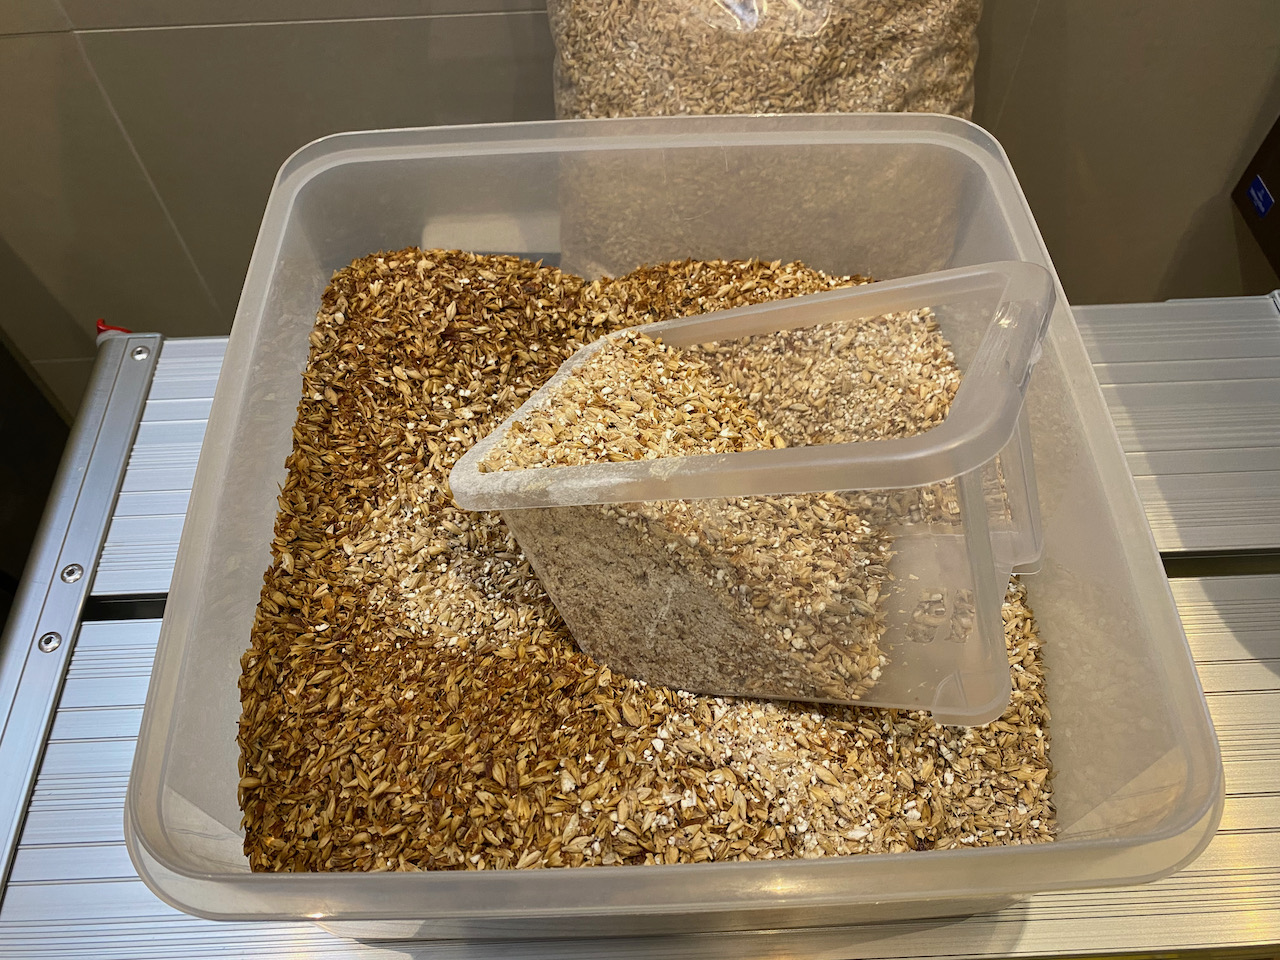
12:50 – Fill sparge water heater with 15 litres cold tap water (3x Ashbeck bottles), set dial to 3, plugged into Masterplug cable reel but expect thermal cut-out to trip at some point. Water temperature 11.5.
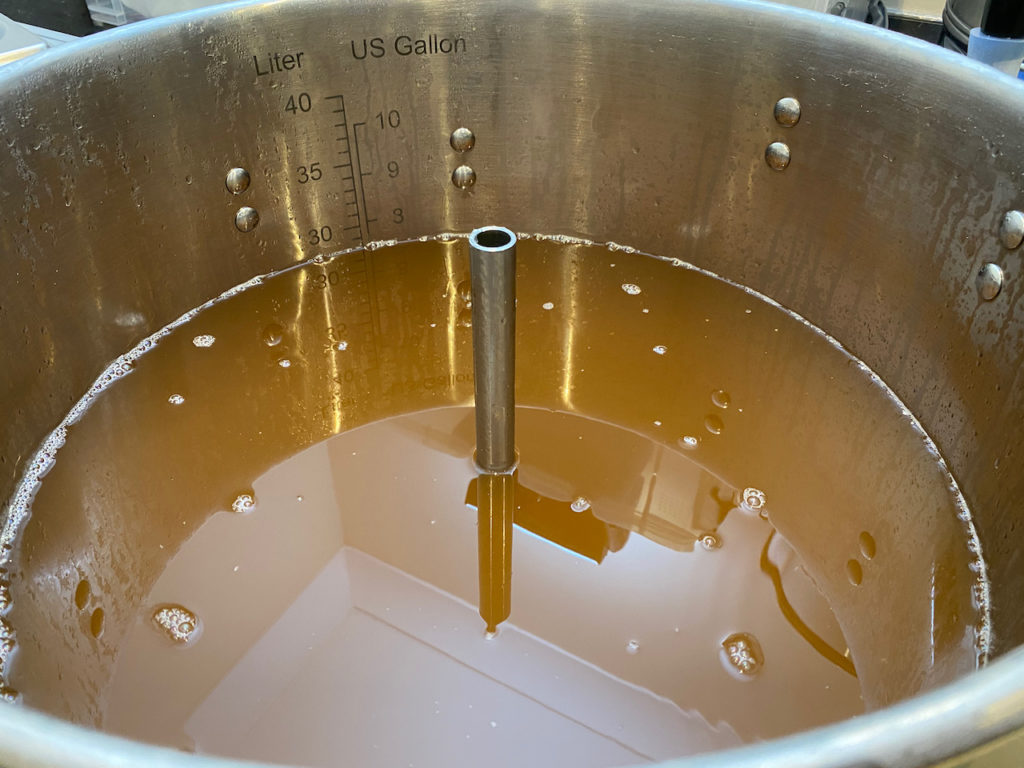
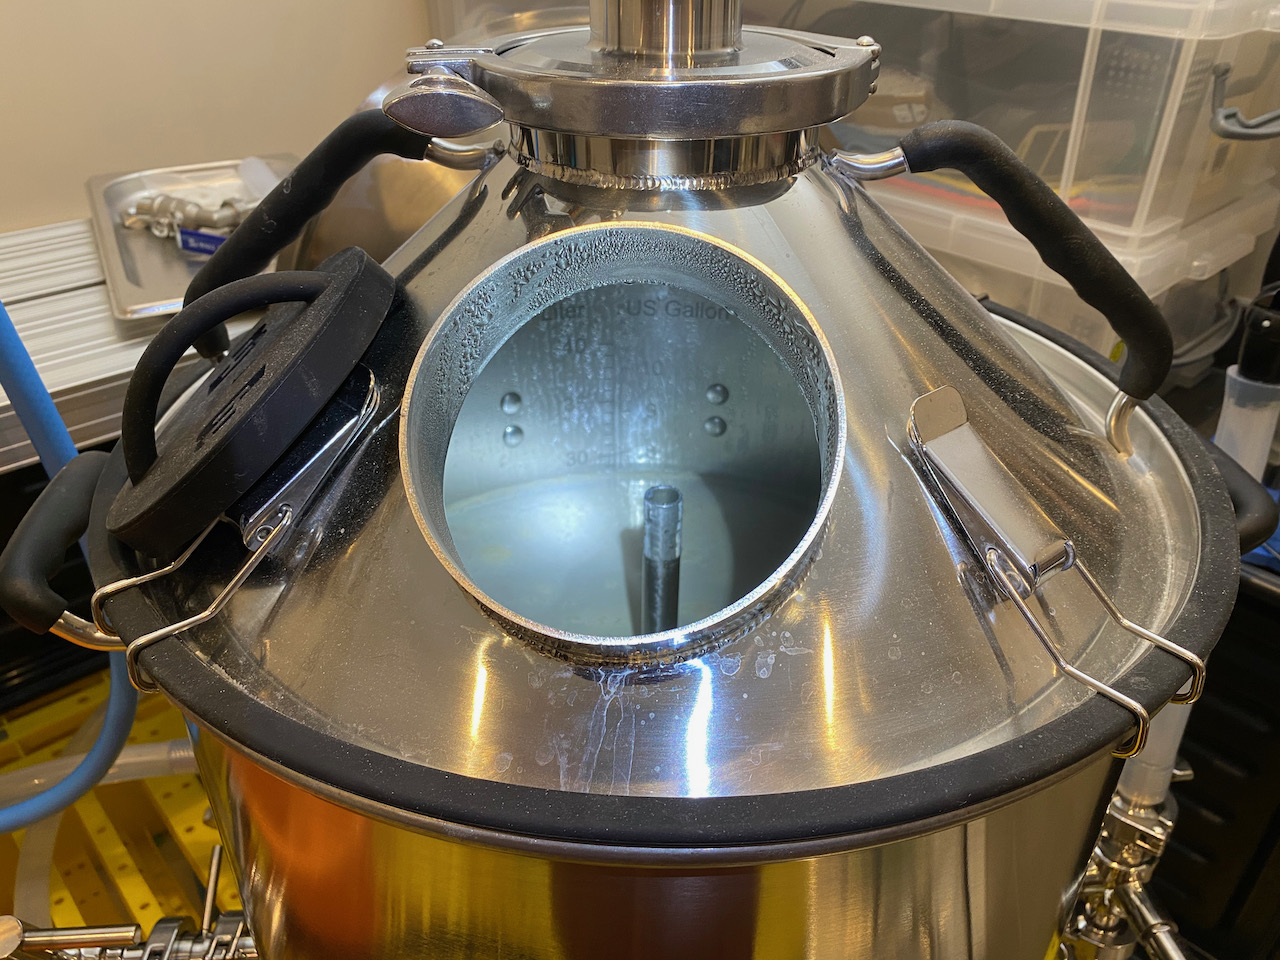
13:15 – Sanitised Fermzilla and finally got around to applying the graduated level scale
13:25 – Scaled the batch recipe for 25 litres (Fermzilla headspace looks to be enough) and adjusted the fermentables and hops a little to round the scaled values and bring IBU / EBC sliders to mid-points.
13:30 – Water heater clicked off gracefully, temperature 66.0. Need 65 for mash so I’m going to give the kettle and coils a quick rinse before bringing in the strike water and topping up.
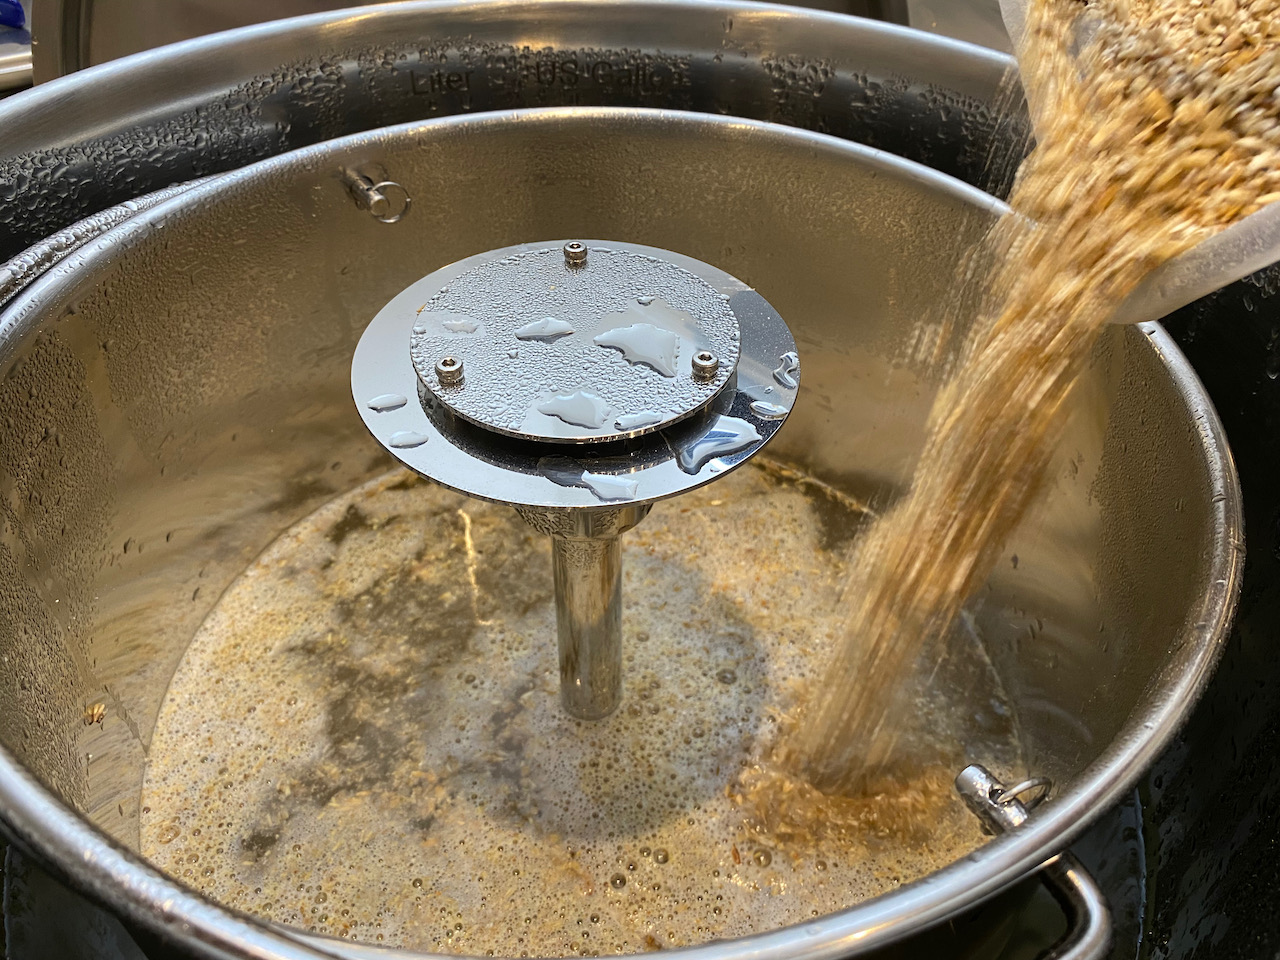
13:55 – Moved 15 litres from water heater to kettle, replenished kettle with 7.5 litres, resumed heating.
14:15 – Grabbed the malt from stores and noticed that mash water in kettle was 24.75 litres. Maybe Ashbeck bottles aren’t the best measuring vessels! Reduced to 22.57 using scale inside the kettle, malt pipe in place. Refilled the water heater with 11.75 litres for sparging, again with Ashbeck bottles, but not brimmed. Need to get myself a decent measuring jug! Started heating sparge water.
14:17 – Started heating strike water in ‘mash’ heating mode, target 65.0, starting at 55.0. There’s no grain in there yet so I could set it to full auto (instead of ‘mash’ where the elements are capped at 50%) but I’m not in a hurry as I want to go get the hops and Protafloc tablet.
Dough-in
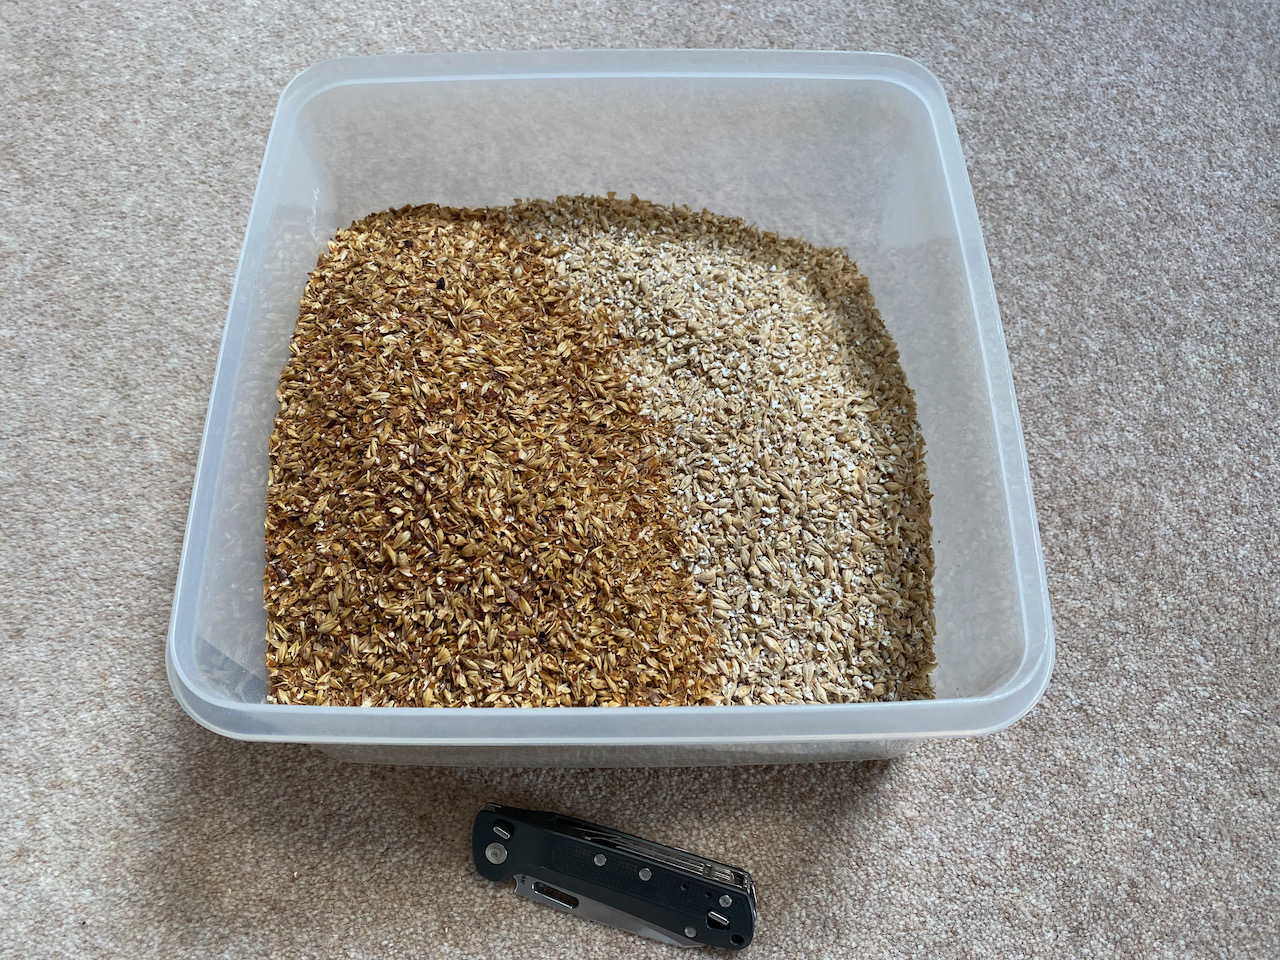
14:52 – Ingredients measured and bagged, commencing dough-in. First 20 minutes are there to settle, no stirring, timer starts when they’re all in.
Mashing
15:06 – Dough-in complete, starting 60 minute mash timer. I’m putting the lid on until I’m allowed to stir / circulate over the mash in 20 minutes time.
15:20 – 5 minutes left until I can stir and switch on the centre pipe to circulate over the mash. Checked the manual again just to be sure, and yes, only circulating outside for first 20 minutes to prevent sugars scorching on the elements. Weird, because there’s a bit of the mash that’s not even wet yet. 3 minutes.
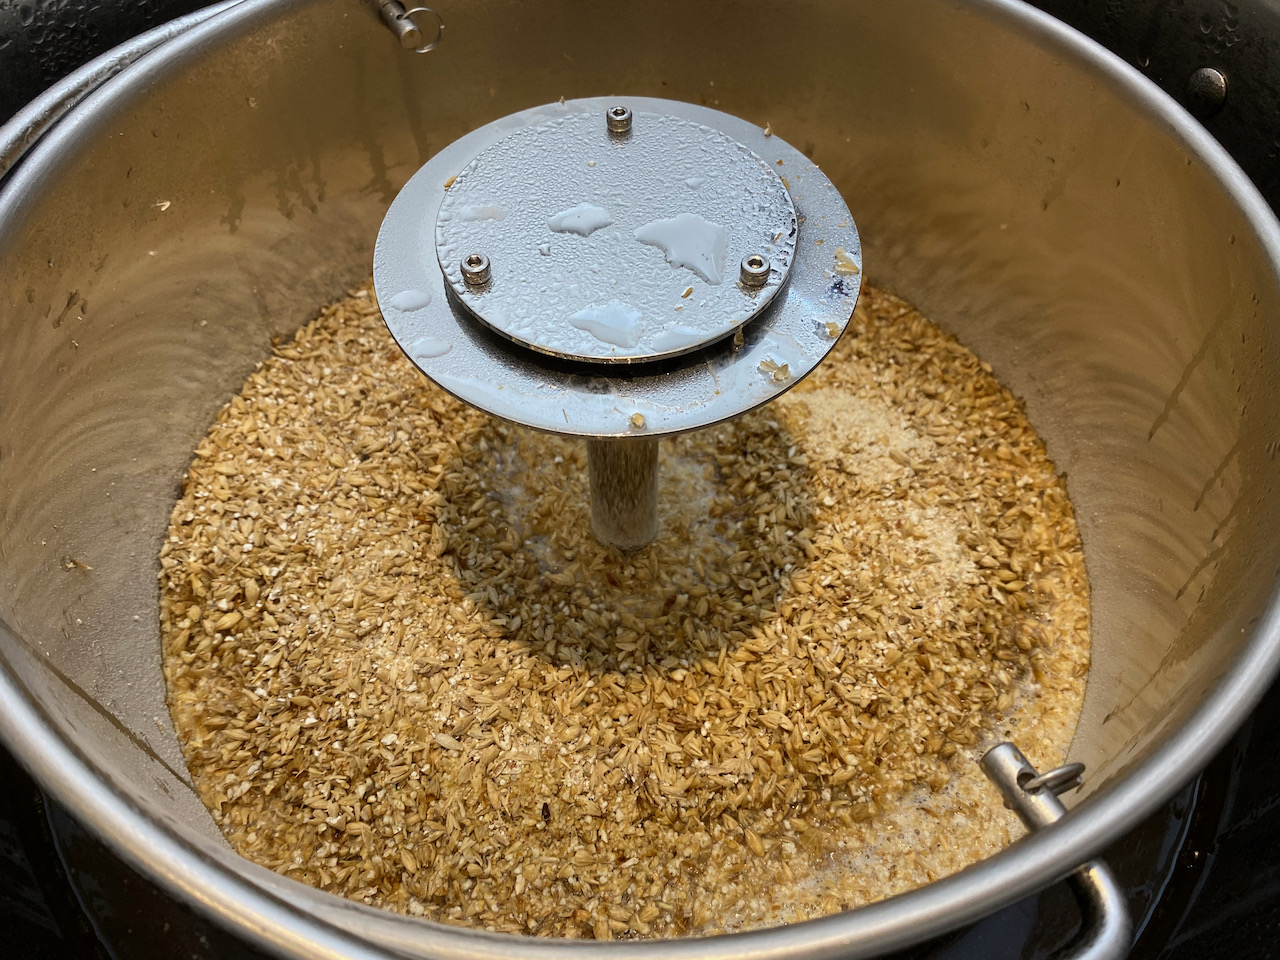
15:24 – Starting to circulate over grain bed and stirring. The mash isn’t as dense as I feared, those dry grains on top at the start soon went under with a gentle stir. Dividing the flow between circulating outside the malt pipe and over the grain bed is a fine balance, didn’t take long before I started sucking air via the thankfully correctly adjusted dip tube. Weight of water on the grain then compacts it further at the bottom, so it needs stirring lower down – something I was hoping to minimise in order not to push too much solid matter out through the screen. Oh well, at least there are no dough balls. Dare say I’ll find the perfect balance with practice.
16:00 – 5 minutes left to go, and I have the pump at 77%, valve halfway between recirculating outside malt pipe and up centre. Nice parasol of wort going on, malt pipe level about 4 inches higher than outside. I know stirring will lower that, but I don’t want to agitate too much and drive solids through the mesh. Also don’t want a stuck sparge. Decisions, decisions …
16:07 – Mash complete, heater and pump off while I raise the malt pipe. Inside / outside levels adjust quickly enough.
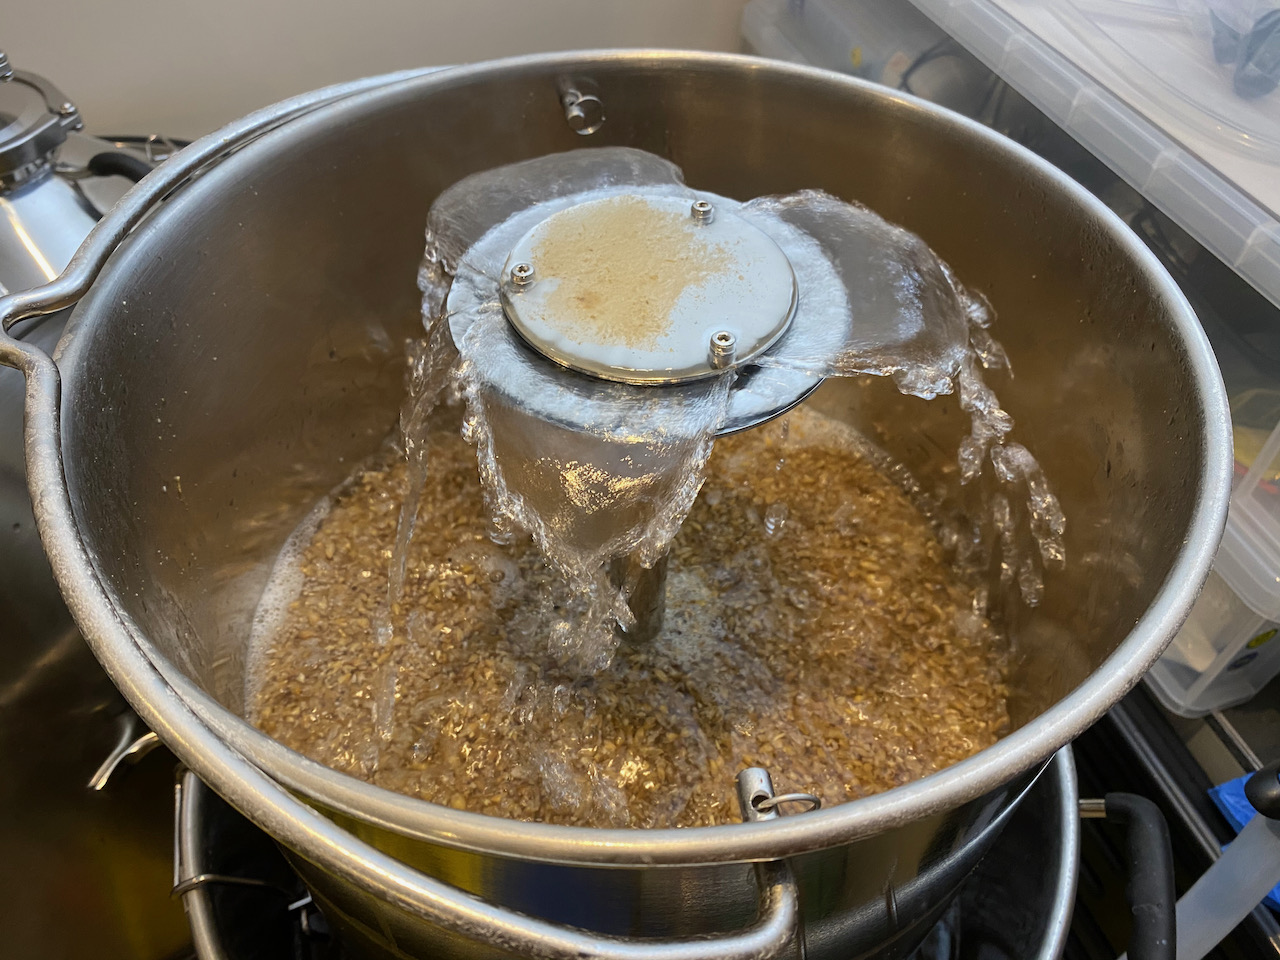
Sparging
16:13 – Try brief vorlauf but the pump seems to stick, cycling it on and off clears it, then it sticks again. Switching to sparge, water temp 76.5.
16:16 – Maintaining an inch of water on grain bed is not easy. Pulsing pump at 45% seems to do it.
16:19 – Sparge complete. Leaving grain pipe for a minute to drain – was heavy lifting it up after mashing.
Prepare for Boil
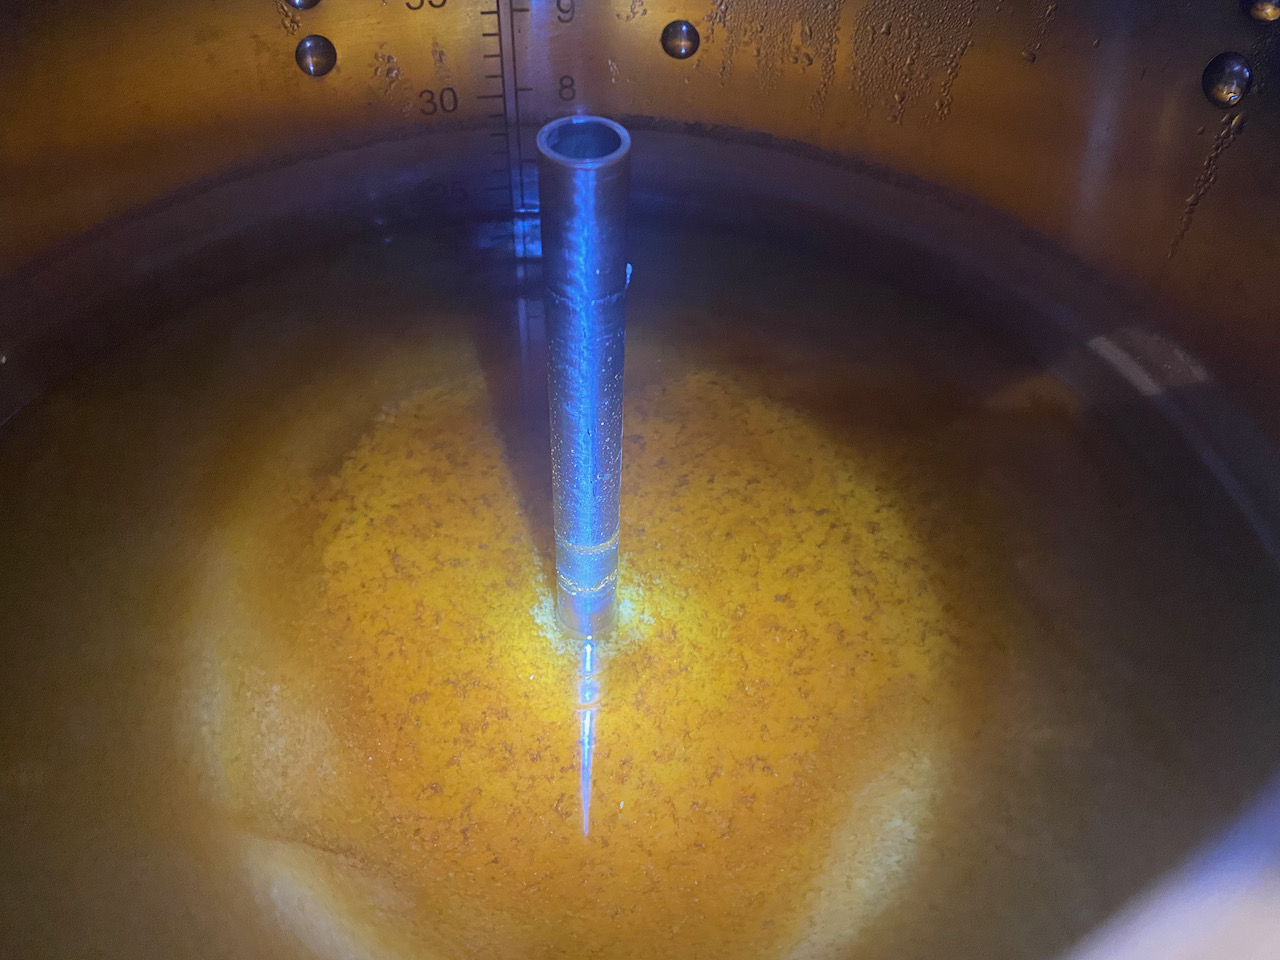
16:27 – Boil volume is only 28 litres (should be 31.5 according to Brewfather) and gravity a measly 1.020 when it should be 1.044. Bollocks. Should I have mashed for longer? Sparged with less? Oh well, let’s boil and see what happens. Might be more of a low ABV session ale after all.
16:30 – Fitting condenser and steam hat, starting approach to whatever boil temperature is, presently at 60.
Boiling
17:08 – That took a while to get there! Extension lead / socket are getting very warm now – I’m on the regular 13A white one since the reel would have thrown its thermal trip by now. 60 minute timer started (still wondering if I should increase that to bring FG up) and 60 minute hop additions done.
Had some advice from the guys on the forum who confirmed that yes, temperature makes a huge difference to SG readings. I plugged my values into a calculator I was offered and it seems I’m actually at 1.036, not 1.020. Happy days!! Still low, but not a disaster.
17:32 – Rolling boil is thankfully uneventful. Keeping a constant eye open for boil-over or a melting socket. Steam hat and condenser doing their ting. I’m on my 4th bucket of warm water now, saving it for cleaning later. Managing heater manually between 85 and 100%, trying to keep the boil going on lowest value possible.
17:51 – I’m two minutes away from next boil additions and the extension lead just crapped out. Switching over to the reel, wondering how long I have before the thermal switch trips. To be fair it was the first lead (also powering the fridge) which seems to have gone, since the fridge is dead. Maybe 90% heating and fridge was too much? Sounds very plausible – I should have thought of that and switched the fridge off for the boil.
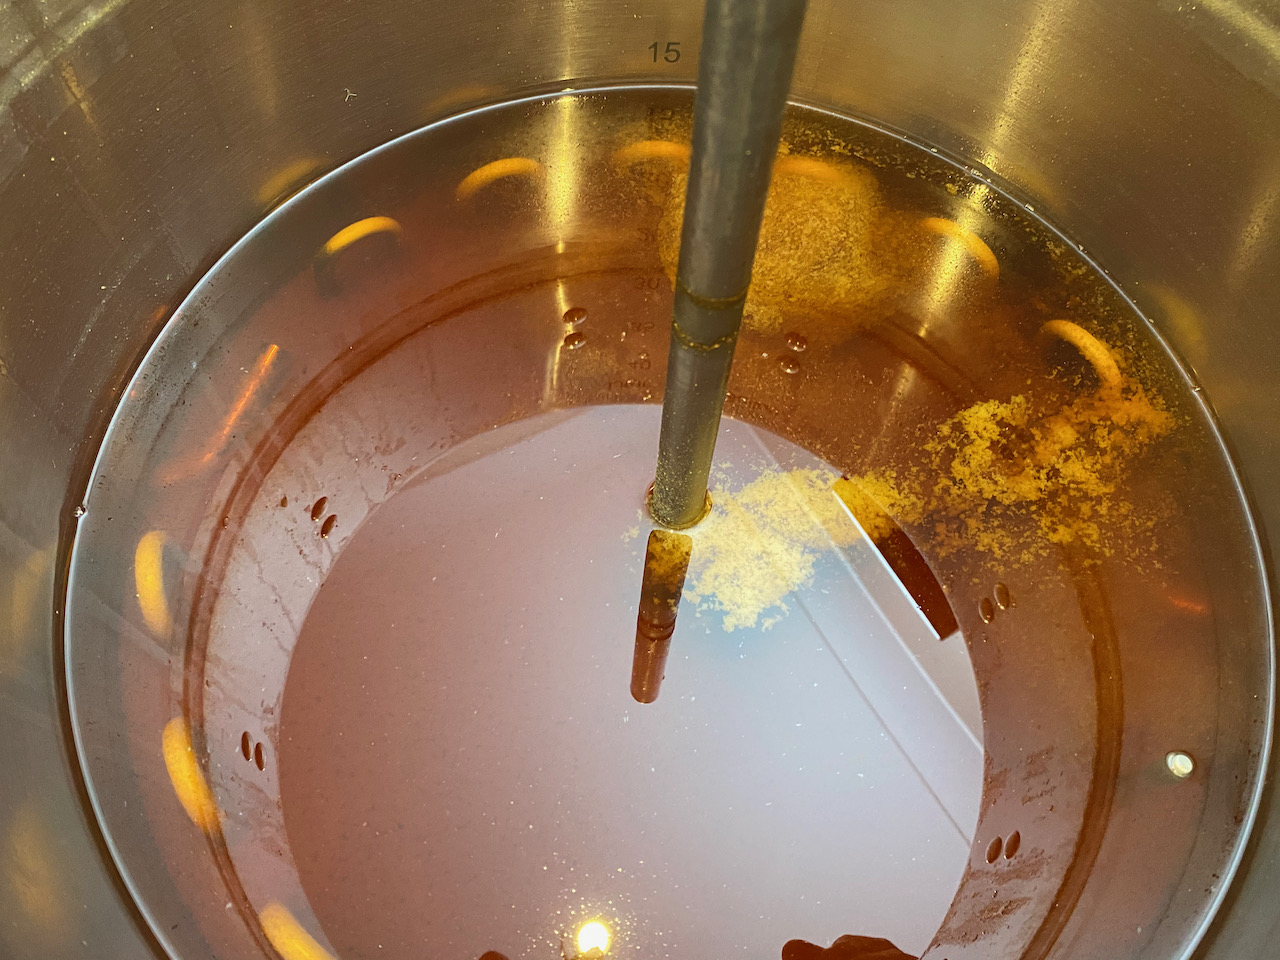
17:55 – Added one third of a Protafloc tablet. Adjusted value was 0.272 from recommended one quarter.
18:05 – 5 minute boil additions are in, smells fantastic. Hang on in there little power reel!!
18:10 – Shit, forgot about sanitising the counter flow chiller for the last 15 minutes!! Let’s give it 5 and hope for the best, was Star-san’ed after all. Heaters back on, hope the power stays on too… Temp 94.5 through chiller.
18:15 – Enough, heaters off again, time to chill or we lose the hops.
18:17 – Counterflow chiller amazing, return temperature already down to 42, tank at 75.
18:21 – Return temp down to 30, tank at 47. Hard to know how to best set the return dip tube and pump speed; faster pump will probably be better for whirlpool but slower pump gets return wort cooler faster. I’m trying to eyeball the kettle contents and get a feel for the balance, but it’s iffy.
Transfer to Fermenter
18:26 – Return is now at 20, tank at 31. I’m stopping the pumps and plumbing in the Fermzilla. Will transfer slow-ish with a bit of splashing since I don’t yet have my oxygen setup. Kettle level is 24 litres, but then I didn’t factor in the chiller.
18:37 – Transfer to FV going well, but guess who forgot to adjust the dip-tube? Using mash paddle to push it down while holding / splashing transfer hose above Fermzilla, let’s hope there are no sanitation issues
Pitching Yeast
18:51 – Yeast pitched at 21.5 degrees, FV volume 21.5 litres. OG 1.050 is OK by me against expected 1.047. Sanitised Tilt deployed, time to clean up.


